How to easily create your Apple ID. First start or how to activate iPhone? How to register a new iPhone 5
Articles and Lifehacks
After purchasing a new Apple phone, the user will in any case need to register his device. What you need to register an iPhone - instructions in this article.
Many people consider Apple's marketing policies to be downright dishonest. I must say, they have every reason to do so.
Under the plausible pretexts of caring for the consumer and fighting piracy, users of Apple devices are, as they say, arm-twisted. And this is without remembering many technological tricks like a non-removable battery or SIM card format.
One of the operations aimed at the “benefit of the consumer” is registration.
Instructions for registering via iTunes
- To activate your iPhone using a computer, you need to download the current version of the iTunes library from the official Apple website and install it on your computer.
- We insert a SIM card into the communicator, which will first have to be cut down so that it fits into its slot. Connect the iPhone to the USB port.
- The program will detect the connected device, and the message “Connecting to iTunes” will appear on the communicator display.
- What follows is filling out forms, agreeing to a variety of licensing agreements, and finally submitting it all to Apple. After this, your iPhone will be activated.
Instructions for activation without connecting to a computer
- We insert the SIM card into the communicator after the inevitable torment of cutting it off. We indicate the country and desired language. The system will then ask if the user wants to activate geolocation.
- The user has nowhere to go, since without him the navigator and many other programs do not work. We select the type of Internet connection, connect and activate the device in the same way as through iTunes.
- If desired, it is possible to restore data from a previous Apple device, if there was one.
- Further actions are already voluntary, although without them using the communicator will be very difficult.
- You can create new account to get an Apple ID or activate voice assistant Siri, which is useless for those who don't speak English.
Will be created when the gadget is activated. However, when setting up a smartphone for the first time, users often skip this step for one reason - the device requires plastic card data. Russian users, accustomed to suspecting fraud in everything, are delaying the creation Apple ID, trying to find a way to do without a card.
There are several options for registering an iPhone “account” - among them there is one in which you do not need to enter your credit card information.
Without Apple ID the user will not be able to:
ABOUT full use iPhone without Apple ID out of the question. The legendary versatility of this smartphone is due to the huge amount of diverse software available in the AppStore. iPhone no apps– just a stylish and well-assembled gadget, but by no means Not multitool, able to cope with any task.
How to create a new account through iTunes?
If you don't have iTunes, you should start by downloading latest version this program from the official Apple website. Once you download and install the media harvester, proceed as follows:
Step 1. Open iTunes and click on the tab " Account» in the horizontal menu at the top.
Step 2. Select " To come in…".

Step 3. In the window that appears, click " Create new Apple ID».

Step 4. You will be taken to the welcome page iTunes Store – here you need to click on the blue button “ Continue».

Step 5. At this point you need to read the document called " " and check the box next to " I have become acquainted...”

If you do not confirm that you have read it, registration will not be completed.
If you can't read Apple's position immediately you should use the “Print Version” link. An HTML document will appear in your browser, which you should print so you can read it whenever you have some free time.

After confirming that you have read the terms and conditions, click " Accept».
Step 6. Fill out the form - you must enter the following data:
- E-mail address. It is important that the address is valid and that you have access to it. If desired, you can specify an additional postal address.
- Date of Birth. By date, you must be over 21 years old - otherwise you will not be able to purchase content and software in the AppStore and iTunes Store.
- Created password. The password requirements for an Apple account are very strict: it must contain numbers, lowercase and uppercase letters. Plus, one character cannot be repeated three times in a row.

The user will also have to answer three questions - for example, what was your name best friend childhood. This measure is necessary to ensure account security.
Step 7 Unsubscribe from the mailing list if you do not want to receive information about Apple company products and film and music releases on Mailbox. To do this, you need to uncheck the boxes next to “ Recommendations and information...».

Then click " Continue».
Step 8. Select a payment method for purchases and enter the required details. note that Entering your credit card details into iTunes does not in any way pose a threat to your well-being. Money will be written off only if you purchase content or software and only with your consent.

If you have chosen as a payment method plastic card, you will have to enter its number, expiration date, and CVC2 - security code on the back side. If you preferred the option " Mobile phone", just indicate cell number and confirm it via SMS.
Step 9. Fill in the fields of the block " Billing address" You must specify:
- Last name and first name.
- City code and name.
- Street of residence and zip code.
- Contact phone number.
- Application form (“ Mr." or " Mrs.»).

Once you have completed the required fields, click " Create an Apple ID" You will see a window directing you to your email.
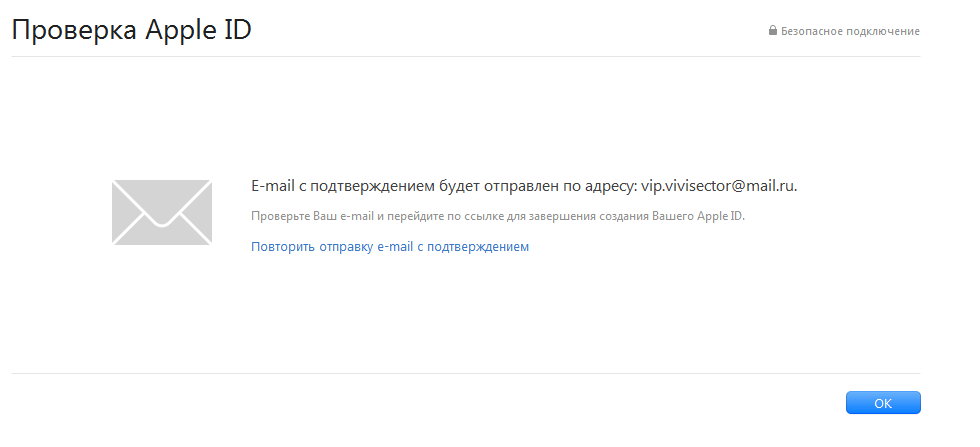
Step 10. In your mailbox you will find the following letter:

You should click " Confirm address", after which you can assume that Apple ID successfully formed.
How to create an Apple ID without a PC?
Start account Apple will succeed without a computer, but in this case the device must be connected to 3G or Wi-Fi. Once you have access to the Internet, proceed as follows:
Step 1. IN " Settings"iPhone, look for the section " iTunes Store, App Store " and go into it.

Step 2. Click on the button " Create a new Apple ID».

Step 3. On the next screen you will see a list of countries - Russia is selected by default. Without changing anything, click " Further».

Step 4. You should read the document entitled " Apple Media Services Terms and Conditions" The document is quite capacious - on an iPhone it turns out to be 29 pages of small print; that is why most users neglect to read it.

Either way, confirm that you have read " Provisions"and agree to the terms, you have to. To do this, click " Accept» in the lower right corner and then click on the button of the same name in the window that appears.

If you want to read the terms, but not from the phone screen, but from paper, use the “Send by e-mail” link. You can print the document from your email.
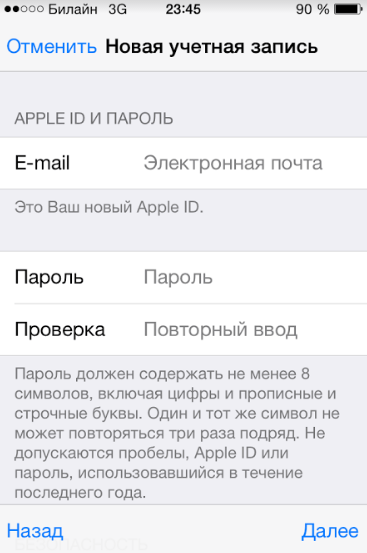
Step 5. Fill in the form. You will have to enter the same data as when registering an account in iTunes– e-mail, password, date of birth, questions and answers necessary to ensure security.
If you don't want to subscribe to news about Apple services, apps, or content, switch the sliders below to inactive.

Step 6. Select a payment method and enter payment details. The same data is required as when registering via iTunes.

After you have provided the required information, click on “ Further».
Step 7. Go to email, which was indicated during registration Apple ID, and press " Confirm address».
Account creation Apple ID in the “Settings” of the device and registration via iTunes– similar procedures: the same information is required in both cases.
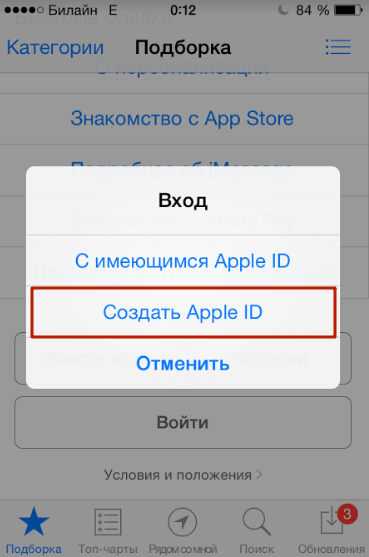
You can also access the Apple account creation service through the App Store. Go to the app store and scroll to the bottom of the home page. Click on " To come in».

Then click " Create an Apple ID».
How to create an account on iPhone without a credit card?
At least one way to create Apple ID without a “credit card” there is. If you don't want to share your payment details with Apple, do the following:
Step 1. Go to iTunes and select " Programs».

Step 2. Find free application (any) on home page and click on its icon.
Step 3. Once the app description opens, click " Download».
Step 4. In the window that appears, click on the button “ Create a new Apple ID" - this will start the account creation procedure.

Continue registration as usual until you decide on a payment method.
Step 7. On the page " Specify payment method"instead of a bank card, select the option " No».

With this choice, you will be spared the need to enter payment details. However, numerous fields in the block " Billing address"You still have to fill it out.
Conclusion
Create Apple ID possible both with the help of a PC and without it. However, if you use a computer to perform this task and iTunes, less time will be spent - you will have to type a lot, and it’s more convenient to do it on a PC keyboard.
In addition, when registering from a computer, you will be able to do without specifying the details of the selected payment method. This is important because many domestic users Apple technology They are suspicious of the requirement to leave card details.
Many new iPhone and iPad users face difficulties registering an Apple ID, an account required to download applications from the App Store and various media content from the iTunes Store. In this manual, we described in more detail the process of creating an account in the App Store (Apple ID) from a computer or directly from mobile devices.
How to create an account in the App Store (Apple ID) from an iPhone or iPad
Step 1: Launch app Store and at the very bottom of the page " Selection» click « To come in».
 Step 2. In the menu that opens, select “ Create an Apple ID».
 Step 3: Select your country and click " Further».
 Step 4. Accept the user agreement.
 Step 5: Provide the following information:
- Password
- Control questions and the answers to them.
- Date of birth.
After entering all the information correctly, click " Further».
 Note: On this page you can unsubscribe from Apple mailings by unchecking the appropriate switches.
Step 6. Select a payment method. In case of by bank card, you must specify the card number, security code and expiration date. If you choose a mobile phone as a payment method (Beeline and MegaFon only), then you only need to indicate the number mobile phone.
 Advice! You can learn how to create an Apple ID without a credit card at this instruction .
Step 7: Enter your billing address with your salutation, last name, first name, address, zip code, city and mobile phone number. Click " Further».
Step 8. Confirm the creation of your Apple ID by clicking on the link “ Confirm address» in a letter that will be sent to the email address specified during registration.
Ready! You've created an Apple ID account and can download or purchase apps from the App Store.
How to create an account in the App Store (Apple ID) from a computer
Step 1: Go to official site Apple Account Management and click " Create an Apple ID».
 Step 2: Provide the following information:
- Email- the email address will be the login of your Apple ID account.
- Password- it must contain at least 8 characters, including numbers, uppercase and lowercase letters. The same character cannot be repeated three times in a row.
- Control questions and the answers to them.
- Date of birth.
After entering all the information, click " Continue».
 Step 3. An email with a verification code will be sent to the email address specified during registration. Enter the code in the window that opens and click " Continue».
 Ready! You've created an Apple ID and can sign in to your iPhone, iPad, or iPod touch. Important! The first time you sign in with your new Apple ID, you'll be required to provide a payment method, billing address, and mobile phone number.
Hello everyone! We have already become acquainted with the identifier in the apple company system (). And at the end of the article, we came to the conclusion that we need to register an Apple ID to create our own unique account. And if it’s necessary, we’ll do it! Moreover, if you follow these instructions exactly, the whole process will not take you much time, and your efforts will be minimal.
By the way, the article will discuss registering an Apple ID without any card (credit card). Why without it? In fact, you can come up with a lot of reasons. I won’t go too deep and will list only a few of them.
And here they are:
- The simplest one is that not everyone has this same credit card.
- Many people are afraid to enter their card details (although it is completely safe).
- Some people only need free apps on the App Store.
If all these three points are not relevant to you, then at a certain stage (at which stage? all the details are below in the text), you will need to enter the “plastic” data.
In general, you can register an Apple ID at absolutely any time, both when you first turn on the device and after it. The scheme is almost the same everywhere. Here we will consider the second option, namely creating an account on an iPhone or iPad that we have already used for some time.
That is, we need:
- Activated iPhone, iPod, iPad - the instructions here are universal, regardless of the gadget.
- Wi-Fi connection or inserted SIM card (nothing will work without the Internet).
All is ready? Begin!
Take your device, unlock it and find the App Store icon in the menu, click.
Choose any free game or application - install. Attention! A free application is required.

Then we need a menu item to create an Apple ID.

A window to create a new account will appear. We see the choice of country or region, leaving Russia.

“Terms and conditions...” – we simply accept. It’s hard for me to imagine a person who will read this - it’s 60 pages after all :) Although, perhaps I don’t have a rich enough imagination :)


A data entry window opens.

A few important clarifications:
- Be sure to enter a real email.
- The password must contain at least 8 characters: numbers, letters of the English alphabet, and at least one capital letter. Write down or remember the password!
- Age – you must indicate that you are at least 18 years old. If you have not yet reached adulthood, lie blatantly.
Very important! The specified e-mail and password will be your Apple ID! Save them, write them down on a piece of paper, and never show them to anyone.
Remember, this data is the only proof that the device belongs to you. To understand the seriousness of the situation, I advise you to read (especially pay attention to the last paragraph). Is everything done? Go ahead…
Payment information – select no (if you do not intend to use a credit card). Or (if you want to use the App Store to its full potential) we indicate payment system, then enter all the necessary information. The item “iTunes gift cards...” is optional. Fill in the rest of the information.


A letter has been sent to the mailbox indicated above - open it, and of course follow the link to complete the process.


Congratulations, Apple ID registration (and completely free) is completed! And now you can use the App Store by installing freely distributed (or paid for) applications and games.
In my opinion, the instructions turned out to be quite detailed, but if you are tormented and haunted by various questions, then I always welcome them in the comments. Feel free to tell us about your problem - I will help, as they say, in any way I can :)
Updated! An article has appeared that summarizes all the errors that may interfere with the creation of an Apple ID. Therefore, if something doesn’t work out, .
P.S. By the way, for full and correct registration of Apple ID you need to click on the buttons social networks and like the article - try it, it really works!
Hi all! Let's talk about what any person faces after a purchase. mobile technology Apple. The article was prepared for novice users of the Apple company’s products, and experienced people will only smile after reading this note - after all, everything has been clear to them for a long time and they will say why bother wasting time and describing this simple and intuitive process.
However, as I can judge from my own experience, some people do not know what to do after turning on the iPhone for the first time. And many are also willing to pay money to have everything done right for them and to “boot the iPhone as correctly as possible.” Exactly for them - this instruction. By the way, it’s completely free! :)
As an example, I'll consider iPhone 5s activation, on other Apple devices everything happens similarly.
Actually, let's start!
We press the power button - the screen with a welcome message lights up. It can be in any language, so when you see hieroglyphs, don’t be alarmed.
Swipe your finger across the screen and a language and country selection menu will appear.


Now we need access to the Internet, there are three ways, any one will do. If the Internet is connected to the SIM card, choose to use cellular communications.

Another variant, Wi-Fi networks, let's connect to them.

If the previous methods do not work, you can always set up your iPhone with using iTunes, first, install iTunes (how to do this -), and then connect the phone to the computer using a cable.

Anyway, you need to install a SIM card, otherwise we will see such an inscription.

We wait a few seconds...

Congratulations, we are with you iPhone activated, there are a few parameters left to configure.
Location Services (). Since many functions and programs are related to map services and navigation, I recommend enabling this item.

Setting up iPhone. On this screen we see three positions:
- Set up like new
If this is your first Apple device, feel free to click the first option.

The next step: setting up an Apple ID is an account in the system (you can find out more about it), and you must create it, but this can be done later. All the intricacies of Apple ID registration are written in detail. And in these instructions for turning on the iPhone for the first time, I skip this point.

We accept license agreement- we have no choice :)

And, since in this article we are looking at activating the iPhone 5s, and let me remind you, it is equipped with a fingerprint sensor, they ask you to configure it as well.

And the last point (finally!). We are asked if we want to send diagnostic data to Apple, I choose to send it - why not help improve products and services? :)

And that's all The first turn on of the iPhone is completed and it's ready to go!

Hooray! Now you can fully use the device!
Well, instructions for iPhone activation 5S turned out to be quite large. But the author of the article has nothing to do with it - it’s all Apple’s fault, it was they who delayed this procedure so much :) However, there is nothing complicated about it. A little attention and everything will work out!
P.S. However, if any difficulties arise, as always, I welcome questions in the comments - I will be happy to help with advice and suggest a solution!
P.S. And if there are no difficulties, then why not like it? Feel free to click on the buttons below the article - the author will be very grateful. Thank you!
