Settings tp link device connection. How to properly connect a TP-Link Wi-Fi router - quick setup. Router Compounds
Modern mobile devices are no longer solely a means of communication; most of them are multifunctional devices that can connect to the Internet using a built-in Wi-Fi module. In enclosed spaces, a wireless connection to the global Internet is provided through routers.
A good solution for obtaining high-speed Internet with a wide range is TP-Link Wi-Fi routers. They are easy to use and allow you to get rid of unnecessary wires in the house, providing access to the Internet to several mobile devices at once. But to do this, you need to know about the rules for using the device; it is possible to connect a TP-Link Wi-Fi router yourself, you just need to use our step-by-step instructions. In this article we will talk about how to properly connect the router to a PC and then configure it.
How to connect to PC?
After purchasing a TP-Link modem, you need to open the package and check the kit for compliance with the description in the documentation. In addition to the device itself, the box should contain a power supply, cables, software disk and instructions.
Once you have ensured that the device is fully equipped, you should select a suitable location for its installation. In any case, it should be close to the computer, since the LAN cable is short. If necessary, you will have to buy an additional long cord. In principle, this is not a problem, because It is inexpensive and is sold at every electrical and accessories outlet.
Before connecting the router, it is important to familiarize yourself with its connectors and buttons. There are several of them:
- power button;
- connector for connecting the power cable;
- WAN connector is designed to connect the router to the Internet;
- LAN connectors – there are several of them (mostly 4) and are designed for connecting computers via a network cable;
- off/on QSS options button;
- button designed to reset settings.
Once you understand the purpose of the connectors, you should connect one end of the power supply to the router, and the other to a power outlet. The Internet cable provided by the provider is inserted into the WAN socket (i.e., Internet access is provided). Typically, the WAN connector on the device is highlighted in blue. One end of the LAN cable is connected to the router (you can use any of the four ports), the other to the corresponding socket on the computer.
Settings
Even if we are dealing with a completely new TP-Link router purchased in a store (where it can be tested by the store’s employees), experts advise first resetting the installation to factory settings.
After the reboot, you can proceed to step-by-step configuration of the router. To do this, you need to open a browser on your personal computer and enter the numbers 192.168.0.1 in the address bar. or 192.168.1.1 (selection based on the firmware version) and press “Enter”. Next, the “Setup Wizard” page will open.
First, you need to write your login and password (admin) in the appropriate fields.
It is better to change the password, which will protect the TP-Link router from unwanted use of your Internet by your neighbors (especially if you live in an apartment building).
In the case when the provider uses Dynamic IP, or the router is connected via a modem, then after connecting it, the Internet on the computer and other devices can start working immediately. But even in this case, you will have to configure Wi-Fi and install a new secret code.
To do this, you need to enter the tab, System Tools, click on it, and click on Password. In the fields of the old password and login you need to enter admin, and enter the new password and login in the appropriate fields (New Password and User Name). It is not necessary to change the User Name, only the password is important. After entering new data, you must confirm the actions by clicking on Confirm New Password. Next, to save the updates, click on Save.
As experts advise, on the settings page you should update the firmware by downloading the latest version. This is done using System Tools, by clicking on it, go to Firmware Upgrade. Next → “Overview” → open the downloaded firmware file for the TP-Link router you are using, downloaded from tp-linkru.com. Then you need to go to Upgrade. Please note that licensed firmware can be downloaded for free only from official sources.
The next step is setting up the Internet in the TP-Link router. This is done using the Network and WAN tabs. First you should select the type of network; information about this can be obtained using the Hot-line provider whose Internet you use. Selecting the network type requires saving (click on Save).
Setting up a Wi-Fi network
To start setting up Wi-Fi, go to the Wireless tab. Enter the name of the network in the Wireless Network Name column. Additionally, you can enter your country in the box below. All changes made must be saved by clicking the Save button.
To protect your wireless connection from unauthorized access, you need to go to the Wireless Security system and come up with a difficult, but memorable secret word for you, and enter it in the PSK Password field. After saving all changes, the device should be rebooted by clicking the Reboot button in System Tools. This action, like the others, requires confirmation.
And so, connecting a TP-Link Wi-Fi router consists of the following basic steps:
- Enter the “Setup Wizard” tab;
- Change Password;
- Firmware update;
- Network selection;
- Setting up Wi-Fi;
Perhaps video instructions are more convenient for you:
By completing all the above steps, you can easily configure the router yourself, thereby saving time and money on the services of a specialist.
In the 21st century, people are unable to live without the Internet. However, compared to the beginning of the century, when all devices were connected through wires, connections are now made through wireless routers. Let's look at the features of setting up a TP-Link router. Models from this company are popular for their price-quality ratio. All actions are successfully applied to almost all TP-Link routers.
Regardless of the model, the TP-Link router and its configuration do not cause problems even for inexperienced users. In most ratings, the Chinese company's routers are leaders in various categories, delivering better performance than their competitors.
Appearance
Visually “Wi-Fi » TP-Link routers are attractive and have rounded shapes. The plastic is glossy, which is a slight minus due to its dirtiness. The delivery set is standard and includes:
- power adapter;
- short network cable;
- disk with software;
- manual and warranty.
Indicator lights are placed on the top part. Due to the large number of holes, the router does not heat up. At the bottom there are rubber feet, thanks to which it does not slip, and a sticker with data, ranging from the standard password to the login address to a special administration page. There are ports and buttons at the back. And antennas are placed on top.
Where to install
 The question is often asked about where to install the TP-Link modem. The main thing is that you cannot install it on devices whose operating frequencies are 2.4 and 5 GHz. It is better to attach it to the wall, hanging it by special devices, or install it on an open shelf in a table or closet away from mirrors. Fix the antennas in a vertical position.
Connection and preparation for work
The process of connecting TP-Link to a computer or laptop will not cause much trouble. To do this, you need to insert the cable provided by your provider into the connector on the back of the device. Then plug the power adapter into a power outlet. In about a minute, the router will be ready to use. This will be “told” by the light indication that has stopped changing.
How to properly configure a TP-Link router
Setting up wi-fi on any TP-Link router is unified and does not cause any problems. Moreover, you can do both a quick setup of the TP-Link router and a more thorough, manual method.
Automatic setup
In order to understand how to quickly set up a TP-Link router, you should go to the IP address indicated on the sticker on the bottom of the device. Typically this is 192.168.0.1. The login and password fields will open. The standard username is admin, the password is the same - admin. Then go to the “Quick Setup” tab. After that, click “Next”, select the country, provider, connection type.

Connecting to the Internet manually
It's a little more difficult to do everything manually. The IP address, gateway, subnet mask and other precise settings for the TP-Link modem, ensuring its correct operation, should be found out from the provider, select the desired connection type and then fill out all the fields yourself to gain access to the Internet.
"Home ru"
For example, let's look at how a TP-Link router connects to the network of a provider called Dom.ru. In the past, you had to find out the mac address, but now this archaic method does not exist. You need to open the “Network” section, then go to the WAN submenu.

In the “Username” and “Password” fields, indicate the login and password that are specified in the concluded agreement. Select the Always Active checkbox. As a result, after saving, the Internet should work.
Rostelecom
First, open the “Network” section and go to the WAN submenu. Then select the connection type, most often PPPoE, but the settings are identical for other types. Enter in the login and password fields the information specified in the concluded agreement. Check the box “Always active”.
"Beeline"
When setting up TP-Link for Beeline, go to the administration page at 192.168.0.1 and then to the “Network” item. The WAN Connection Type field is set to L2TP/Russia L2TP, and, accordingly, the login and password issued by the provider when concluding the contract are written in the required fields. You should check the box next to “Automatic connection”. In general, the settings make it easy to connect to a TP-Link router, regardless of the provider.

Wireless network
The wireless network for TP-Link is configured on the Wireless - Wireless Settings tab. In the special Basing settings field, you can set the name of the network that you created yourself. By logging into Wireless Security, you configure connection security using a password and encryption.
Configuration in repeater, amplifier, adapter or access point mode
To configure TP-Link in repeater (repeater), amplifier, adapter or access point mode, you should go to the wireless network settings field, where in the “Operation Mode” select the required option from the drop-down list.
IPTV
Modern TP-Link routers support IPTV - interactive television. It is possible to set up and watch IPTV over Wi-Fi on any device. If there is a special set-top box, it is recommended to allocate the required LAN port for it, working as a bridge. All this is done in the “Network” tab, where you need to go to IPTV.

Individual user connection settings
There are no options for adding additional users with individual settings through the web interface of the equipment for TP-Link models.
Dynamic DNS
To enable dynamic DNS in TP-Link, you need to go to the DDNS tab. If you are registered on the resources presented in the drop-down menu, enter your login, password and domain, check the “Enable DDNS” checkbox and click “Next”. If the transition is not possible, click on the hyperlink and register.
Security Settings
To protect your data, you should change the password set by the manufacturer. To do this, find the Password field and enter a new password. In the “Protection” tab, subsection “Configuring basic protection”, check the box to enable the SPI firewall. You can install specific computers from which the interface is locally controlled. To do this, in the “Protection” tab, go to the “Local Management” submenu, where you enter the MAC addresses of computers that are allowed access to the setup interface with administrator rights.

To exclude the possibility of remote access, you should go to the “Remote control” sub-item and set its IP address: 0.0.0.0. Any other IP address is a potential vulnerability; for example, entering 255.255.255.255 in the field opens remote access to any other computer.

It is necessary to update the software on a regular basis, because the manufacturing company regularly releases “patches” that protect the device from being hacked by intruders.
Parental control
On the router page, select the appropriate tab. You should check the box next to “Enable parental controls.” After this, enter the MAC address of the host computer in the special field. It’s easy to copy the address of the PC on which the settings are made: by pressing one button.
Below are the MAC addresses of all monitored computers. The schedule can be configured: day, time of action. A “white” list of sites is formed for unhindered visiting.

Changing the function of the buttons
There is no standard mechanism for redefining buttons in the configuration interface for TP-Link models.
Setting up a torrent client
On the TP-Link TL 841n interface page there are no standard ways to configure torrent clients. However, third-party firmware dd-wrt is installed, which turns almost any router with a USB port into a torrent client. It is also possible, without using computer resources, to download torrent files to a USB device connected to the router.
You should go to the official website of the firmware developer dd-wrt. In the field that opens, check the compatibility of the specific router model with the firmware. If successful, select and download one of the versions. Be sure to make a “backup” of the router’s factory firmware, and then install dd-wrt via a patch cord. Then you will need to download the Optoware program and install it on a Linux-formatted USB drive. During the setup process, the Transmission utility will be installed, an analogue of a torrent client. Through the Transmission Remote utility, it is remotely controlled, during which torrents are added or removed, speed is limited, etc.
It is worth noting the low value of this procedure. Firstly, installing third-party firmware voids the manufacturer's warranty on the router. Secondly, it is objectively much simpler and more convenient to use a computer as a torrent client, and specific configuration of a router is quite labor-intensive even for professionals.
Setting up the printer
As with all modern modems, the router settings include a print server function. Of course, this is done using standard Windows 7, 8, 10 tools, but it is much easier to use the specialized TP-Link USB Printer Controller utility, the installation file of which is located on the official TP-Link website.
Setting up DLNA on the router
Since 2011, after the May firmware update for TP-Link routers, support for the “Media Server” function appeared in the settings menu. Using a standard player or even a regular game console, shared access to media files is provided. To do this, you need to go to the modem settings, select “USB Settings”, and then “Media Server”. After that - shared folders. After starting the player, it will find the created media server.

VPN service
The question is how to establish a VPN connection between two modems. For the first, the router settings are set to “Server” mode, and for the second, accordingly, to “Client”.
To configure the “Server”, go to the VPN tab, select the Ip Address Pool field, where the necessary addresses are added using the Add button. In the L2TP/PPTP Tunnel tab, the PPTP protocol is set, and the Mode is set to Server mode. The new login and password are filled in in a special field. Tunnel is set to LAN-to-LAN. After this, all that remains is to confirm the activation.
The “Client” setting is identical, except that the Mode field is set to Client mode.
Possible malfunctions and ways to eliminate them
 If the router does not respond to connection to the power supply, the indicators do not light up, you should check the power button. The router may have burned out.
If the router does not distribute the Internet, there are options:
- Due to problems on the part of the provider. In this case, you should either just wait a while or call technical support. If experts say that everything is fine on their end, then the problem is related to the router. It's worth trying to reboot the router itself. In the vast majority of cases this will be the solution.
- There were some problems with the settings. The easiest way is to reset to factory settings using the Reset button.
How to connect to a TP-Link router to update the firmware
The software is being improved, patches, improvements, and additional functions are released. Accordingly, the question arises of how to install the latest firmware for a TP-Link router. You can do this in two ways:
Via web interface
 Go to the website, select the version you are interested in and download. To avoid losing your settings, you only need to update the firmware using a network cable via a computer. The WAN cable is disconnected - from the provider - and the router is connected to the computer via a patch cord. And then proceed according to the instructions of the installation program.
Via mobile application
Tp-Link has created an application for smartphones and tablets called TP-Link Tether. Operates on Android and iOS. Using this program, you manage, configure and update your Wi-Fi router. Everything is intuitive, as in the vast majority of modern applications. Just go to the page, select the router, go to the system settings and click “Update”.
Resetting the TP-Link router to factory settings
Sometimes people make mistakes, don’t know how the router should be connected, forget to write down personal data, or accidentally delete something. The question arises, how to reconfigure the router. You should use reset settings to default. Do this either through the “System Tools” tab or by clicking the WPS|Reset button. The parameters will be reset to the original factory settings.
Conclusion
It is worth noting that questions about how to connect a TP-Link router and then configure it should not cause problems. It is enough to understand the general principle of operation, then, regardless of the device, you will be able to correctly connect the network and use the Internet. The example considered is also suitable for configuring routers from other manufacturers, because the differences lie in the details.
pros
The advantages of TP-Link routers are:
- Powerful signal that easily covers a large area.
- Availability of WPS button.
- Low heat.
- Reliability.
Minuses
The disadvantages, first of all, include the not very attractive design of the administrator interface; competing companies have a more stylish design. Also, most routers have crevices that make it difficult to remove dust. But the disadvantages, of course, are unable to “outweigh” the advantages.
Our article today is for those who are planning to purchase or have already purchased a Tp-link TL-WR841N router. We will take a step-by-step look at the entire setup of this router - connection parameters, wireless network, Wi-Fi security key, accompanying the process with photographs for clarity. Also, all the settings described here are suitable for the TL-WR841ND model. Therefore, if you follow our instructions, setting up your new router will only take you a few minutes.
This is a successful and therefore quite common router model among users, the quality of which fully justifies the price. In my opinion, this is an ideal option for organizing home networks that will cover all their needs. My copy has been working for more than three years, distributing the Internet to many devices via Wi-Fi, and during this time I do not remember interruptions in the Internet due to its fault. On this page There is my review of the Tp-link TL-WR841N and reviews of its performance.
So, the router is already in front of you, it’s time to start setting up. Here is a list of setup steps we have to go through:
- Connecting the router to the computer.
- Setting up Internet access.
- Setting up a Wi-Fi network on the TL-WR841N.
- Security key (password) of the Wi-Fi network.
- Changing the administrator password.
The power cable is plugged into a suitable connector on the router and, of course, into an outlet. Next to it there is an on/off button - it also needs to be switched to the on state. The LED indicators that light up on the front panel will tell you about successful switching on.
You can connect the router to your computer for configuration in two ways. If it is located near the computer, it would be best to do this using a lan cable.
One end of it is plugged into the connector of the computer’s network card, the other into the subscriber port of the router (yellow ports labeled as LAN).
Accordingly, the blue connector (WAN) is intended for receiving settings from the provider. We will include in it the cable coming from the transmitting equipment or your modem.
The second method is to connect your devices via Wi-Fi. It happens that it is not possible to connect to the router with a cable - be it a damaged network card, the location of these two devices remote from each other, or other reasons. Or maybe someone doesn’t have a computer at all - then you can carry out the setup process using a tablet or smartphone connected to the router via Wi-Fi.
Typically, the Tp-link TL-WR841N router comes with a disk with a pre-selected configuration for setup. In this case, we won’t need it - our task is to learn how to configure the router through its management interface.
So, let’s check: your router must be connected to a computer (or other device) using any of the methods described above, and a cord coming from the provider’s equipment must be inserted into the WAN port. Now you can start setting up.
Setting up Internet access on the Tp-link TL-WR841N router
To go to the router’s management interface, you need to go to the browser on your computer (another device from which you are setting up) and type in the address field 192.168.1.1 . You will then be prompted for an admin password - default values admin/admin. In case any of the above did not work for you, here it is.
And when the settings page opens, you can immediately. This is optional - that is, you can update at any other time or not do it at all.
Ifsettings at 192.168.1.1 will not open, orthe admin password will not work, or the settings you made are unsuccessful - resetting the router to default settings will help you. Between the antenna mount and the fourth subscriber port of the router there is a recessed Reset button. With the power still on, press down on it with a pen/needle or something sharp and don't let go for about ten seconds. When all the indicators go out and light up, the router is reset, you can release the button and start the setup process again. Or try to solve the problem using one of the methods given in the articles: and.
The first thing we need to do is to enable the router to connect to the provider’s equipment and receive from it the settings necessary for Internet access. Without this, further configuration will be pointless.
On the control page, select the menu Network — WAN. A list will appear WAN Connection Type, in it you will indicate the type of connection. You can find out from your provider's support which one you will need: Dynamic IP, Static IP, PPPoE, L2TP, or PPTP. If this is a dynamic IP, then this choice is made after saving using the button Save the router will go online.
If your provider gives you one of the options PPPoE, L2TP, PPTP or static IP, you will need to enter the necessary data - IP address, gateway and DNS addresses, username, password - it all depends on the specific type of connection. You can also obtain this information from technical support or find it in your Internet service agreement.
If you previously used some kind of high-speed connection to access the Internet, you can safely delete it. Now this function will transfer to the router, and you will no longer need to manually establish a connection.
In addition, the provider can link your end devices to your account by MAC address. You can also check this with your support person. If the binding exists, you can tell the employee the MAC of your router, indicated on the sticker on its bottom panel. Another option is to clone the MAC of the network card to the router (Network menu - MAC clone) or change it manually on the router.
This setup stage ends when your router has access to the Internet. If everything worked out, save the settings with the button Save and move on to the next step. And in case this setup step was unsuccessful, we recommend the following instructions: When setting up the router, it says “No Internet access” or “Restricted”.
Setting up a wifi network and protecting it with a security key
To set up a Wi-Fi network, we need to go to the menu Wireless — Wireless Settings. Here in the line Wireless Network Name Enter the name of the network by which devices trying to connect will search for it. Below is a drop down list Region, in which you need to select your country of residence. All of the following settings on this screen can be left unchanged.
Save the settings again using Save.
To protect your network from unnecessary connections, we recommend setting a security key (password). Go to the menu Wireless — Wireless Security. Place a check mark next to the line WPA/WPA2 - Personal(Recommended). IN PSK Password enter the password that will now be requested from each device trying to access your router’s network. Also, setting up a Wi-Fi security key is described in detail in this article.
When a password has been created and assigned, save immediately by clicking Save.
Changing the administrator password
We already had a publication on how to change the standard admin password, which gives access to the management page of the Tp-link TL-WR841N router. Now, while we are still on the management page, you can immediately change this password. This function is needed to ensure that any user working through your network cannot log into the router and make any changes without your knowledge.
This is done in the menu System Tools — Password. You will be asked to enter your existing authorization data, and then a new admin username and password. You can keep the admin name unchanged, but come up with a new password and write it down somewhere inaccessible so that you don’t forget it and someone else doesn’t recognize it. These settings are also saved with the button Save.
At this point, the setup of the Tp-link TL-WR841N router can be considered complete. Now all that remains is to reboot it so that it can receive the settings from the provider. Reboot is done through the menu System Tools - Reboot, or simply turning off the power for a few seconds.
After the reboot, the wireless network is activated. To connect to it, use the network name and security key assigned earlier in the setup process. Even if you configured the router, for example, from a laptop, connecting it via a LAN cable, now you can remove the cable and connect to the network via wifi.
We sincerely hope that you did not encounter difficulties when setting up Internet access, but if this did happen, here are our publications on this topic: “No Internet access” in Windows 7 and “Connection limited” in Windows 10.
You probably have some questions or feedback about the operation of the Tp-link TL-WR841N router. Leave them in the comments.
– favorites among devices that provide Wi-Fi. They are given the championship cup for their laconic design and wide range of actions. It won’t be difficult to find a model in the collection that matches its design and characteristics, but to understand the router settings, you’ll have to work a little.
To help beginners, the article offers brief instructions on how to connect a router to a PC and start using the Internet, which is not limited by wires. The guide consists of 5 stages of quick activation, upon completion of which you will be able to catch wi-fi anywhere in the apartment.
Determining the IP Address
The first step is to search for network settings for authorization. There are only three types of them:
- Dynamic (Dynamic IP);
- Static (Static IP).
- Access via PPPoE protocol.
And now about how to get them. For example, a user with Windows 10, to which the provider’s cable is connected. Internet is active. In this case, to find out the operator’s address, a person needs to go through the following route:
- At the beginning, click on “Start” - “Settings”;
- then find the inscription “Home page”;
- In the suggested options, activate the “Network Control Center”.
Now the “Change adapter parameter” field.

A column with the word “Internet” will appear on the screen. Click on “Properties”, and after that, in the list of “IP version 4 TCP/IPv4”, another click on the field of the same name.

The above maneuvers were carried out in order to find out the type of connection to the operator (see where the default icon is). If it is located in the “Obtain an IP address automatically” area, then synchronization is carried out through Dynamic IP. In this case, you can activate all the settings in an instant, without wasting time and effort. The process is carried out regardless of user actions.
When the “Use the following IP address” field is active in the window and numbers are indicated in the cells, this indicates the use of Static IP. In this case, the received data should be written down on a piece of paper, because they will be useful for subsequent actions with a router like.

Why was all this necessary? From this stage, the upcoming TP-Link WI-FI router settings will depend on the received IP address and differ in their set of procedures. But more on this later.
Installing and regulating device activity
It's time to connect your purchase to your laptop or use Wi-Fi. In the process you need:
- provider cable (by this time it should already provide Internet access to the house);
- patch cord (power cord);
- actually, a computer;
- router of the selected model.
At the next stage, these elements must be assembled into a single structure. There are several connectors on the back of the router. Most often there are 4-5 of them, and TP-Link painted these ports in different colors. It is important to remember that the blue Wan connector is used only for the Internet cable (there is only one), and the rest are used for synchronization with a PC.
You may be interested in the following information:
The connection process consists of 4 stages:
- We remove the provider patch cord from the laptop.
- We move it to the Wan connector.
- We fix the selected router to the laptop with a power cord.
- We connect the power supply of the device to an outlet.
All that's left to do is to configure the network reception correctly.

On the back of the router (for example), its basic data and factory settings are indicated. From this information, you need to select the site address and enter it into the search box of your browser. A window immediately opens with fields for login and password, which are written in the documentation or on the same sticker.

After this, the user has access to tools for changing the functionality of the device. It's worth starting with the local network. Select the “Quick Settings” section, in which you need to fill in all the fields: come up with a security password, name of the wireless network, determine the number of channels, signal reception time, etc.

Only after completing these steps can you proceed to activating free use of the Internet. To do this, open the “Network” and “WAN” tab. The first thing that appears at the top of the window is the connection type. This is the same IP address that has already been determined using the instructions in the previous section. Depending on it, the further process has three different options.

It is worth noting that the web interfaces of all TP-Link models are similar to each other (and this is no exception). It is not difficult to understand the key points. Here are the basic information you need to know to fill out each of them:
|
Connection type |
Setup information |
|---|---|
| Dynamic IP | The setup occurs automatically, without any user input. |
| Static IP | In this case you will need: |
| IP Address; | |
| Subnet Mask; | |
| Default Gateway; | |
| Primary DNS (Preferred DNS server); | |
| Secondary DNS (Alternative DNS server). | |
| PPPoE | It is enough to know the username and password. |
Dynamic IP – setting up a network automatically
If the operator provides the user with Internet communication services through a dynamic address, the entire activation process takes a matter of seconds.
To establish a connection you need:
- find the Dynamic IP item in the WAN list;
- save changes;
- go to the System Tools – Reboot section;
- restart the device.
Now all the settings have taken effect and you can safely use the World Wide Web.

Static IP – we use the provider’s data
If the connection to the operator is made using a static IP, first select the desired address option in the WAN line. A window will appear on the screen where you need to enter your provider data. If they are already written out on a piece of paper in advance, then there should be no problems here. The information is registered - click on the “Save” field. Next, similar to the previous option, you need to restart the router.

PPPoE – remember login and password
Having selected this type of connection from the proposed menu, you need to fill in several data:
- Subscriber name and password, which is specified in the agreement with the provider.
- Operating mode, that is, determine the exact hours or around the clock.
After that, click the “Connect” button. In just a few seconds the device will be ready for use. You can make sure that the router is active at the bottom of the section. There should be the word "Connected".

Router security: quick setup
In order not to distribute free Wi-Fi to all your neighbors, it is better to immediately protect it. The most secure encoding is WPA-PSK/WP2-PSK.
Activating it is very simple:
- section “Access Control” or “Security Setting”;
- mark next to the column with the desired name.
A prerequisite for a secure line is the presence of a cipher. You need to invent it, add it to the line and, preferably, remember or write it down. The cipher must contain at least 8 characters. It is better to use Latin letters mixed with numbers. When finished, be sure to restart the router. This way, all changes made will remain in the system.

Internet connection to the device
The final part of setting up a TP-Link router is to enable the laptop to receive a signal from the router. On the bar at the bottom of the screen, you need to find and select the network activation icon by clicking the model name from the proposed list. To activate it, you need to enter the password you created earlier. Now left-click on the “Enable” or “Save” button. To test the operation of the device, go online to any of the sites.
After that, you can synchronize any devices that support the Internet with Wi-Fi: set-top box, other gadgets.
How to recover a lost password?
It happens that after some time the password to access the router settings is forgotten. If this happens, it doesn't matter.
There are several solutions to the problem:
- You can restore all original settings using the Reset button on the device panel.
- Log into the web service from any connected device and see your forgotten password.
- Try standard login details admin/admin. Perhaps they haven't changed.
If you choose the first option, you will have to go through all the installation steps again

Brief summary
At the end of the instructions for connecting a TP-Link router, all that remains is to consider a few mistakes that beginners make when connecting a device:
- before starting the activation process, the Wi-Fi button located on the back of the case was not pressed;
- the username matches the name of the router model, which is why it is lost in the list;
- operator parameters are incorrectly specified;
- The wrong connector is selected for connecting the patch cord.
Everything is simple, nothing fancy. If you look closely, connecting a TP-Link router will take no more than 5-7 minutes. It is important to take your time and follow the instructions carefully.
Determining your Internet provider's network settings
Before you connect your router, you need to know what network settings are needed to connect to the Internet.
The most common types of network settings are:
- Dynamic IP— dynamic settings, issued automatically via DHCP
- Static IP— static settings, entered manually
- PPPoE— Internet access is provided via the PPPoE protocol after entering the username and password
It is assumed that you have Windows 7 installed, the provider cable is connected to the computer and Internet access is configured.
Go to "Change adapter settings".

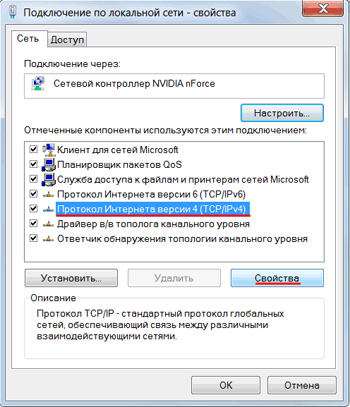
Right-click on "Local Area Connection" and select "Properties"

Click on “Internet Protocol Version 4 (TCP/IPv4)” and the “Properties” button.
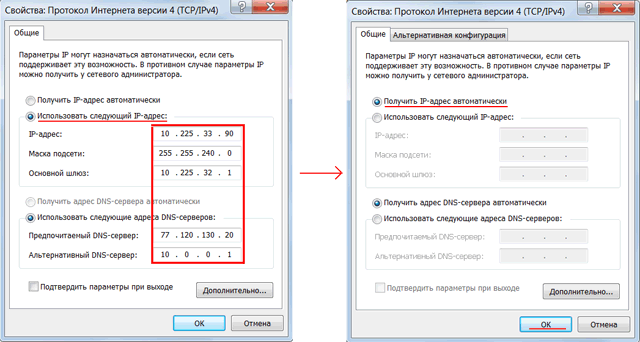
- If you have selected “Use the following IP address” and there are numbers, then write down all settings- these are the static settings of the provider ( Static IP). After that, select “Obtain an IP address automatically” and click the “OK” button.
- If you select the “Obtain an IP address automatically” option, then you receive network settings automatically - these are the dynamic settings of the provider via DHCP ( Dynamic IP).
There are providers that block access to the Internet by MAC address (you can look it up in the contract). In this case, you need to configure the router so that it has the same MAC address that is registered with the provider.
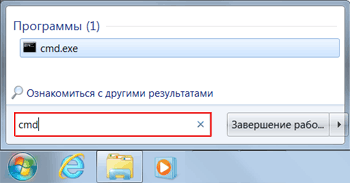
To find out the MAC address of the network card, click “Start”, in the “Search programs and files” window write the command cmd and press Enter.
We write the command in the console ipconfig /all and press Enter.

We are looking for “Ethernet adapter Connection via local network...”
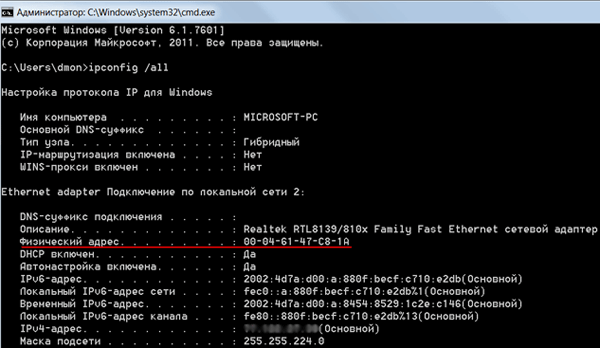
In field " Physical adress"Your MAC address of the network card is indicated. Let's rewrite it.
Connecting and setting up a TP-Link router
To set up a Tp-Link Wi-Fi router we will need:
- provider cable (Triolan, MaxNet, Vega, Volya, Airbites, or others without vpn);
- computer or laptop;
- TP-Link router, which will distribute the Internet via Wi-Fi to a laptop, TV with Wi-Fi, tablet or smartphone.
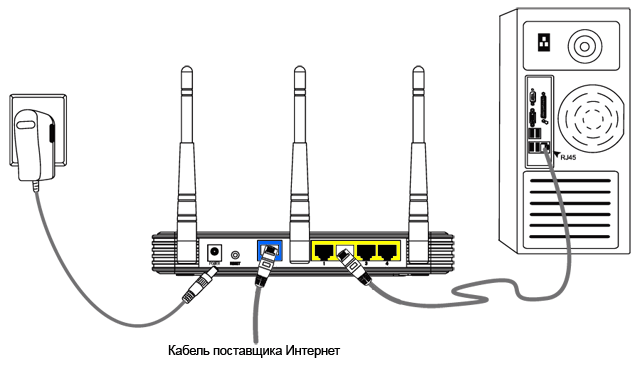
Let's connect the equipment as follows:
- Plug the power supply into the router’s “Power” connector;
- connect the Internet provider cable to the blue WAN port of the router;
- connect the computer to the router using a network cable to any yellow LAN port;
- We will connect other devices (laptop, tablet, TV with Wi-Fi, smartphone) via Wi-Fi wireless connection.
Let's move on to setting up the router.
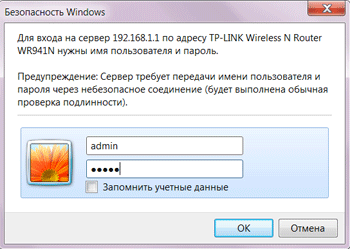
Open Internet Explorer and enter the address 192.168.1.1
Attention! The proxy server should not be specified in the browser settings
In the window that appears, enter your username admin and password admin.
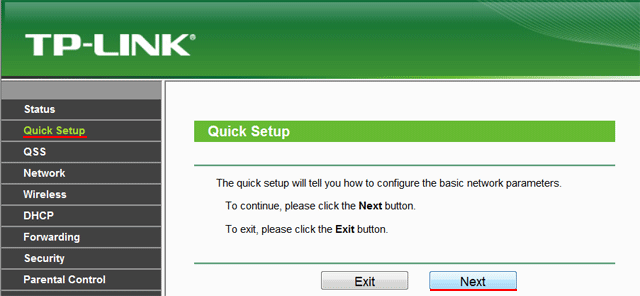
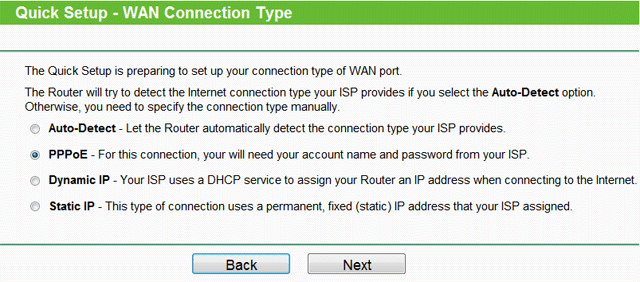
On the left side of the menu, select Quick Setup Wizard Quick Setup and press the button Next.
Dynamic IP— automatic network settings of the provider via DHCP
If you receive automatic network settings, then select Dynamic IP and press the button Next.

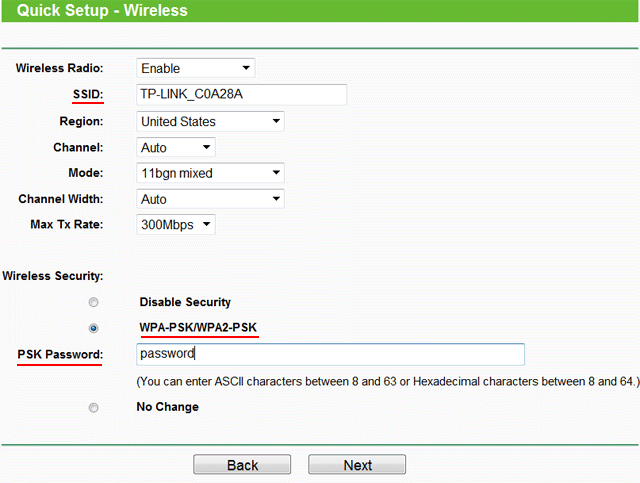
In field SSID
In chapter Wireless Security specify the encryption type WPA-PSK/WPA2-PSK
In field PSK Password:
Finish.

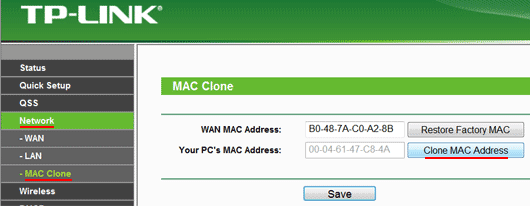
Network - MAC Clone.
In field WAN MAC Address enter the MAC address.
You can also click Clone MAC Address, if in the field Your PC's MAC Address
Static IP— static network settings of the provider
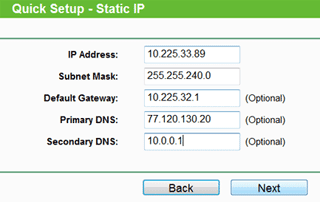
If network settings need to be entered manually, then select Static IP, press the button Next.

Enter the settings:
- IP Address(IP address)
- Subnet Mask(Subnet mask)
- Default Gateway(Main gate)
- Primary DNS(Preferred DNS Server)
- Secondary DNS(Alternate DNS server)
- and press Next
In field SSID Enter the name of the access point to connect via Wi-Fi.
In chapter Wireless Security select the encryption type WPA-PSK/WPA2-PSK
In field PSK Password: enter the password to access the Wi-Fi access point. The password must be at least 8 characters.
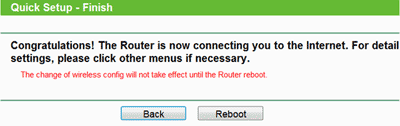
The next window indicates that you have successfully completed the setup. Press the button Reboot and wait for the router to reboot.
If your provider blocks access by MAC address, select from the menu on the left Network - MAC Clone.
In field WAN MAC Address enter the MAC address.
You can also click Clone MAC Address, if in the field Your PC's MAC Address the required MAC address is located.
PPPoE— Internet access using user and password
If Internet access is provided via the PPPoE protocol after entering the username and password, then select PPPoE.
Enter the settings:
- User Name:(Username)
- Password:(Password)
- Confirm Password:(Confirm password)
- and press Next

In field SSID Enter the name of the access point to connect via Wi-Fi.
In chapter Wireless Security select the encryption type WPA-PSK/WPA2-PSK
In field PSK Password: enter the password to access the Wi-Fi access point. The password must be at least 8 characters.
The next window indicates that you have successfully completed the setup.
Press the button Reboot and wait for the router to reboot.
TP-Link router security settings
To prevent anyone other than the administrator from entering the router settings, you need to change the password to enter the settings.
To do this, select from the menu on the left System Tools - Password and enter the settings:
- Old User Name: old username, enter admin
- Old Password: old password, enter admin
- New User Name: enter a new username, you can leave admin
- New Password: enter a new password
- Confirm New Password: confirm the new password
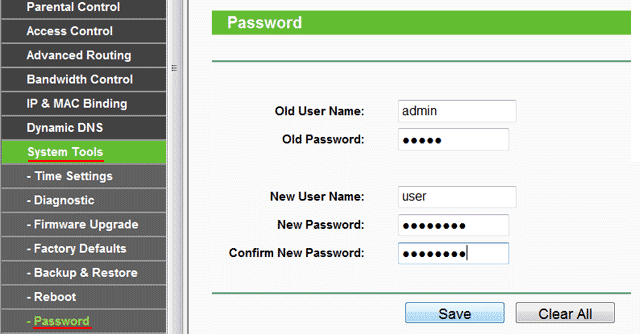
After this, press the button Save to save the password.
Connecting a laptop to the Internet
We will connect the laptop to the Internet via Wi-Fi.
To do this, select the wireless network management icon in the lower right corner of the monitor. After updating the list of wireless networks, our network should appear in it. Select it and click the “Connect” button.
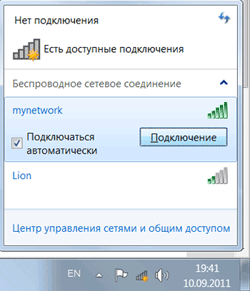
In the next step, enter the password to connect to the Tp-Link router via Wi-Fi.

Enter the password you specified in the field PSK Password: in the router settings. After this, the Internet will appear on the laptop.
You can connect devices that support Wi-Fi, such as a TV, netbook, tablet, smartphone, to the Tp-Link Wi-Fi router. To do this, you need to select a Tp-Link access point in your device and enter a password.
Recovering the password to enter the settings of the TP-Link router
If you have forgotten the password to enter the settings of your Tp-Link router, you can restore the factory settings and password.
To do this, press the Reset button on the back of the router for 8-10 seconds.
