Arduino goes to the beginning of the program by condition. Arduino loops. Condition and branching in the program text
Design for used to repeat a block of statements enclosed in curly braces. The increment counter is typically used to increment and terminate a loop. Operator for Suitable for any repetitive activity and often used in conjunction with data/output collection arrays.
Loop header for consists of three parts:
for (initialization ; condition ; increment) (operators executed in a loop)
Initialization is performed first and only once. Each time in the loop, a condition is checked, if it is true, a block of statements and an increment are executed, then the condition is checked again. When the boolean value of the condition becomes false, the loop ends.
Example
// Dimming the LED using PWM pin int PWMpin = 10; // LED in series with a 470 ohm resistor for 10 pins void setup() ( // no setup needed) void loop() ( for (int i=0; i<= 255; i++){ analogWrite(PWMpin, i); delay(10); } }Cycle for C is much more flexible than loops for in other programming languages, for example, BASIC. Any or all three header elements may be omitted, although semicolons are required. Also, the loop initialization, conditional, and increment statements can be any valid C statement with independent variables, and use any C data type, including floats. These are unusual for the cycle for operator types make it possible to provide a software solution to some non-standard problems.
For example, using multiplication in a loop counter operator allows you to create a logarithmic progression:
For(int x = 2; x< 100; x = x * 1.5){ println(x); }
Generated: 2,3,4,6,9,13,19,28,42,63,94
Another example, smoothly decreasing or increasing the signal level to an LED using one cycle for:
Void loop())( int x = 1; for (int i = 0; i > -1; i = i + x)( analogWrite(PWMpin, i); if (i == 255) x = -1; // switching control at maximum delay(10); ) )
Design for used to repeat a block of statements enclosed in curly braces. The increment counter is typically used to increment and terminate a loop. Operator for Suitable for any repetitive activity and often used in conjunction with data/output collection arrays.
Loop header for consists of three parts:
for (initialization ; condition ; increment) (operators executed in a loop)
Initialization is performed first and only once. Each time in the loop, a condition is checked, if it is true, a block of statements and an increment are executed, then the condition is checked again. When the boolean value of the condition becomes false, the loop ends.
Example
// Dimming the LED using PWM pin int PWMpin = 10; // LED in series with a 470 ohm resistor for 10 pins void setup() ( // no setup needed) void loop() ( for (int i=0; i<= 255; i++){ analogWrite(PWMpin, i); delay(10); } }Cycle for C is much more flexible than loops for in other programming languages, for example, BASIC. Any or all three header elements may be omitted, although semicolons are required. Also, the loop initialization, conditional, and increment statements can be any valid C statement with independent variables, and use any C data type, including floats. These are unusual for the cycle for operator types make it possible to provide a software solution to some non-standard problems.
For example, using multiplication in a loop counter operator allows you to create a logarithmic progression:
For(int x = 2; x< 100; x = x * 1.5){ println(x); }
Generated: 2,3,4,6,9,13,19,28,42,63,94
Another example, smoothly decreasing or increasing the signal level to an LED using one cycle for:
Void loop() ( int x = 1; for (int i = 0; i > -1; i = i + x)( analogWrite(PWMpin, i); if (i == 255) x = -1; // switching control at maximum delay(10); ) )
", we learned how to use a "for" loop to organize the operation of the controller. This type of loop is used everywhere and more than covers the “need for looping operations.” However, there is another type of loop - "while". It's no better than a for loop, it just uses different principles.
In most cases, you can choose which of two types of loops to use. In we used "while" to pause the program until the user enters the required data. In this lesson we will take a closer look at how this loop works using the Arduino platform as an example.
Let's continue working with the circuit, consisting of 2 LEDs.

In addition, we will continue to work with the code that we finalized in lesson 14.

Back to the past: the controller prompts the user for data, waits for input, and then assigns the resulting values to variables blinkNumberGreen And blinkNumberRed. This allows the user to control the number of times each of the 2 LEDs blinks.
To expand a programmer's worldview, it is worth learning to use two types of loops to implement the same tasks, and in the future you can demonstrate sympathy for one or another type.
Let's figure out how it works:
int z= 1 ; // declare a variable and assign it the value 1
while (z<=10) { //запускаем цикл while
Serial. println(z); //output the current value of the variablez via serial port
z= z+1 // increase the value of the variablezby 1
) // end the loop
The while loop will continue to execute commands as long as the “condition” described in parentheses is true. In the example above, the loop will continue to execute commands as long as z is less than or equal to 10. The body of the loop executes 2 commands:
- Outputting the value of a variable via a serial port;
- Increasing the value of a variable by 1 (scientifically called incrementing).
By increasing the value of the variable, the program will eventually exit the loop. If we imagine for a second that we forgot to specify this line or some kind of failure occurs, then the program will happily go into a loop (in other words, it will freeze).
The loop begins its work by checking the truth of the condition. If z is less than or equal to 10, then the program runs the loop. Then the condition is checked again, etc. When the value of the variable reaches z = 11, the condition will no longer be true. The program will not execute the loop and will go to the next line immediately after the loop curly brace.
Enough theory, let's move on to practice. Let's replace the for loops in the source code with while loops.
Flasher performed by the FOR cycle:
for (int i = 1; i<= blinkNumberGreen; i++) // launch cyclefor
{
Serial. print("Green flashed");
Serial.println(i);
digitalWrite(greenLed, HIGH); //turn on green Light-emitting diode
delay(timeOnGreenLed); //we wait
digitalWrite(greenLed, LOW); //turn off green Light-emitting diode
delay(timeOffGreenLed); //we wait
}
Flasher in WHILE cycle:
int i=1; //declare a variable and assign it the value 1
while (i<= blinkNumberGreen)
{ // launch cyclewhile
Serial.print("Green blinked «);
Serial.println(i);
digitalWrite(greenLed,HIGH); //turn on green Light-emitting diode
delay(timeOnGreenLed); //we wait
digitalWrite(greenLed,LOW); //turn off green Light-emitting diode
delay(timeOffGreenLed); //we wait
i= i+1 //increase the value of the variable by 1
}
Save the program and load the firmware into the controller. Let's look at the result.

Loops using statements for And while are one of the most important constructs of the C++ language that underlies Arduino. They are found in absolutely every sketch, even if you don't know it. In this article, we will take a closer look at loops, find out what is the difference between for and while, how you can simplify writing a program with their help, and what mistakes should be avoided.
If you are still a novice programmer and want to understand what a loop is and why it is needed, look at the next section of this article with a detailed description.
The WHILE operator is used in C++ and Arduino to repeat the same commands an arbitrary number of times. Compared to the FOR loop, the WHILE loop looks simpler; it is usually used where we do not need to count the number of iterations in a variable, but simply need to repeat the code until something changes or some event occurs.
WHILE syntax
while(<условие или список условий>)
{
<программный блок, который будет повторяться>
}
Any language construct that returns a Boolean value can be used as conditions. Conditions can be comparison operations, functions, constants, variables. As with any other logical operations in Arduino, any value other than zero will be perceived as true, zero – false.
// An endless loop while(true)( Serial.println("Waiting..."); ) // A loop that runs until the value of the checkSignal() function changes while(!checkSignal())( Serial.println("Waiting..."); )
Note that the while statement can be used without blocking the block with curly braces, in which case the first command encountered after the loop will be repeated. It is highly not recommended to use while without curly braces, because in this case it is very easy to make a mistake. Example:
While(true) Serial.print("Waiting for interruption"); delay(1000);
In this case, the inscription will be displayed in an endless loop without pauses, because the delay(1000) command will not be repeated. You can spend a lot of time catching such errors - it's much easier to use a curly brace.
Usage example while loop
Most often, while is used to wait for some event. For example, the readiness of the Serial object for work.
Serial.begin(9600); while (!Serial) ( ; // Some Arduino boards require you to wait until the serial port is free)
An example of waiting for a character to arrive from external devices via UART:
While(Serial.available())( int byteInput = Seria.read(); // Some other actions)
In this case, we will read the values as long as Serial.available() returns a non-zero value. Once all the data in the buffer runs out, the loop will stop.
FOR loop in Arduino
In the FOR loop, we have the opportunity not only to set boundary conditions, but also to immediately define a variable for the counter and indicate how its values will change at each iteration.
FOR loop syntax
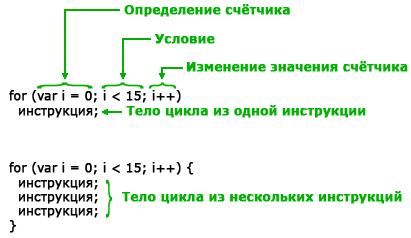
Here the design will be a little more complicated:
for
(<начальное значение счетчика>;<условие продолжения выполнения цикла>;<изменение значения счетчика на каждом шаге>){
<список_команд>
}
The simplest example:
For(int i=5;i<10;i++){ // Конструкция «3 в одном» pinMode(i, OUTPUT); }
We immediately created a variable, initialized it, and indicated that at the end of each cycle the counter value should be increased by one. And that's it - now you can use the variable inside the loop.
The variable step may be different. Here are examples:
- for(int i=0; i<10; i=i+2) // Шаг 2
- for(int i=0; i<10; i+=2) // Аналогичен предыдущему
- for(int i=10; i>0; i–) // Go back – from 10 to 1
do while loop

In some cases, we need to organize the loop in such a way that the instructions of the block are executed at least once, and then the check is carried out. For such algorithms, you can use the do while construct. Example:
Do ( Serial.println("Working"); ) while (checkSomething());
This version of the loop does not present any difficulties - we simply moved the block with the conditions down, so all the contents inside the curly braces after the do operator will be executed before the first check.
Continue and break statements
There are situations when you need to urgently interrupt the execution of a loop inside a loop block, without waiting to move on to the condition checking block. To do this you can use the operator break:
While (true) ( if (checkSomething()) ( break; ) )
If we simply want to stop the progress of the current iteration, but not exit the loop, but go to the condition checking block, then we must use the operator continue:
While (true) ( if (checkSomething()) ( continue; ) )
The continue and break statements can be used with all variants of FOR and WHILE loops.
Nested loops in Arduino
Any variants of loops can be easily combined with each other, making nested structures. Variables defined in the block of the “overlying” loop will be available in the inner one. The most common example of this kind of loop is traversing two-dimensional arrays. In the following example, we use a double loop: the first one will iterate through the rows (variable i), the second, nested, will loop through the columns (variable j) of the array, which we defined in the variable arr.
Int arr; void setup() ( for (int i = 0; i< 10; i++) { for (int j = 0; j < 3; j++) { arr[i][j] = i * j; Serial.println(arr[i][j]); } } }
More about cycles
If you've never worked with loops, let's dive a little into the world of theory and figure out what loops are and why we need these mysterious language constructs.
Why do we need a loop?
In fact, the main task of the loop is to repeat the same language constructs several times. This need arises in almost every program, and certainly not a single Arduino sketch can do without a loop - the loop() function is also called in an infinite loop.
Let's look at the following example. You need to supply power simultaneously to 5 LEDs connected to the Arduino board from pins 5 to 9. The most obvious option for this would be to place five instructions in a row:
digitalWrite(5, HIGH);
digitalWrite(6, HIGH);
digitalWrite(7, HIGH);
digitalWrite(8, HIGH);
digitalWrite(9, HIGH);
Let’s ignore for now the issue of the riskiness of such an action, because the simultaneous inclusion of such a number of LEDs creates an increased load on the board’s power circuit. The main thing for us now is that we have created five lines of code, each of which differs from the others by only one digit. This approach has the following disadvantages:
- With any change, you will have to make changes to many lines simultaneously. For example, if we need to switch the LEDs to pins 2 to 6 or turn off the voltage instead of turning it on, we will have to make 5 changes in the code. What if there are more instructions and changes?
- Large code with a large number of similar instructions is inconvenient and unpleasant to read. Five identical lines are not very scary. But the habit of dirty code will eventually lead to tens and hundreds of extra pages in the listing, which will make both you and your colleagues despondent.
- In the process of “copy-pasting” almost identical instructions, you can easily make a mistake, for example, forgetting to change the pin number: digitalWrite(5, HIGH); digitalWrite(5, HIGH);
- You can easily fail an interview at any normal software company by showing the interviewer this code.
From all of this, we can conclude that reusing the same strings over and over again should almost always be avoided and replaced with loops. Moreover, in many situations it is impossible to do without cycles; nothing can replace them. You cannot change the number of times the code is repeated while the program is running. For example, you need to process each element data array, received from external devices. You will never predict how much data there will be, how many times the processing will be repeated, and therefore you will not be able to insert the required number of instructions at the time of writing the article.
And here cycles come to our aid.
Syntax rules
Loop in Arduino is a special program block that will be called a certain number of times during program execution. Within this block, we describe the commands themselves that will be called and the rules by which the controller will determine how many times they need to be called.
In our example above, we could tell the controller the following:
Repeat the command digitalWrite 5 times
In an ideal world with robot programmers, this would probably be enough, but since we are talking to the computer in C++, we need to translate this phrase into this language:
Repeat the command – you need to use special instructions that tell the controller that something interesting is about to begin with while or for loops
digitalWrite – leave it as it is, but write it once and enclose it in curly braces. What to do with the pin numbers - just below.
5 times – use a counter for this, which will increase with each repetition. At the beginning (or end) of a block, you can compare the value of this counter with a limit value (in this case 5) using a comparison operation.

Let's look at an example of such a "translated" loop command with a while statement:
Int counter = 0; // A variable that will store the counter value // We ask the processor to repeat the construct in the curly braces until the condition in the parentheses returns true. // In our case, counter is our counter, 5 is the limit value, the condition is that the counter value is less than 5. // But we can specify completely different logical operators while (counter< 5) { digitaWrite(5, HIGH); // Будем включать светодиод counter++; // Увеличиваем значение счетчика } // Дойдя до сюда, исполняющий процессор переместится в начало блока и опять займется проверкой условий. Если условия вернут истину, команды в блоке между { и } выполнятся еще раз. Если условие не выполнится - процессор переместится к концу блока и пойдет дальше. Этот цикл больше его не заинтересует.
For those who noticed an error in the given code, we give a five and write the loop block differently:
While(counter< 5) { // Вот теперь мы будем включать разные светодиоды, с 5 (0+5) по 9 (4+5) digitalWrite(counter + 5, HIGH); counter++; }
The same result can be achieved using a FOR loop:
For(int counter =0; counter<5; counter ++){ digitalWrite(counter+5, HIGH); }
As you can see, in this case we immediately place all the necessary operations with the counter into one FOR instruction - this is much more convenient if you need to count the required amount.
You can get detailed information about the rules for using loops in the relevant sections of this article.
Conclusion
In this article, we looked at very important constructs of the Arduino language: FOR and WHILE loops. You can find these operators in almost any more or less complex sketch, because without loops many operations on data would be impossible. There is nothing complicated in the syntax of loops - you can easily get used to them and can actively use them in your projects.
/ /
For operator
Design for used to repeat a block of statements enclosed in curly braces. The increment counter is typically used to increment and terminate a loop. Operator for Suitable for any repetitive activity and often used in conjunction with data/output collection arrays.
Loop header for consists of three parts:
for (initialization; condition; increment) (operators executed in a loop)
Initialization is performed first and only once. Each time in the loop, a condition is checked, if it is true, a block of statements and an increment are executed, then the condition is checked again. When the boolean value of the condition becomes false, the loop ends.
Example
// Dimming the LED using PWM pin int PWMpin = 10; // LED in series with a 470 ohm resistor for 10 pins void setup() ( // no setup needed) void loop() ( for (int i=0; i<= 255; i++){ analogWrite(PWMpin, i); delay(10); } }Cycle for C is much more flexible than loops for in other programming languages, for example, BASIC. Any or all three header elements may be omitted, although semicolons are required. Also, the loop initialization, conditional, and increment statements can be any valid C statement with independent variables, and use any C data type, including floats. These are unusual for the cycle for operator types make it possible to provide a software solution to some non-standard problems.
For example, using multiplication in a loop counter operator allows you to create a logarithmic progression:
For(int x = 2; x< 100; x = x * 1.5){ println(x); }
Generated: 2,3,4,6,9,13,19,28,42,63,94
Another example, smoothly decreasing or increasing the signal level to an LED using one cycle for:
Void loop())( int x = 1; for (int i = 0; i > -1; i = i + x)( analogWrite(PWMpin, i); if (i == 255) x = -1; // switching control at maximum delay(10); ) )
