Self-assembled PC. How to assemble a computer yourself from components. Connecting power to the motherboard
It is worth noting the following point. Budget motherboards are equipped with a 4-pin CPU power connector. So, we divide the existing 8-pin cable into two 4-pin cables with our hands and connect to the board. Expensive motherboards, on the contrary, are equipped with an additional connector in addition to the 8-pin connector. The trick is that in this case everything will work from one 8-pin wire. An additional port is needed if, for example, you seriously overclock the central processor. But then you will need an accompanying power supply or adapter.
Step #5: installing storage drives and optical drive
For desktop PCs, there are two most common drive form factors: 2.5-inch and 3.5-inch. Plus, solid-state drives with an M.2 connector are gaining popularity. As for the latter, everything is simple with this form factor: the device is installed directly into a port soldered on the motherboard. But 2.5- and 3.5-inch drives must first be secured in the case.
In 99% of cases, the case is equipped with a special basket with a slide. The manufacturer also indicates in the specifications the number of slots for 2.5- and 3.5-inch drives, as well as 5.25-inch devices. In the case of the Fractal Design Define R5, two metal baskets are used. The first (top) can accommodate five 3.5-inch or the same number of 2.5-inch drives. The second (bottom) is three. In some cases these baskets may be removable. Plus, this particular case has two seats for 2.5-inch drives behind the chassis.
Not all computer cases optionally support the installation of 2.5-inch drives. True, many SSD manufacturers complete their products with special adapters for 3.5-inch sleds. They are usually packed in cardboard boxes, but not sealed in a blister.
Water from precipitation and melting snow must be drained both from the surface of the roof and from the entire building. Modern manufacturers offer a huge selection of products that satisfy the needs of any homeowner or developer. The presented systems are characterized by simple installation, are characterized by long-term trouble-free operation, have an excellent design and a variety of colors.
With initial knowledge and following the rules for installing a drainage system, even a novice craftsman can complete the work. The instructions available from all manufacturers are of great importance during installation.
Design features and types of roof drainage
A drain is a structure consisting of gutters and pipes. The diametric cross-section of its parts is selected in accordance with the volume of wastewater exerting pressure on the roof.
Special brackets and hooks are used to attach gutters to the building. The pipes are connected to the gutters using funnels, and the pipes are fixed to the walls of the house using clamps.

The drain consists of different elements that are selected in accordance with the exterior of the house:
- Corner elements are used to join the parts of the gutters in the corners of the building.
- Plugs and gutter connection elements.
- Using a pipe elbow, pipes are connected at a bend.
- Pipe ends add a finished look to the entire structure.
Shapes and sizes
Parts of the drainage system can be rectangular or round in shape. The parameters of the elements are determined by the area of the roof, with the gutter width in most cases varying from 10 to 20 cm, and the pipe cross-section from 7.5 to 12 cm.
In most cases, plastic or metal gutters are produced. Galvanized iron is not used due to its poor resistance to water. Sometimes you can find copper, titanium or zinc gutters, but the cost of such structures is very high.
The type and layout of the drainage system is determined at the design stage of the house. The main condition is that the structure must uninterruptedly perform its assigned task and be an integral part of the overall exterior of the building.

When installing a drainage system yourself, you need to take several points into account:
- The amount of precipitation that falls during the year in a region.
- Materials used for the facade and roof, as well as their colors.
- Roof dimensions and type.
- Architectural features of the house.
Before installing roof gutters, be sure to read the instructions from the system manufacturer.
Location of the drainage system and tools used
Drain pipes are located depending on the size of the roof overhang. If this parameter is less than 10 meters, one drain is installed. If the size of the overhang exceeds 10 meters, then two drains are installed.

Assembling a drainage system with your own hands is carried out with the following tools:
- Tape measure, string and marker or pencil.
- Scissors for cutting metal.
- A device used to bend hooks.
- Level.
- Rivet pliers.
- Screwdriver or drill.
- Hammer and rubber mallet.
How to assemble gutters with your own hands - step-by-step guide
When answering the question of how to properly assemble a drainage system, it should be noted that installation work requires the sequential implementation of all actions.
- At the first stage of work, hooks are installed. These elements can be short, long and adjustable. The hooks are attached to the bottom board of the sheathing, to or on the rafter leg. Each fastening is performed with a separate type of hook.

- The angle of inclination of the hooks is calculated; ideally, this parameter is 3 mm per linear meter. The hooks need to be laid out side by side, numbered and the fold line marked. Using a device for bending hooks, bend along the mark.

- When fixing the first hook, pay attention to the following: the outer side of the gutter should be located at a distance of no more than 2.5 cm from the visual continuation of the roof.

- A gap of about 90 cm is maintained between the hooks, tilting the system by 3 mm for each linear meter of the roof. Installation of the outer hooks is carried out at a distance of 10-15 cm from the edge of the roof.

When installing hooks on a rafter leg or sheathing batten, you should make a cut to align the surfaces of the element and the attachment points.
- To insert the funnel into the gutter, you need to make cuts. To do this, make a mark with a pencil or marker and make a slot with a hacksaw. Use pliers to give the funnel the appropriate shape and remove burrs.

The metal at the cut site must be treated with paint or a composition to protect against corrosion. The funnel must first be secured from the outside of the gutter, and then secured with a special clamp on the inside.
Before installing gutters, you need to place a cap on the end of each gutter, pressing it with your hands or hammering it with a rubber mallet. The finished drain is laid by lightly pressing the gutter near each hook.
It is very important that the constituent elements of the system are attached to the gutter before the final installation of the gutter system on the roof. - The gutters need to be connected to each other using connecting locks, so when installing, there must be a free gap of about 3 mm between the end ends. The sealing part is coated with sealant, drawing lines in the central and side parts. Then the back of the lock is attached to the inside of the gutter and the entire piece is pressed, moving towards the outside of the structure. The lock is snapped into place, secured with clamping parts.

- Similar actions are performed during the installation of corner elements at the bend points of the drainage system. In both cases, the gap left acts as an expansion joint that prevents destruction or deformation of the drain.

- The work is carried out according to the installation diagram of the drainage system. Pipe elements are attached to the walls using clamps spaced at 2-meter intervals, and they, in turn, are fixed with dowels.

Drains should be fixed no closer than 4 cm to the wall. The pipes should be cut with a hacksaw, but remember not to make a cut from the narrower side.
Connection and fastening of drainage system pipes
When assembling a drainage system, it is sometimes necessary to connect two elbows. To do this, perform the following steps: determine the distance between them and add 10 cm. These additional centimeters ensure that the connecting element fits into the end ends of the knees, 5 cm on each side.


The given instructions on how to assemble a drainage system are a description of the main stages of the work. All installation details are indicated in the manufacturer's instructions, since each product has its own characteristics.
Hello friends! If you are a computer enthusiast, then learn on your ownAssembling a computer will not be difficult for you.
When I wrote this article, I immediately showed it to a person who had never assembled a personal computer. He read it carefully and began asking me questions, from which I realized that the publication urgently needed to be supplemented with many little details, only then would it become understandable to beginners. As a result, I almost completely rewrote the article several times and only now am I offering it for your consideration.
In my last publication, I explained to you, but today we will independently assemble a classic PC.It is best to assemble a computer on a table so that you can see everything and be as comfortable as possible. Let's start withapplying thermal paste to the processor and installing it in the motherboard socket, then we assemble the processor cooler and connect it, after that we insert the RAM modules into special connectors on the motherboard, then mount the power supply into the case and tighten the wires, secure the SSD, HDD in the system unit, and only after that install the motherboard in the case...
First, we need to buy thermal paste and apply a thin layer to the processor. It is inexpensive and is usually sold together with a special hard card, with the help of which it is literally smeared over the surface. Why do you need thermal paste? During operation, the processor heats up very much and, with the help of thermal paste, effectively removes heat from itself to the cooling radiator.

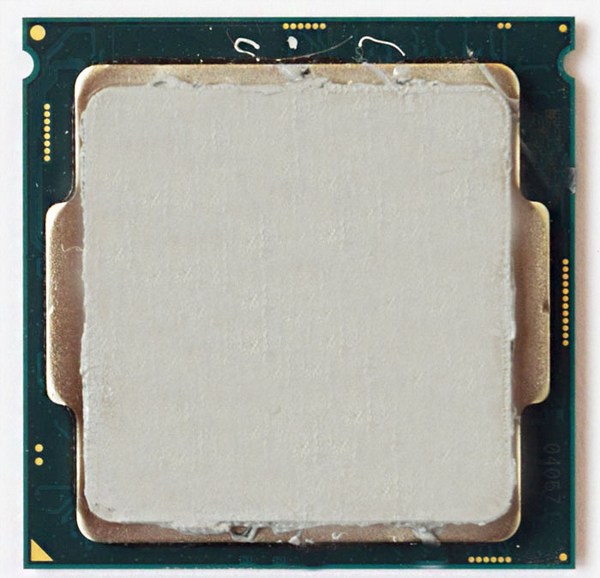
Installing the processor into the motherboard
Now let's install processor in, in my case i5 6400 and Asrock z170m pro4s. Install the processor into the socket very carefully and carefully so as not to damage it. This especially applies to AMD processors, since unlike Intel processors, which have contact pads, first there are so-called “legs”, bending which the processor will stop working. So, we open the socket on the motherboard using the side latch and look at the keys that show us how to insert the processor correctly.


We take the processor in our hands and see that it has corresponding recesses and a triangle in the corner, thanks to which it will be difficult to make a mistake during the installation process.

With a gentle movement of your hand, simply place the processor in the socket,

We make sure that it does not hang out there and close the side latch.

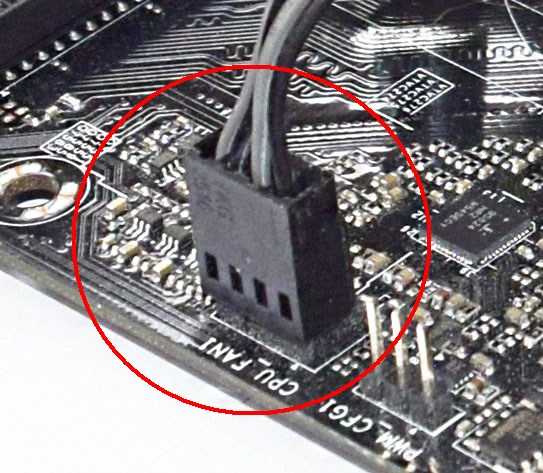
CPU cooler
Next, I prefer to outfit the motherboard in full and install RAM on it immediately, outside the case, because personally, with my large hands, doing this in a cramped space (inside the case) is problematic.
So, we look at the motherboard and see special connectors for mounting the cooler, and that’s where we’ll install it.


This is done simply, take the cooler, put the special legs into the holes and snap them into place.

After installation everything will look like this.


Don’t forget to also connect the cooler’s power to a special connector on the motherboard called CPU FAN.

RAM
power unit
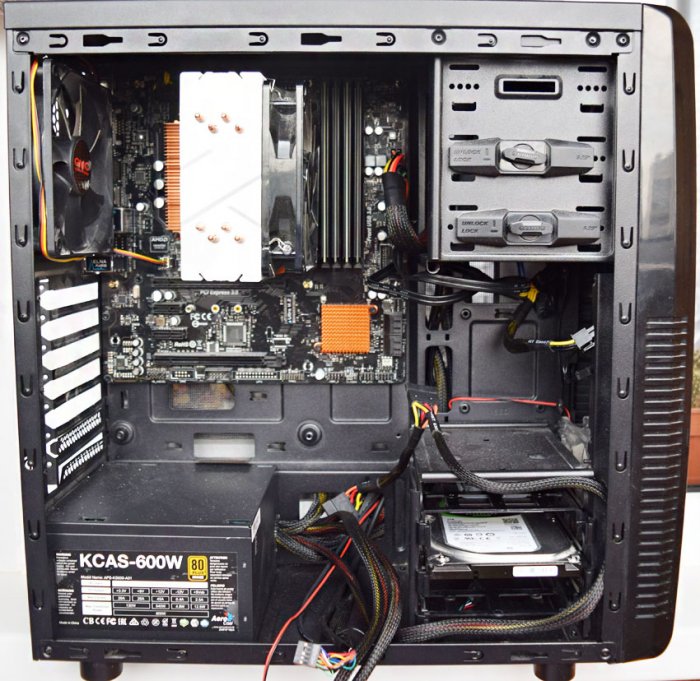
Now that the motherboard is fully charged, we proceed to installation in the case. Many people advise installing the motherboard into the case first, but I prefer and recommend that you start with the power supply, because if you follow my advice, you can stretch all the necessary wires properly and avoid damage to the motherboard, since the unit is usually very large and takes up a lot of space . One awkward move and you can easily damage the microcircuits - goodbye motherboard. In my case, the GMC Forge case and the Aerocool KCAS 600W power supply.
Installing the unit is a very simple process. We install, stretch the wires as desired and screw the screws into special holes on the back of the case.


I would like to note that the power supply is always installed so that the fan is directed downwards when the unit is mounted at the bottom. Inside the case you can tell your own microclimate and temperature, so it will be better if the power supply draws in cool air from the outside, rather than warm air from the inside.
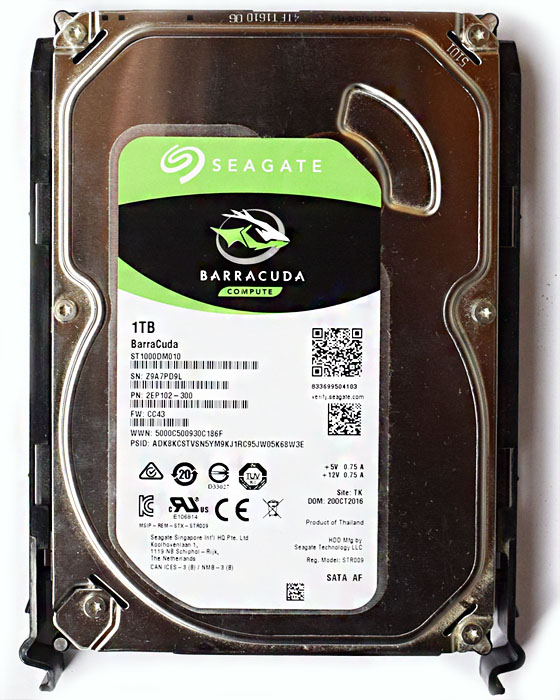
SSD and HDD
Now before installing the motherboard for the same reason as with the power supply. We insert the solid-state drive and hard drive into the corresponding cages, if they exist; if they do not, then simply screw them to the case. I will have a Patriot Spark 128gb and a Seagate Barracuda 7200 1000gb working hard on my system.


Motherboard
Let's move on to installing the motherboard into the case. The mother itself has special holes for fastening; depending on the model, the number of these holes may vary. We insert the motherboard into the case in accordance with these fasteners and tighten it with the screws that are included with the case.

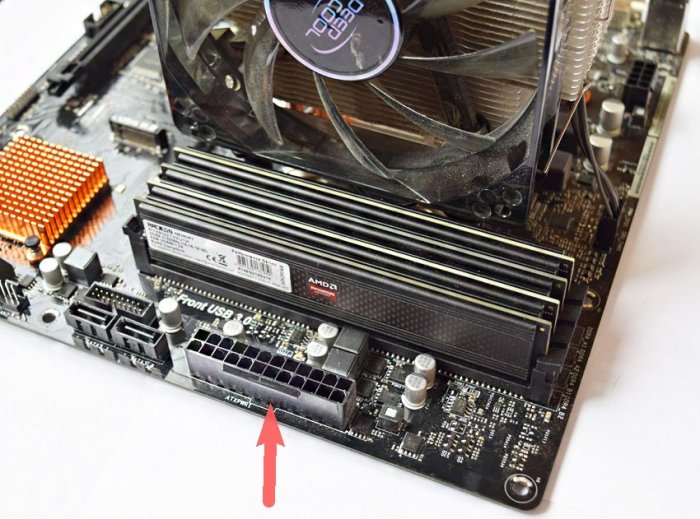
CPU power
And finally, all we have to do is connect all this stuff together. Let's start with powering the processor. The power connector can be 4pin or 8pin and is usually located directly next to the processor. We find the corresponding cable at the power supply and connect it.


Motherboard power


Case cooler
Let's move on to connecting case coolers for injection/exhaust. They are connected to the corresponding connectors on the motherboard with the name CHA FUN or SYS FAN or similar.


Now let's connect our drives using SATA interface cables to the corresponding slots on the motherboard.
Don't forget to connect additional power to our drives. In my case, this can be done from the back of the case.

A drip at home is done under unfavorable conditions, when there is a need for the procedure, but there is no opportunity to contact a qualified physician.
Advice: if you have the slightest opportunity to get a doctor at home who knows how to properly give intravenous injections and place IVs, use her. Intravenous injections have their own specifics and are fraught with serious complications (necrosis, infiltrates, blood clots).
Preparatory stage
Initially, you should prepare your workplace:
- the procedure is performed in a clean room;
- the surface where medicines and instruments will be placed should be disinfected;
- You need to wash your hands thoroughly.
Place on the prepared field:
- bottles with prescribed solution and medicine;
- syringe;
- tripod. If it is not available, use any hook and a plastic bag or a hook with Velcro (adhesive tape);
- ethanol;
- cotton wool;
- scissors;
- patch;
- sterile gloves;
- device (system) for intravenous infusion;
- catheter;
- medical tourniquet.

Advice: make sure that all prepared drugs correspond to those prescribed, they have not expired, the liquid in the bottles does not contain sediment, and the color corresponds to that described in the instructions.
System assembly
- Prepare a tripod or other device for hanging the bottle.
- Wash your hands thoroughly and wear sterile gloves.
- Open the bottle with the solution. Treat the rubber cover with cotton wool soaked in alcohol.
- Open the syringe package, assemble it (the needle is put on the cannula), put the instrument back into the package (its interior is sterile).
- Print out the medicine. Draw it up with a syringe and inject it into the bottle with the solution. Remove the tip of the syringe from the cap.

- remove the instrument from the packaging;
- move the regulator wheel to the opposite position - the lumen of the tube will be pinched;
- you need to find the end where the needle is;
- stick its tip into the cap of the bottle with the solution;
- there is another needle in the bag with the dropper; it is stuck next to the lid of the bottle;
- you need to find the extension of the system (the shape is a cylinder), where you need to squeeze it hard 2-3 times. This part is designed to control the rate of drug administration. After squeezing, it will be filled with solution approximately to the middle;
- put the free end of the device back into the packaging;
- move the dispenser wheel up;
- let the solution fill the system;
- when the liquid begins to pour out from the free end, lower the dispenser wheel down;
- inspect the device - you need to make sure that there is no air in it. Use the wheel on the regulator to drain some of the solution along with any air bubbles;
- Insert the free end of the dropper into the second unoccupied needle, which is inserted into the lid of the bottle with the solution.
The home drip system is ready for use.
Introduction
The bottle with the solution is raised up to a height of at least 1.5 m - installed on a tripod or suspended in another way available at home. The prepared tools should be located within reach.

Tip: the optimal place for self-infusion is the bend of the elbow or the front side of the palm. It is easier to find veins there, because the needle must clearly enter the venous vessel. Veins of the lower extremities are not recommended due to the increased risk of blood clots.
How to place an IV:
- pull your hand 10-15 cm above the elbow with a tourniquet, clench your hand into a fist and place your hand on a hard surface. Feel for the most visible and largest vein. Disinfect the injection site.
- Place the system in the working position - press the selected vein with the thumb of your left hand (fix it) below the intended injection site. With your right hand, take the needle that is installed at the second end of the system, point its cut upward and pierce the skin parallel to the vein, and then the vein itself at an angle of 45º. When it enters a venous vessel, you will feel a “failure”. Secure the device with a bandage at the point where it connects to the vein. If it is necessary to administer drugs intravenously for a long time, venous catheterization is performed. In any case, you need to find a suitable place and install a catheter;
- check the accuracy of the hit - dark red venous blood should appear from the other end of the needle;
- Lower the control wheel to select the optimal feed speed. If there are bubbles in the bottle, reduce it;
- release the tourniquet, unclench your fist. If a bulge forms at the insertion site of the IV, immediately close it and remove it from the vein.
At the end of the procedure, the regulator wheel rises up and the device is removed from the vein. The injection site is wiped with cotton wool soaked in alcohol and sealed with an adhesive plaster.
Safety
How to put in an IV without harming yourself:
- work only with newly opened sterile gloves;
- Do not administer drugs near areas affected by purulent inflammation;
- if thrombophlebitis is diagnosed, the procedure is prohibited;
- It is better to lie down during the IV drip, but you should not sleep - you should monitor the operation of the system and its integrity;
- After the drip, it is advisable to lie down for some more time (30-40 minutes); you should not get up suddenly.
Tip: To properly administer intravenous injections, the nurse needs experience. A newbie who is about to make his debut as a medic also needs a senior companion who can carry out the procedure and explain how the procedure should go to avoid problems.
And so in front of you are all these small and expensive parts that you recently bought, the assembly process may look like a complex task, but in fact the installation process is, at the same time, a relatively simple procedure. Having tools such as a paper cutter and a screwdriver will make this process much faster.
One of the important tasks is to ground yourself. This can be done by touching the metal case. You should also work on a non-conductive surface, such as a wooden table, or purchase an anti-static wrist strap to ensure you don't accidentally burn new components with static.
In short, remember to use common sense when working with your future computer. Don't pick up ingredients after shuffling wool socks around or putting fresh clothes out of the dryer. With that said, let's get started.
External assembly
Step One: Motherboard
We're going to start with the motherboard. Carefully remove it from the shipping box. Just make sure you don't put it on top of the anti-static bag it came in. As we already mentioned - the motherboard is the heart and soul of your system.
Step two: CPU or just processor
Inside the box labeled Intel or AMD will be a processor and a large fan called a heatsink or cooling system. A working cooler is a guarantee that the processor will not overheat. Carefully lift up the LGA socket on the motherboard to remove the protective cover. Remove the processor from the package and place it in the socket, observing the installation keys. Do not press as this may damage the contacts.
There is thermal paste on the bottom of the heatsink, which improves heat transfer between the processor and the heatsink. Find the power connector on the motherboard, and rotate the radiator accordingly so that it is in the correct position, and press the opposite diagonal pins. As soon as you hear the characteristic click, move on to the second pair of diagonal contacts. Press them down while holding the motherboard until they click.
Step Three: RAM
Installing RAM is a simple procedure. If your motherboard has more than two slots, be sure to look at the numbers and colors that correspond to each slot. In most cases it will be something like slot #1, 3, 2, and 4, or blue, black, blue and black. Open the latches on the sides of the memory slot, place the memory stick in slots 1 and 2, and press until it clicks. If you have 3-4 strips, you can place them in additional slots No. 3 and 4.
Internal assembly of the system unit
Step Four: Power Supply
Put the motherboard aside because it's time to move on to the power supply. Take your new power supply out of the box and place it inside the case, it will be located either on the top or bottom. Align the power supply with the holes located on the back. If you have a modular power supply model, then there is no need to connect all the power cables yet.
Step 5: Installing the Motherboard Inside the Case
Now it's time to install the motherboard into the case. Handle it carefully to connect external connectors such as front panel USB and headphone and microphone inputs.

Step 6: Video Card
The video card connects to the PCI Express port on the motherboard, with the rear port facing out. Pull back the PCI-e latch on the connector and carefully insert the card.

Step 7: Hard Drive, DVD Drive and Fans
Installing the hard drive is a relatively simple process; simply insert it into the dedicated slot, and secure it with screws. In most cases, you need to remove unnecessary plugs for the DVD drive on the front panel. Once they are removed, the drive is installed in the top bay and is similar to a hard drive. The drive must be securely fastened with screws.

If you purchased a wireless WiFi card, you need to connect it to the motherboard in the appropriate PCI slot. If you are using a USB wireless adapter, connect it to the USB port on the back of your computer.
Let's give life to a new computer
Step 8: Cables
The main components are installed and it's time to connect each component to a power source. First, connect the large 20+4 or 24-pin ATX connector to the motherboard, this connector should be located next to the RAM. Next, connect the 4-pin CPU auxiliary power connector to the motherboard, it can be found near the CPU.

For the video card, connect 1-2 6-pin PCI connectors to the rear. Next, connect a SATA power cable for the removable drives (hard drives and CD/DVD drives) and a 4-pin Molex connector for each of your case coolers.

Now you have to connect each device to the motherboard itself. The hard drive and DVD drive are connected using a SATA connector on the motherboard.

You must also connect the power buttons, LED connectors, and audio inputs and USB ports on the front panel, which must be plugged into the corresponding 8-pin USB connectors.
The power switch and LED connectors are in the first 8-pin connector, even though they will only consist of one or two pins.

Each motherboard is different, so we recommend connecting according to the instructions included with the motherboard.
Step back and look at your work with a critical eye. You've done it, you've built your first computer! If your system unit looks a little chaotic, you can restore order among the cords and cables using zip ties or wire. Keeping extra cables tied up will be much neater and safer.
Although the initial assembly process is complete, you still have a lot of work to do.
So, press the Power button!
In some cases, the first time you turn on your computer, assuming everything is connected correctly, the Basic Input Output System, or BIOS, settings will begin to work. A splash screen will appear on your monitor with information about the need to Press the “Del” button to enter the BIOS settings.
Inside the BIOS settings, you need to set the boot priority from the DVD drive. Then save the BIOS changes and restart your computer.
Step 10: System Installation
Power on the system and first insert the Windows installation disc into your DVD drive. If the operating system starts to install, then you just have to sit and wait. If not, then we must change some settings in the BIOS.
Select your language in the Windows Installer, and click on the “Install Now” button. After accepting Microsoft's terms, select "Custom Installation" and select the hard drive on which you want to install the operating system.
After Windows is installed on your computer, you should be prompted to create a username, enter a product key, and set the date and time.
Step 11: Drivers
The last step is to update the software drivers; they allow the operating system to interact correctly with each component. You can install them using the CD that came with each component, or go to the manufacturer's website and download them from the support or download section.
Step 12: Operation
You've spent several hours and several hundred dollars building a new computer, and the last thing you want to see is problems while building and setting up the computer. To avoid problems in the future, we recommend regularly cleaning the system unit.

Now you can download a new toy onto your freshly assembled computer and relax a little, you deserve it!
