How to manage sound and vibration settings. How to remove the maximum sound level limit
Every owner of a smartphone with the Android operating system has probably more than once encountered inconsistency in sound volume in different device options or the problem of speakers that are too quiet, even in maximum volume mode. This becomes especially unpleasant when the sound cannot be increased even through the phone settings. However, there are other ways, for example, using the engineering menu. Increasing the volume in this case is not difficult.
How the sound is adjusted on phones and tablets running Android OS (“Android”)
The developers have included different volume modes in the Android OS, designed for different situations of using the smartphone, which depend on the connected devices. Thus, without a headset, the sound on the phone can be quiet, but when headphones are connected, it can be suddenly deafening with the melody of an incoming call. It is to eliminate such misunderstandings that you need to adjust the sound and change the volume using hidden methods.
How to change the volume of alarm, ringtone, music and video through settings
You can control the sound on a smartphone running Android OS using the buttons on its body, as well as through the internal settings of the standard menu. The setup methods are the same for smartphones and tablets, so you can easily understand the functionality.
 Select the "Sounds and notifications" section
 Click on the gear next to the active mode
In the window that opens, depending on the system version, the following options for changing the volume will be available to you:
Adjust the settings so as to provide for all possible situations and prevent unexpected explosive sounds when a call or alarm rings.
 The window will contain all the items that can be changed through standard settings
Another reason for a call that is too loud or not quiet enough may be the installed ringtones themselves. Standard sounds are usually leveled in volume, but there may also be those that begin with bright, sharp sounds, unlike others where the sound increases slowly and gradually.
 A quiet ringing tone is one of the possible reasons why you may not hear your phone ringing
 To listen to a melody, press it with your finger
 By analogy with choosing a ringtone, configure notification sounds
 Mark only the sounds you need or set vibration
You can quickly change the sound level using the buttons on your smartphone or tablet. Manufacturers specially place these buttons on the body so that you can find them without looking and increase or decrease the sound. However, in this mode there are very few settings.
 You can adjust the volume using the usual buttons on the phone body.
 Pressing the volume up or down buttons will display the corresponding sliders on the device screen.
In some models, from this screen you can go to detailed settings by clicking on the corresponding icon to the right of the volume slider.
 Some devices display a special button to go to settings
Sometimes the smartphone spontaneously goes into silent or silent mode, for no apparent reason. This most often happens with Samsung, HTC and Lenovo devices. This situation may occur when changing the audio profile from quiet to loud, followed by an outgoing call. When the call is completed, the new profile may fail, and the gadget will mistakenly restore the previous one. The solution is to reboot the device after changing the sound profile. This problem is related to bugs in the firmware version and is usually fixed by developers with the release of updates.
Increasing volume through the engineering menu
You can make more flexible sound settings if you go to the Andoid engineering menu. However, this section of the device is not so easy to access. The developers specifically hid it from the eyes of ordinary users so that they could not change the settings and disrupt the operation of their device.
But for smartphone owners who want to understand everything and thoroughly study the operation of their device, the ability to access such settings is a real gift.
Do not forget that thoughtlessly changing parameters in the engineering menu can lead to malfunction of the gadget.
Before changing anything, you need to read all the available information on this item, compare it with how it looks on your device, and think about how you can quickly return everything back in case of unexpected behavior of the gadget. Only if you are confident in your own actions, you can proceed with the settings. It's best if you take a screenshot of the screen or copy the original values into Notepad before making changes so you can restore them back.
Opening the menu via call
To enter the engineering settings menu you will not need special efforts and Root rights. The menu is entered through the dialing interface using a special code.
The access codes to the engineering menu are different for all devices, as they are set by the manufacturer, not by the system. All of them will be presented in the table below.
You need to dial the entry code to the engineering menu in the same way as a regular phone number. The engineering menu usually opens on its own after typing the last character of the code. If this does not happen, press the "Call" key.
 Try different options if the first one doesn't work
Table: access codes
Opening the menu through the application
If none of the codes work for you, try downloading a special utility from the Play Market that will create a separate shortcut to go to the engineering menu.
 All applications for entering the engineering menu are the same, so you can choose any
 The application will weigh very little and installation will not take much time
 In some cases, you will need to check the manufacturer of your device
Increasing volume: step-by-step instructions
 Open the Audio section in the Hardware Testing tab
 The meanings of all modes are described in the table below
 The values of all sound parameters are described in the table below
 Set up the first and last levels first
 Set the volume gain and confirm the change
 Set the volume limit to the selected level and press Set
 Calculate the volume levels on the calculator and adjust the missing ones
Table: mode values for earpiece speaker, headphones and microphone
Table: description of audio parameters
Video: how to increase the volume through the engineering menu
How to increase volume through apps
In addition to standard settings and the system engineering menu, there are special programs that allow you to make additional changes to the sound parameters of your smartphone or tablet. Various programs do not work correctly on all devices, since they interfere with the normal functioning of the phone, and this is not welcomed by manufacturers. All of the programs described below are available in the Play Market.
You should also understand that such services for editing any smartphone restrictions that cannot be changed in normal ways can lead to disruption of the gadget’s operation and ultimately only worsen its performance.
Volume+ (the most reliable application)
This application is only available in English, but is the least conflicting and almost incapable of causing sad consequences for your smartphone.
 There is no point in downloading the paid version of Volume+
 Volume+ has a lot of features, but you won't need many of them
 Check Speaker Modifications and Virtual Room Effect
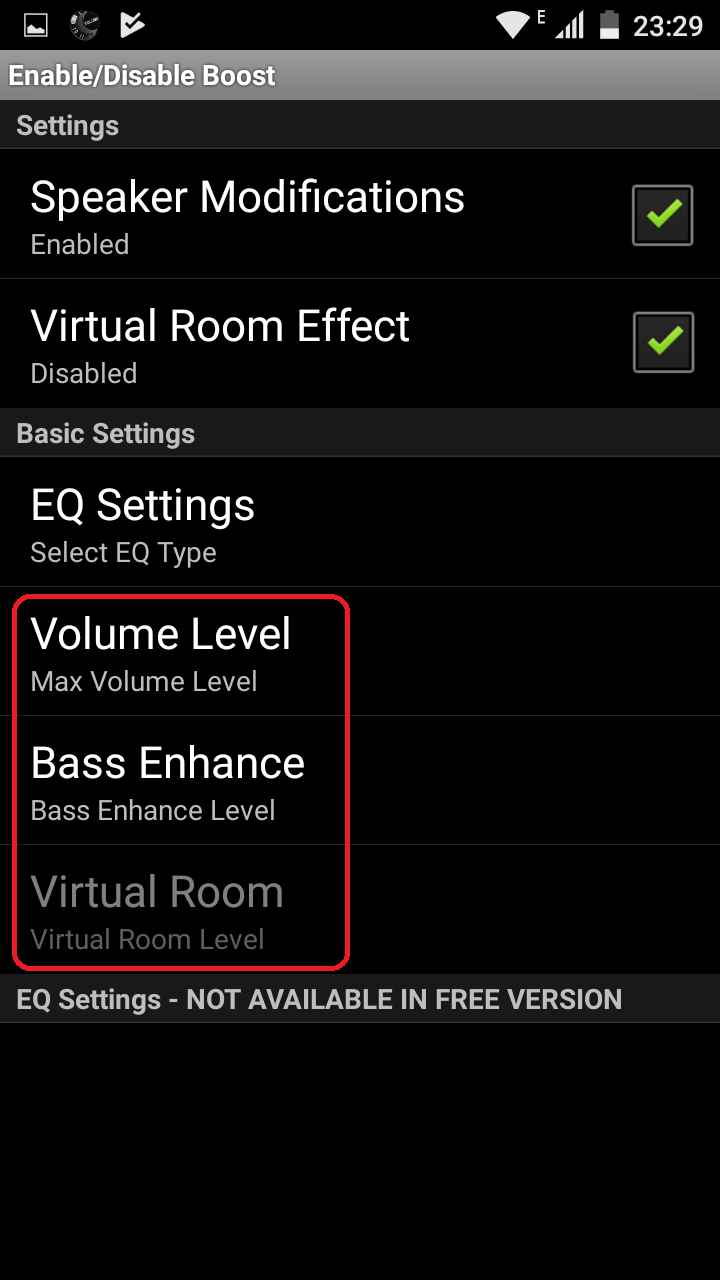 Increase the marked parameters by one notch and check the effect
A sharp increase in parameters can cause freezes, crashes and other troubles in the operation of the device.
JetAudio (equalizer and effects settings)
Jet Audio belongs to the category of equalizers and is a very functional program: it has an audio converter, player and ripper. Equalizer is just one of its options. The standard sound mode it uses is Normal Mode.
 JetAudio may be called a player or an equalizer, but they are the same program
 If the “Equalizer” button is accessible from the main screen, click on it
 If the “Sound Effects...” button is missing, find the equalizer through “Settings”
 The rest of the buttons that appear may also be useful to you, especially the sound amplifier
 All changes made can be very easily returned back
The parameter with a value of 60 Hz must be left unchanged.
Do not forget that by increasing the volume of the sound, you lose in its quality, since not all models of smartphones and tablets are designed for good melodies. Some devices have weak speakers, excess load on which will cause wheezing and extraneous sounds. Don't let the speaker burn out and take care of your gadget.
Volume Booster Plus (automatic sound adjustment)
The program is available in the Play Market app store and is the easiest to use.
 Volume Booster Plus is the easiest to use volume control software
 After installing and launching the application, you will see only one button that you need to click on.
 After pressing the button in Volume Booster Plus, automatic optimization of volume parameters will begin
 Ways to strengthen the speaker using improvised means
There are some neat tricks that can help you increase the audio volume on your device in a very simple way. To do this, you will only need available materials and minimal knowledge of the laws of physics.
How to remove the maximum sound level limit
Manufacturers of smartphones and tablets often set software restrictions on changing volume settings. That is, using the interface, you can set one sound level, but in reality the gadget will make sounds much quieter than you would like.
There is an opinion that to bypass this limitation, you need to reset the gadget settings to factory settings. However, there is no exact data on how this will affect your device specifically. There are a lot of gadget models; each manufacturer follows its own logic when setting standard settings. Resetting the settings will inevitably lead to the deletion of data on the phone. Therefore, if the effect of volume-increasing applications is not enough for you, be well prepared and back up the information from your device.
Reset the settings to factory defaults, and then select the North America region as the default for your gadget. This is because smartphone manufacturers impose such restrictions in some countries, where societal norms may prohibit the use of settings that could violate the rights of others.
One of the main problems of cheap smartphones is the poor quality of the built-in speakers, which causes serious difficulties in sound reproduction. However, several simple methods, from built-in parameters to using improvised tools, will help owners of smartphones with Android OS quickly navigate the situation and change the sound settings to more comfortable ones.
One of the most frequently used actions in Windows is changing the volume. It’s good if you have a laptop - there are usually volume control keys combined with function keys. But what if you have a simple PC keyboard with no multimedia keys?
In order to solve the problem, you will have to cheat a little. We will need the NirCmd program, which you can download. Now unpack it to any convenient location on your disk and remember the path to nircmd.exe. Create a shortcut on your desktop and write in it path to nircmd.exe and team changesysvolume 3000. The sound volume changes in the range from 0 to 65535, that is, a step of 3000 means a change in volume by 5% (you can do any step if desired):

Select any shortcut name (for example, “Volume Up”) and save it. Now when you start it, the volume will increase by 5%. But, of course, constantly launching a shortcut is inconvenient, so right-click on it > Properties and in the shortcut enter a keyboard shortcut that is convenient for you (it’s worth considering that such an increase in volume will work throughout the system, so choose the combination that does not work in any of your programs - for example, Ctrl + Shift + =, where there is a “plus” on one button with “equals”):

That's it, now when you press a given key combination, the sound will increase. In order to reduce the sound, create another shortcut, but write the command with a minus: for example, changesysvolume -3000.
Despite the popularity of online music distribution, many users continue to listen to their favorite tracks the old fashioned way - by downloading them to their phone, player or PC hard drive. As a rule, the vast majority of recordings are distributed in MP3 format, the disadvantages of which include volume issues: the track sometimes sounds too quiet. You can fix this problem by changing the volume using special software.
There are several ways to change the volume of an MP3 track. The first category includes utilities written specifically for this purpose. The second includes various audio editors. Let's start with the first one.
Method 1: Mp3Gain
A fairly simple application that can not only change the recording volume level, but also allows for minimal processing.

This solution would seem ideal if you did not take into account clipping - distortion introduced into the track caused by increasing volume. There is nothing you can do about it, this is a feature of the processing algorithm.
Method 2: mp3DirectCut
A simple, free audio editor has the necessary minimum of functions, including the option to increase the volume of a song in MP3.
- Open the program, then follow the path "File"—"Open…".

- A window will open "Conductor", in which you should go to the directory with the target file and select it.

Upload the recording to the program by clicking on the button "Open". - The audio recording will be added to the work area and, if everything went correctly, a volume graph will appear on the right.

- Go to menu item "Edit", in which select "Select all".

Then, in the same menu "Edit", select "Gain…".
- The gain settings window will open. Before touching the sliders, check the box next to "Synchronously".
For what? The fact is that the sliders are responsible for the separate gain of the left and right stereo channels, respectively. Since we need to increase the volume of the entire file, once synchronization is turned on, both sliders will move simultaneously, saving you from having to adjust each separately. - Move the slider lever up to the desired value (you can add up to 48 dB) and press "OK".

Notice how the volume graph in the work area has changed. - Use the menu again "File", however this time select "Save all audio...".

- A window for saving the audio file will open. Change the name and/or save location as desired, then click "Save".

mp3DirectCut is already more complicated for the average user, even if the program interface is friendlier than that of professional solutions.
Method 3: Audacity
Another representative of the class of programs for processing sound recordings can also solve the problem of changing the volume of a track.
- Launch Audacity. From the tools menu, select "File", then "Open…".

- Using the file adding interface, navigate to the directory containing the audio recording you want to edit, select it and click "Open".

After a short download process, the track will appear in the program
- Use the top panel again, now the item "Effects", in which select "Signal Boost".

- The Apply Effect window will appear. Before you start making changes, check the box "Allow signal overload".

This is necessary because the default peak value is 0 dB, and even in quiet tracks it is above zero. Without enabling this item, you simply cannot apply the gain. - Using the slider, set the appropriate value, which is displayed in the window above the lever.

You can preview a fragment of the recording with a changed volume by pressing the button "Preview". A small life hack - if the window initially displayed a negative decibel number, move the slider until you see "0.0". This will bring the song to a comfortable volume level, and setting the gain to zero will eliminate distortion. After carrying out the necessary manipulations, press "OK". - The next step is to use it again "File", but this time choose "Export audio...".

- The project saving interface will open. Change the destination folder and file name as desired. Required in the drop down menu "File Type" select "MP3 files".

Format options will appear at the bottom. As a rule, nothing needs to be changed in them, except perhaps in the paragraph "Quality" worth choosing "Insanely high, 320 Kbps".
Then click "Save". - The Metadata Properties window appears. If you know what to do with them, you can edit them. If not, leave everything as it is and press "OK".

- When the saving process is completed, the edited entry will appear in the previously selected folder.

Audacity is already a full-fledged audio editor, with all the disadvantages of programs of this type: an interface that is unfriendly for beginners, cumbersomeness and the need to install plug-in modules. True, this is compensated by its small footprint and overall performance.
Method 4: Free Audio Editor
The latest representative of audio processing software for today. Freemium, but with a modern and clear interface.

One of the most frequently used actions in Windows is changing the volume. It’s good if you have a laptop - there are usually volume control keys combined with function keys. But what if you have a simple PC keyboard with no multimedia keys?
In order to solve the problem, you will have to cheat a little. We will need the NirCmd program, which you can download. Now unpack it to any convenient location on your disk and remember the path to nircmd.exe. Create a shortcut on your desktop and write in it path to nircmd.exe and team changesysvolume 3000. The sound volume changes in the range from 0 to 65535, that is, a step of 3000 means a change in volume by 5% (you can do any step if desired):

Select any shortcut name (for example, “Volume Up”) and save it. Now when you start it, the volume will increase by 5%. But, of course, constantly launching a shortcut is inconvenient, so right-click on it > Properties and in the shortcut enter a keyboard shortcut that is convenient for you (it’s worth considering that such an increase in volume will work throughout the system, so choose the combination that does not work in any of your programs - for example, Ctrl + Shift + =, where there is a “plus” on one button with “equals”):
That's it, now when you press a given key combination, the sound will increase. In order to reduce the sound, create another shortcut, but write the command with a minus: for example, changesysvolume -3000.
Instructions
Open the recording in Adobe Audition using the keyboard shortcut Ctrl+O. You can use the Open command from the File menu. You can do it even easier by right-clicking on the file that needs processing and selecting the “Open with...” option in the context menu. Select Adobe Audition from the list of programs that offer to open the file.
Enlarge volume records using the Normalize filter. To do this, open the filter settings window with the Normalize process command from the Amplitude group, which after a short search can be found in the Effects menu. Enter the percentage value to which you want to increase volume, in the Normalize to field. Click OK.
Listen to the result by pressing the Spacebar. If you think that volume is not enlarged enough, cancel the previous action using the Ctrl+Z key combination, open the Normalize filter settings window again and enter a different numeric value.
Save the recording with an enlarged view volume Yu. To do this, use the Save As command from the File menu. In the window that opens, select the location to save the file, and enter the file name in the “File name” field.
From the File Type drop-down list, select the file format you want to save. If your source was in mp3 format, you will be prompted to save the modified file in the same format. Click the Options button and select the bitrate of the saved file from the drop-down list. It would be quite reasonable to save the record with the changed volume yu with the same bitrate that was in the source file, unless, of course, you need to reduce the weight of the file. The bitrate of the source file can be found using the File Info command from the File menu. The same thing happens if you use the keyboard shortcut Ctrl+P. Having selected the bitrate of the saved file, click on the OK button in the codec settings window and on the Save button in the “Save As” command settings window.
Sources:
- How to change audio volume (songs, mp3) in Adobe Audition.
When organizing any special event, we often think about musical accompaniment. Naturally, we want the music we use to sound as loud as possible, because it is often what creates the overall mood of the event, and half the success of the event depends on the correctly selected soundtrack. There are several options for increasing the volume of the audio track.
You will need
- - amplifier
- - acoustic system
- - computer
- - Internet
Instructions
The first option is the simplest. Adjust the equalizer levels so that either all points are at the maximum level, or individual frequencies are overestimated. Use this option depending on what effect you want to achieve - increasing the overall volume or individual frequencies.
If you can connect an amplifier to the speakers, use this option. The amplifier increases the volume of the reproduced phonogram, but the most important thing is to correctly select it in accordance with the power of your speaker system. Consult seller for best fit.
There is also an option to programmatically increase the volume of the audio track. For this you need any music editor. Normalize volume track to the desired level and check if the sound is normal, then save the changed track on your computer. Remember that the music should sound loud, but without interference or distortion.
Modern software for digital playback allows you to manipulate playback parameters (for example, sound volume) within very wide limits. However, sometimes this is not enough for comfortable viewing. In this case, you can make the video louder by processing it in a video editor.

You will need
- - video file;
- - VirtualDub 1.9.9 (available for download at virtualdub.org).
Instructions
Load into VirtualDub editor. Use the hot keys Ctrl+O, or in the main menu, click on the "Open video file..." item in the "File" section. In the file open dialog that appears, go to the required directory. In the directory listing, select the video file. Click on the "Open" button.
Activate direct video stream data transfer mode. Open the "Video" section of the main menu and check the "Direct stream copy" checkbox. This will avoid processing while saving it, thereby increasing the overall processing speed many times over and preventing image quality degradation.
Enable full processing of the audio data stream. In the main menu, expand the "Audio" item and check the "Full processing mode" checkbox.
Make the video louder. Open the "Audio volume" dialog by sequentially selecting the "Audio" and "Volume..." menu items. In the dialog, set the "Adjust volume of audio channels" switch to active. Then, by moving the slider below to the right, select the desired sound level relative to the original (the current value in decibels and percentage is displayed to the right of the slider). Click "OK".
Find out the current characteristics of the audio data stream. Click on the "Audio" and "Conversion..." items or press Ctrl+N. Note the sampling rate value shown in parentheses after the “No change” text located in the “Sampling rate” control group.
Configure audio stream encoding parameters. In the main menu, select "Audio" and "Compression...". In the "Select audio compression" dialog, select your preferred encoder in the left list. The list on the right will display a listing of the available encoding modes. Select one of the modes with a sample rate value equal to the value obtained in step five. Click "OK".
Save the video. On your keyboard, press F7, or select "File" and "Save as AVI..." from the menu. Specify the name and path to save the file. Click on the "Save" button.
Wait for the video recording to finish. If the volume of audio data is large enough, the process may take quite a long time. The elapsed and estimated save time will be displayed in the "VirtuaDub Status" dialog.
Video on the topic
note
Increasing the audio level too much can cause distortion in the resulting video.
When listening to your favorite music, sometimes you want it to sound as loud as possible, even if it is played at maximum volume. You can increase your playback volume in a few simple steps.

Instructions
Use equalizer settings to maximize playback volume. They are present in almost every player and listen to adjust the sound according to the type of track being played. By maximizing all the equalizer settings, you can make the volume as loud as possible.
Use an audio editor to change the volume of a track. The best option would be to use Sony Sound Forge or Adobe Audition. These editors have the best compression quality. Use normalization and volume boost effects. Make sure that when changing the volume the euphony is not lost. You can also calibrate the track according to the frequencies that should be played loudest. Use the Graphic Equalizer effect. Increase the frequencies that need to be increased, then save the result.
To process multiple files, use the Mp3Gain program. With its help, you can increase the volume of several tracks. To do this, just install this program and after launching, add for processing those files that you want to process. Please note that this editor does not allow you to undo changes made, so it is best to use the "Save a copy" option. This way, all the tracks you edit will remain unchanged, and you will end up with copies of them with increased volume.
Most headphones that come with audio players have an impedance of 32 ohms. Look for headphones that have an impedance of 16 ohms, as they allow you to play tracks at higher volumes. You can also use noise canceling headphones. With their help, external sounds will be heard to a lesser extent, so the music will sound clearer.
Video on the topic
It is impossible to improve the quality of video or audio if initially these parameters did not have the highest values. But when encoding video into another format, you can set the maximum possible settings for audio, which will preserve its quality.

You will need
- - video converter.
Instructions
Open your movie using a video converter program that can be easily obtained on the Internet. When choosing, pay attention to the file formats it supports, so that the resolution of the converted record matches the list of working elements of the program.
You can use the “Pocket Divx Encoder” utility. Download the program of your choice from the official website of the developer, check the installer for viruses and complete the installation according to the menu instructions. Please note that you may also need additional codecs installed on your computer to perform conversion operations.
In the converter menu, select the format into which encoding will be performed. Open the conversion parameters and in the section responsible for sound settings, set the maximum values. You will most likely be asked to choose from two formats. Changes in the quality of sound parameters will not be noticeable, however, in some cases changes for the better occur.
Perform the conversion and wait until the operation is completed. During this time, try not to overload your computer by running games or other programs that heavily use system resources.
If you have videos in .mkv format, use a program specifically designed for editing them. Change the desired audio track by extracting it from the file and then transcoding it to a higher bitrate with an audio converter.
