1c data upload. Publications. Exchange of order information
Transferring information between databases is one of the tasks of their support and administration. For its effective implementation, processing is created in automated 1C complexes. They greatly facilitate routine work, speed up the processes of uploading and downloading information and at the same time implement control over its correctness. Uploading from 1c to xml allows you to create a file with the contents of any configured configuration object, and use it when you need to upload data to an identical configuration.
Tools for creating uploads
To export information contained in databases, the xml format is mainly used. For 1C, many processing methods have been developed (for example, UploadLoadDataxml82 epf), with the help of which it is possible to output and load data to a file. In this case, the user must receive a file of a certain structure, which allows the information stored in it to be loaded into the native database or transferred to another location. When creating an upload, the following rules must be observed:
- Save the created files until complete recovery and completion of procedures for verifying the correctness of the transferred information;
- If you use processing as a backup tool, create separate subfolders for data copies and keep a log of them for quick retrieval.
Supplied in the 1C user support program, which can be found on the ITS website or disks, it is an excellent tool for exporting and importing information. A computer user can upload both the entire database and its individual objects, and in addition to the actual export, various operations are performed to check information that help get rid of critical errors in the data. Processing 1c upload to xml works in two modes:
- Unloading. Creates a file containing user-defined pageable objects;
- Loading. Reads a previously exported file and writes the information contained in it to the information base.
Processing allows you to check objects for invalid characters, and also includes a function for exporting information with restrictions.
Uploading can be used not only when exchanging information between 1C databases. With its help, you can ensure the integration of various complexes, for example, 1C and the Parus system. The versatility of the XML format allows you to create programs for transferring information for almost any information banks. Processing unloading and loading xml data– the most important tool for exchanging information.
The process of uploading data toxml
Let's look at how to upload from 1c to xml in normal mode. After downloading the processing UploadLoadDataxml.epf and opening it, you must perform the following steps:
- Select objects for export;
- Set up the necessary filters, for example, by period;
- Determine the location of the file with information on the disk subsystem;
- Start unloading objects.

It must be remembered that the header part of the upload file format differs from the file format used when uploading according to exchange plans.
xmlThe xml is loaded into 1c into the receiving database with a configuration identical to the source database. Before loading xml 1c into 1c, you need to open processing in the receiving database. Then you need to specify the path to the previously uploaded file and download the data by clicking on the “Load data” button.
If necessary, checkboxes are activated to load data in exchange mode in a distributed infobase and ignore errors that occur when loading objects.

After this, you need to check the databases and make sure that all elements are loaded correctly so as not to lose them, for example, if an error occurs in the event handler after loading the object.
Instructions
1C: Enterprise allows you to upload any directory without resorting to writing complex loading/unloading processing, using only built-in tools. First, we need to decide in what format we want to receive the data:
*.mxl – internal format 1C tabular data, suitable for loading into another 1C database;
*.xls – Excel spreadsheets;
*.pdf – electronic document Adobe Reader;
*.html – web page for publication on the Internet;
*.txt – simple text file, useful for loading into any database.
If the directory is hierarchical, then the list will be uploaded to *.mxl and *.xls formats, preserving the hierarchy and with the ability to collapse/expand groups. In all other formats, the upload will occur in a simple list, listing the elements of the group after its name.
Let's open the directory that we need to download. In our case, this is “Nomenclature”. Operations -> Directories -> Nomenclature. You can download not the entire directory, but only a specific group; to do this, you need to go to this group. For large volumes of data, it makes sense to upload them in groups to different files to speed up the work.
On any line of the list that opens, right-click and select “Display List”. A settings window will appear.

In the settings window, we will leave the checkboxes only for those fields that we need in the final document. In the “Output to...” field, leave the “Tabular document” item (you can also select “ Text Document", but tabular is more universal). Click the “OK” button.

Hello dear readers.
I continue my series of articles, it can even be called 1C for the user
Today we'll talk how to unload 1C database and configuration . This is a trivial question for a 1C specialist, but some of my clients are specialists in other fields and don’t know this.
You can also install the folder with the database on another computer; to do this, open 1C and connect this database " Add" - "Add to the list of existing infobase" Then indicate the name and path with this database.
1C information base catalog
The information base directory in our case “DemoAccounting” contains the following information:
1. Main file information base – 1Cv8.1cd. Contains data entered by users and configuration describing the structure and algorithms for working with data.
2. Subdirectory 1Cv8Log. Contains a log of user actions.
After launching the infobase, various service files are created in the infobase directory that are necessary to support user work.


So to transfer the database to another computer we need the 1Cv8.1cd file and the 1Cv8Log subdirectory
Information security can be copied while users are working.
Copying is available only for file operating mode.
Uploading the 1C information base
Now let's look at the process of uploading and loading an information base in configurator mode. Select a menu item Administration – Upload infobase .


A file with the *.dt extension will be downloaded, in which the data and configuration are packed
This option is considered universal.
To restore the infobase from a backup *.dt file, select the menu item in the configurator Administration – Load infobase .
Save configuration to file
In most cases, one configuration without data is enough for improvement.
In order to download the configuration, you need to select the menu item Configuration – Save configuration to file in the configurator
As a result, a file with a *.cf extension will be downloaded, in which the configuration is packaged.
The protocol is used by the standard procedure for exchanging commercial data between the 1C:Enterprise system, on the one hand, and the site management system, on the other hand.
Functionally, the exchange is divided into two blocks:
The first block ensures the publication of a catalog of nomenclature items and data on the website. The second block is necessary to transfer information about online store orders from the website to the 1C:Enterprise system, and further synchronize order statuses and parameters.
In both cases, the initiator of the exchange is the 1C:Enterprise system. The exchange of electronic documents is carried out in accordance with the rules and formats described in the standard.
When interaction is initialized, an HTTP connection is established. The 1C:Enterprise system requests the necessary parameters from the site, such as the maximum package size, compression support, etc. Based on this data, the 1C:Enterprise system generates XML messages and transmits them to the site.
Uploading to the site
Data for publication on the website is uploaded in one batch.
A. Start of the session
http://<сайт>/<путь>/1c_exchange.php?type=catalog&mode=checkauth.
- word "success";
- cookie name;
- Cookie value.
Note.
B. Requesting parameters from the site
1. zip=yes
or
zip=no
2. file_limit=<число> , Where<число>
C. Uploading exchange files to the site
Then "1C:Enterprise" with queries with parameters like
http://<сайт>/<путь>/1c_exchange.php?type=catalog&mode=file&filename=<имя файла>
uploads exchange files to the site in CommerceML 2 format, sending the contents of the file or part of it as a POST.
If the file is successfully written, the site management system displays the line " success".
D. Step by step data loading
At the last step, upon request from "1C:Enterprise", step-by-step data is loaded upon request with parameters of the form http://<сайт>/<путь>/1c_exchange.php?type=catalog&mode=import&filename=<имя файла>
During loading, the content management system may respond with one of the following options.
1. If the first line contains the word " progress" - this means that you need to send the same request again. In this case, the second line will return the current processing status, the amount of downloaded data, import status, etc.
2. If the response is a string with the word " success", this will mean a message about the successful completion of file processing.
Note.
Examples of upload files
Exchange of order information
Orders placed on the website are loaded into the 1C:Enterprise system.
Sequence of actions when working with an order
1. The order is placed on the website
2. When transferred to the 1C:Enterprise system, the category “Order from the site” is set in the order.
When placing an order in the 1C:Enterprise system, the number and date of the order with which it was placed on the website are recorded. The search for a counterparty is carried out by TIN or name, depending on the specified settings.
3. When loading an order, a search for an agreement with the counterparty is performed. The agreement is searched among existing agreements with the client, with the sign of conducting mutual settlements for orders (according to the Organization specified in the loading settings). If no agreement is found, a new one is created.
4. When loading an order, all its properties transferred from the site are loaded. Properties are searched in the 1C:Enterprise system by name. If there is no property with this name, then a new property is created with values of type string or number.
5. The order can be modified in the 1C:Enterprise system, and its changes will be uploaded to the website
6. If the order is paid for or shipped in the 1C:Enterprise system, then the order states for payment and shipment are uploaded to the site only when the operation is fully completed (full payment and full shipment). Until this moment, the order is considered unpaid and unshipped.
7. If you try to change an order in the 1C:Enterprise system for which payment or shipment has been made, the order will not be loaded onto the website as changed. The user will receive a message about this.
8. After each order is uploaded to the site, the values of its categories are determined on the site side (link to categories). These values are set in the 1C:Enterprise system as they are assigned to the order on the website
A. Start of the session
Data uploading begins with the 1C:Enterprise system sending an http request of the following type:
http://<сайт>/<путь>/1c_exchange.php?type=sale&mode=checkauth.
In response, the site management system transmits three lines to the 1C:Enterprise system (the line separator "\n" is used):
- word "success";
- cookie name;
- Cookie value.
Note. All subsequent requests to the site management system from 1C:Enterprise contain the name and value of the Cookie in the request header.
B. Clarifying session parameters
In response, the content management system sends two lines:
1. zip=yes, if the server supports exchange in zip format - in this case, in the next step the files must be packed in zip format
or
zip=no- in this case, in the next step the files are not packed and are transferred each separately.
2. file_limit=<число> , Where<число>- the maximum allowed file size in bytes for transfer in one request. If the 1C:Enterprise system needs to transfer a larger file, it should be divided into fragments.
C. Receiving an exchange file from the site
Then a request like this is sent to the site
http://<сайт>/<путь>/1c_exchange.php?type=sale&mode=query.
The site transmits information about orders in . If orders are successfully received and recorded, 1C:Enterprise sends a request of the form to the site
http://<сайт>/<путь>/1c_exchange.php?type=sale&mode=success
D. Sending an exchange file to the site
Then the 1C:Enterprise system sends a request of the form to the site
http://<сайт>/<путь>/1c_exchange.php?type=sale&mode=file&filename=<имя файла>
,
which uploads an exchange file to the server, sending the contents of the file as a POST.
If the file is successfully written, the content management system sends a line with the word " success". Additionally, the following lines may contain notes on loading.
Note.
If an error occurred during any request, the first line of the response from the content management system will contain the word “failure”, and the following lines will contain a description of the error that occurred while processing the request.
If an unhandled error occurs at the core level of the product or sql query, then html code will be returned.
Examples of information exchange files
The presented protocol is used to integrate the 1C:Enterprise system with systems
Backup 1C Enterprise 8.3 database allows you to protect the user from data loss when performing “dangerous” operations that can significantly change credentials (for example, correcting accounting registers, group changes to documents) or spoil the database (operations to update configuration, etc.). It may also be necessary to copy the database in order to transfer it to someone, and in this case the most compact size is required.
Uploading the 1C Enterprise 8.3 database to a backup copy
Backing up a 1C database can be done in several ways, the most universal is through the infobase upload utility in the 1C configurator. This method is suitable for both file and client-server applications 1C Enterprise. For creating backup copy you need to go to the configurator and select Administration - Upload infobase...
 Menu “Configurator - Upload infobase...”
 A standard file saving panel will appear, where we indicate the directory in which we will save the backup copy. Enter the name of the upload file (the default is “1CV8”) and click the “Save” button. As an example, I'll change the default name to "1CV8-MyUpload". After this, wait until the backup procedure is completed.

After the upload is completed, a message will appear indicating that the upload of the infobase to the file has been completed, indicating the path and name of the upload.
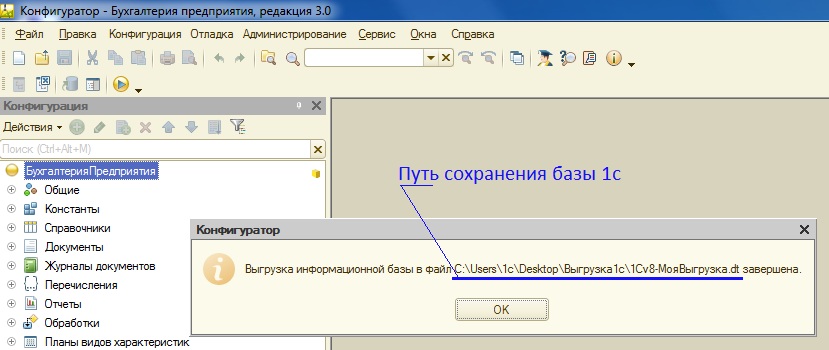
Now you can find the upload file in the directory you specified. Let's go to the specified directory and see the file in it 1CV8-MyUpload.dt. I'll add one useful note
The 1c backup upload file has the extension .dt
Now you can copy this file to media, send it, save it... the only thing is! — most likely, it will not be possible to send the download file by mail due to its volume.
Your upload file is ready, suppose you copied the file to a flash drive, brought it to a friend to show the status of your accounting, and then there is a need to restore the 1c database from your upload file.
Restoring a 1C Enterprise 8.3 database from a backup copy
To restore a database from a backup, the action plan is as follows:
- Create a new database 1C Enterprise 8.3
- Upload the 1C Enterprise 8.3 file into an empty database
Let's get started!
The process of creating a new 1C Enterprise 8.3 information database is described in detail in the article. After creating a new database, you need to load the upload file 1CV8-MyUpload.dt into it.
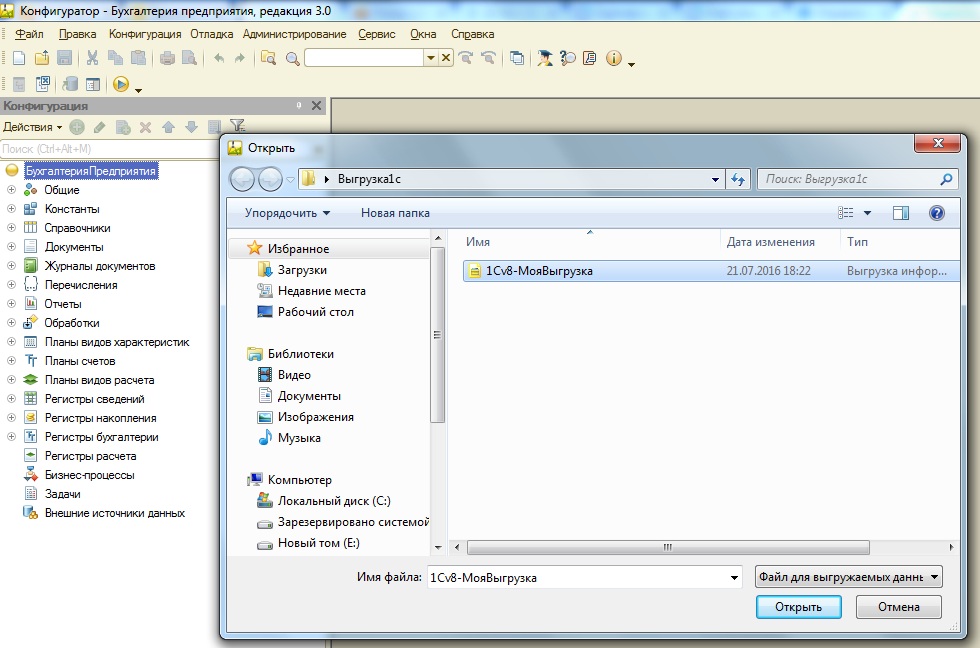
To load the 1C Enterprise 8.3 database from a backup copy, enter the created new configuration in the “Configurator” mode and select the menu item “Administration” - “Load information base...”

In the form that opens, select the 1c infobase upload file (has the extension *.dt)
and agree to the proposal to lose all data if the operation continues. The database loading operation will begin, the time depending on the volume of the loaded database.

As a result, we will receive a message that the information base has been successfully loaded. Next, we can agree to restart the configurator in order to see the loaded configuration objects, or we can choose not to do this, click “No” and close the configurator.

By entering the created database after downloading the 1c upload file in the “Enterprise” mode, you will see an identical copy of the previously uploaded 1c database.
Direct copying of the 1C Enterprise 8.3 database
After publishing this post, one of the clients received a request that he could not download the *.dt file to restore the backup. Having tried all the standard methods and interrupted all the popular queries on the Internet on this topic, we came across Recommendations for backing up 1C databases, which states that in the event of a failure in the 1C Enterprise 8.3 database, some information may not be uploaded to the *.dt file, while direct copying will save all the information. Therefore, in order to fully disclose the information, I decided to add this subsection.
Unlike uploading to a file using the 1C Enterprise 8.3 platform, direct copying involves direct copying of database files.
To copy a 1C Enterprise 8.3 file database, you need to go to the folder with the created database. The path to the database can be seen when you place the pointer to the desired infobase in the list of connected 1C Enterprise 8.3 databases. It will be located under the database selection window and will look like File = "Path to the 1C Enterprise database."

Let's move on specified path and we see the working files of 1C Enterprise 8.3.

The main data file is called 1Cv8.cd (type - File information base), and you need to copy it. The remaining files are auxiliary; they will be created anew when you launch the 1C Enterprise 8.3 configuration.
Accordingly, to launch the database you do not need to restore anything - copy the 1Cv8.cd file to the folder and .
Backing up a 1C Enterprise 8.3 database to a client-server version is more complex and requires special scripts or applications for working with relational databases on which the 1C Enterprise 8.3 database is deployed. This is a separate topic for discussion, so we'll talk about it next time.
If you have any questions, you can ask them in the comments to the article or on the website.
Don't lose this useful article - save it in in social networks via the buttons below:
Backing up the 1C Enterprise 8.3 database and restoring it
