Transfer of data 7.7 to 8. Additional differences from standard rules
For proper migration, it is advisable to update the source and destination configurations to latest version. At the time of writing these were
- 7.70.544 for source;
- 2.0.42.6 for the receiver.
Selecting processing and data transfer rules
The transfer of data from 7.7 must be carried out by appropriate processing and according to the rules that should be selected in 8.2 from the reference book “Conversions from information bases of previous generations” (see Fig. 1):
Rice. 1. Selecting processing and rules from the reference book “Conversions from information bases of previous generations”.
Let's save the selected processing and conversion rules. In the future, if necessary, they can be edited in the “Data Conversion 2.1” configuration and will be used to transfer data.
Editing in the “Data Conversion 2.1” configuration
If the source database is standard, there is no need to use the “Data Conversion 2.1” configuration, and you can immediately proceed to the next step. For modified databases, or to change standard transfer rules, you should load the saved rules into the conversion database (Fig. 2):
 Rice. 2. Loading exchange rules
Once the rules are downloaded, they can be edited to suit your migration requirements. For example, the customer set the task of transferring the “Materials” directory with the original source codes. In the standard rules, the search for elements of the “Materials” directory is carried out using three details (ThisGroup, Name, Parent), search by code is disabled and, in addition, in the rule for converting the properties of the code, its length is reduced to the standard for 8.2. length with the addition of leading zeros on the left (Fig. 3). Note that even if you use standard rules, but with the parameter value “Upload directory codes”, then everywhere for the corresponding rules “Before uploading” you will still have to replace the text “Parameters.UploadCodes = Yes” with the correct expression “Parameters.UploadCodes = 1” , so you will have to use the “Data Conversion 2.1” configuration or edit the code manually directly in the Exp77_82.ert processing.

Rice. 3. Standard transfer rules for the “Materials” directory code
Now we will change the transfer rules so that elements of the “Materials” directory from 7.7 are transferred to 8.2. with original source codes. To do this, first, set up a search using the details Code, This is a Group, and delete the code conversion rule that has become unnecessary. Secondly, let’s add a few lines to the “Data Exchange Rules” for our conversion in order to pre-set the transfer parameter by which directory codes will be downloaded from the source database (Fig. 4):
If ParameterSettingsTable.FindValue("UploadCodes",NS,"Name") = 1 Then
TableParametersSettings.SetValue(NS,"Value", 1)
endIf;
You don’t have to make this setting, but then every time you call processing data upload from 7.7, on the “Parameters” tab, you will need to set the “Upload directory codes” parameter to value 1.

Rice. 4. Setting transfer parameters
It is important to remember that the settings made must not only be saved in the upload rules, but also the processing module 7.7 Exp77_82.ert must be replaced with the one obtained from data conversion (Fig. 5).

Rice. 5. Saving exchange rules
To download data from 7.7, we will call the appropriate transfer processing, indicate in it the rules for data transfer (Acc77_82.xml) and the file where the transfer result will be saved (St. Petersburg_bukh_77_82.xml), as well as the details “Start date” and “End date”. In this case, balances in accounting sections will be transferred to the start date, and the transfer of documents will be carried out for the period from the start date to the end date. If you need to transfer full information, you can select all data transfer rules. But, as a rule, only selected “Balances by accounting sections” are transferred, while reference books and documents to which these accounting sections refer are transferred automatically. This significantly reduces transfer time.

Rice. 6. Uploading information
Next, call the appropriate form from the menu Tools-->Information about the organization, switch the keyboard case to Russian, and copy the name of the organization to the clipboard. It is necessary to switch the case, otherwise the information on the clipboard will be incorrect for copying to 8.2.

Rice. 7. Information about the organization
Loading information into 8.2
Let’s call the “Organization information entry assistant” processing and replace the name “Our organization” with the name copied to the clipboard from 7.7. (Fig. 8.)

Rice. 8. General information about the organization
Let's copy the TIN and KPP details from the corresponding fields “Information about the organization” on the “Codes” tab. When transferring data, the organization will be identified by it. There is no need to copy other details, as they will be filled in during the exchange. Let's save the entered information.
Now let’s execute the menu item Service-->Transfer data from information bases 1C:Enterprise 7.7 and select the item “Load data from file”. In the form that opens, indicate the location of the file and click the “Next” button.
All! The result of the download can be seen in the operation log.
Principle of operation.
A few words about how data is transferred from typical configuration « Accounting", edition 4.5 for 1C:Enterprise 7.7 or configuration "" (hereinafter referred to as Source Configurations) into a standard configuration " Enterprise accounting", edition 3.0 for 1C:Enterprise 8 (version 3.0.52), hereinafter referred to as “Receiver configuration”.
IMPORTANT! Data transfer is possible from the configuration Accounting edition 4.5 for 1C:Enterprise 7.7 versions 7.70.569 and later or from the configuration " Simplified taxation system, ed. 1.3"versions 7.70.219 and higher.
It is recommended to switch from the source Configuration to the destination Configuration at the beginning of a new period (year, quarter, month) after completing the regulatory operations of the previous period.
Data transfer is carried out using specialized processing that downloads data from the source Configuration information base into a file in XML format. The resulting file is loaded into the recipient Configuration infobase using universal data loading processing.
The following files are required to transfer data:
ACC_ACC8 .ert - external processing of uploading data to an external file from the configuration " Accounting, Rev. 4.5»;
USN_ACC8 .ert - external processing of uploading data to an external file from the configuration " Simplified taxation system, ed. 1.3»;
ACC_ACC8 .xml - data conversion rules.
USN_ACC8 .xml - data conversion rules.
Transferable data.
The following are transferred from the Source Configuration infobase to the Recipient Configuration:
Elements of reference books;
Information on current balances in the accounting accounts of the Configuration-source information base as of the date of conversion of the information base;
Current documents with a date greater than the infobase conversion date.
The conversion is carried out in two stages:
Data from the Source Configurations infobase is uploaded to separate file(data file);
The resulting file is loaded into the recipient Configuration information base.
Installation.
To install data migration processing, you must use the setup.exe installation program. After starting the program (if the number of 1C:Enterprise infobases is large, then after some time) a dialog box will appear in which you need to mark those infobases where data transfer processing will be installed. The window looks like in Fig. 1. If the number of information bases is more than seven, then use the “up” and “down” buttons to navigate. If several infobases are selected, the “path” line reflects the location of only the last selected infobase. This information is of an auxiliary nature and is used optionally for additional control on the part of the user over the result of the work. installer, do not pay special attention to it, the program itself will determine where the information bases you have chosen are installed.
Fig.1 Window for selecting infobases during installation
Additionally, you can specify the folder in which data transfer processing will also be installed; to do this, use the folder selection window (by clicking the button with three dots). The full path for the selected folder will be reflected in the selection line. After clicking on the “install” button, the necessary files will be installed in the selected infobases and (or) in the selected folder. After completion, you can click the “details” button and see a detailed installation log, which files were written into which folders. As a result, the selected folder should have something like the following picture, see Fig. 2.

Fig.2 Files installed in the selected folder
To subdirectory ExtForms processing is installed Transition to 1C:Accounting 8, ed. 3.0 and transfer rules. Please note that upload processing ACC_ACC8.ert and data upload rules replace standard processing and rules. If you want to keep the standard transition mechanism, install the new processing in a separate directory and not in the infobase.
The installation process is described in more detail using the example of installing a report " for configuration "1C: Accounting 7.7".
Operating procedure.
In a programme " 1C: Accounting 7.7"must be opened from additional features processing " Transition to 1C:Accounting 8, ed. 3.0", select the folder in which the transfer rules are located (see Fig. 3) and download the exchange rules. You do not need to include all transfer rules. You should use only those that are necessary, for example, for transferring balances, or balances and documents. For example, in the directories group not a single rule can be included, because all directories are transferred by reference, as needed, i.e. only those that are involved either in the remainder or in the documents. This ensures that there is no “garbage” in the new one. information base. Documents also do not need to be included all. For example, if some documents are not in your database, or you do not want to transfer them, you do not need to enable this rule.

Fig.3. Processing for data upload
I recommend setting the data file name to "C:\v77_v8\Exp77_80.xml", this folder is often used by default in the program " 1C: Accounting 8"when loading data from programs on the platform" 1C:Enterprise 7.7". If necessary, set the parameters on the page " Options".
During the process of downloading data from the configuration " Accounting 7.7"Various errors may occur. The transfer rules presented here differ from the standard ones in that at the data upload stage they perform a search typical mistakes. Let's consider those about which messages are displayed.
Zero quantity and non-zero amount of inventory items. Entering the balance in the receiving Configuration in such a way that the quantity of material is equal to zero, and the cost estimate of the material is not equal to zero, is impossible, and it is also pointless, because this is an error. Therefore, when transferring balances, such positions (with a zero quantity) will not be included in the balance entry documents. Consequently, if errors are not corrected before data transfer, then the amounts in the source and destination of the data when transferring balances will not match, which will cause additional reconciliation difficulties. Therefore, in the process of downloading data from the configuration " Accounting 7.7» messages about encountered errors are displayed (see Fig. 4). Additionally, to find errors, we can recommend using the “Express check of accounting management” processing, namely the rule “Absence of a non-zero amount when there is a zero quantity for materials”.
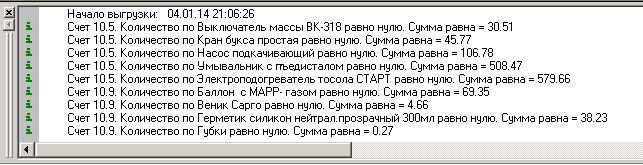
Fig.4.1 Messages about encountered errors
Non-zero balance for subaccount of the second (third) level, while the balance at the first (second) level is zero. This is a fairly common situation of erroneous record keeping. A typical example is shown in Figure 4.2. This condition arises as a result of “re-grading” in analytical accounting. For example, an agreement is indicated in the cash flow documents, but there is no agreement in the capitalization documents, or vice versa, or there are agreements but they are different. In all these cases, there is a non-zero balance under the contracts, despite the fact that the balance under the counterparty is equal to zero. A similar picture can arise in the accounting of materials and nomenclature (when total accounting by storage locations is included): re-grading between warehouses, especially if the warehouses are financially responsible persons.

Fig. 4.2 Example of errors in accounting
It is clear that this is a mistake, and it is clear that it makes no sense to carry over such balances. In order to exclude the transfer of this kind of balances, there is a parameter “Do not unload balances if there is a zero balance at the upper level.” If this parameter is set to one, then during upload the messages shown in Fig. 4.3 (compare with Fig. 4.2), and balances for such positions will not be unloaded. You can use different combinations of this parameter with the rules for transferring different residues. If you transfer not all balances at once, but by accounting sections, then you can transfer balances from different accounting sections with different parameter values.

Fig.4.3. Error messages
Empty contract values or foreign contracts. The problem is similar to that described above, the reason is the same - misgrading in analytical accounting for contracts (see Fig. 4.4). But the balance for the counterparty is not zero, so the verification rule described above will not work. When transferring data, an error will occur when posting the document for entering balances, because an empty contract value is not allowed.

Fig.4.4 Report showing error
To eliminate such errors before transfer, error messages are issued at the data upload stage (see Fig. 4.5). The same figure shows that another error was encountered: the contract does not correspond to the counterparty, i.e. the owner of the contract is another counterparty. Such errors are often found in modified, i.e. non-standard configurations or in databases created long ago, when even in standard configurations there was not a sufficiently strict check for compliance of contracts when filling out documents.

Fig.4.5 Accounting error messages
Checking for empty values of contracts and other people's contracts is carried out if the parameter " is set to one Check contracts for empty values and compliance with the counterparty". Additionally, to find errors, we can recommend using the "Express check of accounting management" processing, namely the rules "Absence of empty analytics for contracts" and "Compliance of counterparties and contracts".
There are other error checks, for more information please contact us (contacts at the bottom of the page).
Working methods
We will show how you can transfer data in parts, rather than entirely, using the example of uploading documents of a separate type or even individual copies of documents of a selected type. Let's mark only one data upload rule " Payment order" (see Fig. 5). This will allow you to upload documents only of the type " Payment order". If with these parameters you click on the button " Unload", then all documents of the type " will be downloaded Payment order", located in the time interval with " start date" By " expiration date". Press the button " Install PVD", after this the message " Selection of data for Payment order".

Fig.5 How to set a rule for uploading data of a certain type
Next, click the "Add condition" button, you will be able to select a selection attribute (see Fig. 6.1), most often it is " CurrentDocument", which allows you to select an individual document from a list of documents of this type. Using other selection details, you can obtain a selection for a group of documents, for example, select documents by date. In all cases, documents are selected within the time interval specified by the parameters " Start date" And " expiration date".

Fig.6.1 How to select a single document
Important! "1C"), which in some configurations does not allow the selection of documents when uploading according to the selection details. This is due to the fact that in the standard rules the selection of documents is carried out by a request without specifying a period. Such requests do not always work.
In a similar way, you can upload directories, not the entire directory, but by selecting according to some details. First, select the desired data upload rule, then successively press the buttons " Install PVD" And " Add condition". For example, Fig. 6.2 shows how you can unload only those employees with whom at the time of transition from the program " 1C: Simplified taxation system, ed. 1.3" on " 1C: Enterprise Accounting, edition 3.0" (or, as users often say, the transition from accounting 7.7 to 3.0) labor relations have been established.

Fig.6.2 How to select a group of directory elements
Important! An error in the standard rules has been corrected in the proposed rules for data transfer (from the company "1C"), which leads to incorrect selection of directory elements when unloading using periodic directory details, i.e. those that have different values set for different dates. This is due to the fact that in standard rules the selection of directory elements is carried out by a query without specifying a period.
Selection based on the periodic details of the directory is made on the date of the parameter " expiration date"!!!
You can use a combination of data upload and selection rules. Rules that have selections set will be marked as "[SELECTION]". In order to see or edit the selection of a specific data upload rule, you need to double-click on this rule in the list of rules or, having selected it, click the button " Install PVD".
Important! If the upload of objects turns out to be empty or incomplete, you need to check whether the synchronization mode is set with 1C:Accounting 8. If this is the case, then only objects that have been changed after the transfer will be uploaded (Directory.Synchronous Accounting Parameters stores the Position of the Last Uploaded Document parameter, which is checked during upload by the CheckFor Upload Possibility function) . Full time job in synchronization mode becomes impossible. The synchronization mode is checked after loading the exchange rules. If the mode is installed, a warning window will be generated (see Fig. 6.5) and you will be asked to disable the synchronization mode.
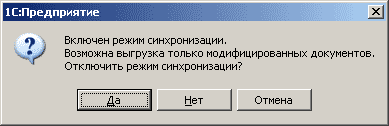
Rice. 6.5 Synchronization mode warning window
Additional differences from standard rules
Fixed an error in transferring PT&U with old receipt types: if in the documents Receipt of Goods and Services the receipt type is equal to 2 (outdated value) and there is no supplier invoice, an erroneous conversion of this document in BP 3.0 into a return document from the buyer occurs.
An error has been fixed when transferring manual operations that have a subaccount of Division to the PROF version of BP. Such an operation is not recorded in the BP; an error occurs: “The Division field must be empty.” This is due to the fact that the rules are designed to work with CORP versions, however, in PROF, the DivisionDt and DivisionKt dimensions of the accounting register must be empty.
Fixed a bug that led to duplication of directory groups Treaties and, as a consequence, to duplication of elements of this directory (since the search during loading is carried out taking into account the parent). This is illustrated in Figure 6.6.

Fig.6.6 Result of directory transfer Treaties standard rules
Here in the column Parent(directory group) with name 2015 There are two different directory groups with the same name (there is only one group in the source), therefore the contracts are duplicated.
Fixed an error in transferring bank documents when transferring money from one current account to another. IN BP 3.0 in this case a document is created Debiting from current account with the type of operation Transfer to another account of the organization, which is not carried out due to the fact that the details are not filled in Recipient's account. In addition, the details are filled in incorrectly. Account And Debit account. This will show up if they are different, for example 55 and 51, then they need to be swapped. Fixed error not filling in details Type of obligation in tax transfer documents. All of the above applies to release 3.0.43.215.
Props are transferred main contract directory Counterparties.
The rule for downloading the directory has been changed Nomenclature, now the method of data selection is standard sampling, which allows you to select directory elements by details (in the standard rules of the simplified tax system 7.7 - BP 3.0 this is not possible). When transferring a directory Nomenclature, are transferred and Item prices via links, i.e. prices of only transferred items of the nomenclature. To enable this feature, you need to set the parameter value to one Upload prices when unloading items.
An error has been fixed in the standard rules "USN 7.7 - BP 3.0" when transferring balances for settlements with counterparties: the type of agreement was always set to Other. Now - depending on the type of balance, according to the accounting section " Calculations with suppliers and contractors"contract type = " With supplier", according to the accounting section" Calculations with buyers and customers"contract type = " With buyer", in other cases, contract type = " Other".
An error has been fixed in the standard rules "USN 7.7 - BP 3.0" when transferring balances for settlements with counterparties: the amount of mutual settlements was recorded in two details of the input document initial balances Sum And AmountKt. Because of this, the entry document for opening balances was not posted.
CheckWith the buyer" (in standard rules " Other"). The value of the attribute " is set. Payment State", this is important for the right choice invoices for payment to the buyer in bank payment documents in the recipient Configuration.
When transferring documents of the form " Payment order"contract type is set to " With the supplier" (in standard rules " Other").
An error has been fixed in the standard rules "USN 7.7 - BP 3.0" when transferring storage locations: the details "are not filled in" Warehouse type".
Added parameter " Exchange with regulatory authorities included": if its value is 1, then the prop Type of Exchange with Control Authorities directory element " Organizations"set to value" ExchangeIn Universal Format", otherwise in " ExchangeDisabled"as in the standard rules. This is important for repeated (regular) transfers, so as not to spoil the EDF setup.
The search rule for downloaded items for the directory has been changed " Counterparties": first the search is performed by TIN And checkpoint(if these values are filled in), then only by TIN and finally by Name. In all three cases, the search involves the group attribute (ThisGroup) and the group itself (Parent). This is important for repeated (regular) transfers, so as not to create duplicates for counterparties with names changed AFTER loading.
When transferring counterparties, fill in the details CountryRegistration meaning "Russia". This is necessary so that after loading the directory of counterparties into the program "1C Accounting 8" I didn’t have to manually fill out the required details CountryRegistration. If it is not filled in, then in the form of a directory element " Counterparties"details will be available" Tax number" And " Reg. number"and the details" TIN" And " checkpoint" will be hidden.
A data upload rule for transferring the “Employees” directory has been added to the transfer rules “USN 7.7 - BP 3.0” (in the standard rules, only the directory of individuals is transferred).
In the transfer rules "USN 7.7 - BP 3.0" the transfer rule for the information register Current Tariff Rate of Employees has been corrected.
Features of transferring payment orders for tax payments
For payment orders with transaction type Tax transfer Additional details must be filled in: KBK - budget classification code, compiler status, etc. The structures of these details are in Bukh 7.7 (USN 7.7) and in BP 3.0 do not match. In particular in BP 3.0 Some of these details are included in a separate directory Types of taxes and payments to the budget, a link to which is contained in the payment order. The directory contains a number of supplied elements that appear in the information base, for example, when editing an accounting policy. When transferring data, these elements will also appear when loading the accounting policy. When uploading and downloading payment orders, a directory element Types of taxes and payments to the budget searched using the KBK for substitution into the details of the payment order Tax. Therefore, it is recommended that after transferring the accounting policies, you check whether all the necessary taxes appear in the directory and, if necessary, supplement them. When comparing (synchronizing) KBK in payment orders, the source and receiver do not take into account the four KBK categories, categories 14-17, income subtype code: tax, penalty, fine, etc. In the directory Types of taxes and payments to the budget these bits are filled with zeros. When adding new elements to the directory, digits 14-17 should also be filled with zeros.
Transfer of large information databases.
First of all, when transferring large infobases, the process of downloading data can take a very long time. This happens if there is a large number of balances in one accounting section, for example, balances of goods. To reduce upload time, you can use the technique of splitting one document " Entering initial balances" for a few. If you set the parameter value " Number of lines in the balance entry document" different from zero (see Fig. 6.3), then uploading data into one document will be limited to a specified value. This can very significantly (several times) reduce the upload time.

Fig.6.3 Setting parameters when transferring data with a document size limitation " Entering initial balances»
Note: the parameter value limits the number of transaction table rows uploaded into one document " Entering initial balances", rather than specifying the number of lines of the document itself. Therefore, the number of document lines will differ from the parameter value; this is not an error. When splitting a document " Entering initial balances” for several documents, a postfix will be added to the comment of each document at the end of the line: “-1”, “-2”, etc.
IMPORTANT! The described algorithm for splitting one document " Entering initial balances"several is used only to reduce the time of data uploading; all documents are uploaded into one file, i.e. Data transfer occurs in one step, comments (postfixes) are generated automatically, only one parameter is specified. But this technique does not solve the problem of lack of memory, which will be discussed below.
When migrating large infobases, the problem of lack of information may arise. random access memory: When attempting to upload, the program will exit with or without an appropriate error message. Trying to replace your computer with a more powerful one is useless. In this case, you should upload the data in parts, breaking it into portions. This requires transfer rules that support the specified mode. Let's look at how to unload. Firstly, data transfer should be performed using only one upload rule (see Fig. 6.4). If the transfer is impossible according to one rule, then we divide it into parts, indicating the initial and final portion numbers. Each portion will contain information for a given number of first-level analytics values, for example, product balances, i.e. the specified number of account balance values "41". Knowing the total amount of analytics for the account, it is easy to calculate the number of servings. How much data is transferred without problems at a time (into one piece of information) needs to be determined experimentally; as a rule, when uploading account balances, transfer problems appear when the number of balances is several thousand or more. Although, to save time for uploading data, we can recommend splitting it into parts, even if it is possible to upload all the balances in the accounting section at one time. The upload time depends on the size of the data portion, not proportionally, not linearly. Therefore, by dividing, for example, ten thousand product balances into ten parts of a thousand, you can reduce the unloading time by several times. If we are transferring the first portion, the number of the initial portion may not be indicated; if the last portion is transferred, then the number of the final portion may not be indicated.
IMPORTANT! When transferring data in parts, it is necessary to specify a postfix in the parameters, which is involved in the formation of the document comment “ Entering initial balances" When changing the portion range numbers, you must not forget to change the postfix, otherwise, when loading into the recipient Configuration, documents with the same comments (postfixes) will be overwritten. The name of the data file is not particularly important. You can use sequential transfer tactics: unload - load, unload - load, etc. In this case, the data file name does not need to be changed. You can choose a tactic: first unload everything, then load everything. In the latter case, the name of the data file will have to be changed each time it is uploaded. One more example. If the number of balances in the accounting section (for example, goods) is, say, 10,000, we divide it into parts of a thousand, then we get 10 portions. Each part must have a unique postfix: "-1", "-2", "-3", "-4". If we unload all remaining goods and then load everything, then the data files must also be unique, for example: “41_1”, “41_2”, “41_3”, “41_4”. The parameters “Portion number start” and “Portion number end” should take the following values: 0, 1000; 1001, 2000; 2001, 3000; 3001, 4000.

Fig.6.4 Setting parameters when transferring data in parts
Transferring data in parts is supported for the following upload rules:
-
Finished products and semi-finished products
Selling expenses
Goods shipped
Financial investments
Settlements with suppliers and contractors
Other settlements with counterparties
Taxes and fees
Settlements with personnel
Calculations with accountable persons
Settlements with founders
Settlements with other debtors and creditors
Capital and reserves
Future expenses
Deferred tax assets and liabilities
Financial results
Off-balance sheet accounts
Fixed assets
Materials
Deviations in the cost of inventory items
VAT on purchased assets
Unfinished production
Don't try to follow ridiculous advice like: "Transfer first reference books, and then transfer leftovers." Firstly, there is no point in moving the directory separately, either in parts or in its entirety , if the error occurs when unloading balances, then this will not help. The error will most likely actually occur when transferring balances (during unloading, this is important to understand), when the directory is transferred using links. It doesn’t matter whether the directory has already been transferred or not, when unloading leftovers, it will still be unloaded without restrictions. Secondly, transferring entire directories is usually transferring garbage; you shouldn’t do it.
After unloading is completed you need to launch the 1C:Accounting 8 program. Loading, both initially and during repeated data transfers or additional transfers, should be performed using standard processing (see Fig. 7).

Attention, important. Treatment Universal exchange data in XML format (in some releases 3.0.43.x) contains errors. Corrected processing can be used Universal data exchange in XML format, which is included in the delivery and is installed in the database directory Accounting edition 4.5.
After loading into the program 1C: Accounting 8 documents for entering balances must be posted, and the remaining documents must be re-posted. This is best done using processing Group transfer of documents, which is in the section Administration. If it is not visible in the specified section, configure the action bar by adding the desired command (see Fig. 7.1)

Fig.7.1 Setting up the action bar
Important. You cannot use processing from the standard configuration, since it works in the handler debugging mode (Exchange Processing.Handler DebuggingMode Flag = True) and does not allow using the handler "Search fields" to search for downloaded items for the directory " Counterparties" (see above). More precisely, all handlers that are used during loading are in the processing built into the configuration ProcessorsDownloadsFromAccounting77. Therefore, it is impossible to carry out the transfer according to the changed rules, according to at least at the loading stage.
You can use a similar external processing Transfer of Data from Information Bases of 1Enterprise77(it is included in the delivery). Below we describe how to use it (once again - external processing).
After unloading is completed you need to launch the 1C:Accounting 8 program. In the menu: File - Open and point to external processing Transfer of Data from Information Bases of 1Enterprise77.
After this, a form will be displayed in which you need to specify the data loading option – Load data from file (Fig. 7.2).

After which a dialog box will be displayed in which you will need to specify the path to the uploaded file (see Fig. 7.3).

By clicking “Load data”, start the data loading process (see Fig. 7.4), upon completion of which you will need to generate a balance sheet and check the turnover in the source Configuration database and the destination Configuration into which the download was made.

If any errors occur during the data transfer process, a message window will open, from which you can double-click to resolve the error. To receive a report on errors that occurred with a description and recommendations for elimination, you must click the hyperlink “ Error Information».
Loading during repeated data transfers or additional transfers of individual documents or directories can be performed using the standard processing "Universal Data Interchange in XML Format", this will speed up the process.
Data conversion technique.
If necessary, conversion can be performed in several stages, for example, first balances and then documents. Re-transfer of information is possible.
Balances are transferred through documents " Entering initial balances».
More details on the methodology for entering balances can be found in the article on the ITS website of the 1C company (for 1C: Enterprise Accounting rev. 3.0)
Important! Before entering opening balances, accounting policy parameters must be set. The organization's accounting policy parameters are read on the date following the date the balances are entered. For example, if the date for entering balances is December 31, 2013, then the accounting policy parameters established as of January 1, 2014 are taken into account. This allows you to take into account the parameters of the current accounting policy (for example: if in 2013 the organization applied a simplified taxation system, and since 2014 . switched to common system- then when entering balances as of December 31, 2013, the accounting policy parameters of 2014 will be taken into account). Make sure that the accounting policies have been transferred correctly, correct if necessary.
Important! If you decide to start working in the recipient Configuration before you have transferred the remainder there, then you must first transfer the directories before starting work in the recipient Configuration. Otherwise, errors may occur when transferring balances to a non-empty database.
I am answering the questions! The processing and transfer rules included in the delivery set are open and not protected from copying in any way. This does not mean that the buyer (licensee) has the right to distribute and reproduce. The licensee does not have such a right. The licensee has the right to use. By exercising this right, the licensee can create archival copies, make changes, and use an unlimited number of times on an unlimited number of computers. To refine or correct the conversion rules, as well as to become more familiar with them, you need to load the rules into the program Data conversion. This program is distributed by 1C, and it determines the rules for its use.
Reasons to buy
Updated regularly. Updates are free for six months after purchase. Included in the TOP 100 publications of Infostart.
Advantages
The text of the rules and processing are open, Data Conversion technology is used, and are easy to edit.
Comparison of versions
01/29/2019 Rules updated to release 3.0.67.70
07/05/2018 Rules updated to release 3.0.63.22
09.25.2017 Rules updated to release 3.0.52.36
07/18/2017 Rules updated to release 3.0.51.16
10/12/2016 Fixed an error in transferring vocational education and training with old types of admission
09/08/2016 Rules updated to release 3.0.44.102
06/18/2016 Fixed an error in transferring manual operations that have the subaccount Division
05/31/2016 The rules were updated to release 3.0.43.236. In standard configurations (BP releases 3.0.43.174 - 235) in the Universal XML Data Exchange processing, the Load Parameters procedure does not work correctly. The rules have been changed to work around this bug. You can also use the Universal Data ExchangeXML processing included in the delivery package to load into BP 3.0. It is written during installation to the ExtForms subdirectory of the info directory. bases 7.7.
05/25/2016 Rules updated to release 3.0.43.215
05/11/2016 The restriction on the length of the contract name was changed from 50 to 100.
02/23/2016 Rules updated to release 3.0.43.29
12/21/2015 Processing and rules updated to release 3.0.42.33
11.11.2015 Added check for synchronization mode
05/18/2015 Processing and rules updated to release 3.0.40.24
05/14/2015 The transfer of payment documents for taxes has been finalized
04/08/2015 Processing and rules updated to release 3.0.39.56. In release 3.0.39, the structure of the invoice for payment has changed: there is no longer the “Services” tabular part, now goods and services are in one “Goods” tabular part. Therefore the rules for 3.0.38 cannot be used for porting to 3.0.39
04/02/2015 Processing and rules updated to release 3.0.38.53
12/23/2014 Processing and rules updated to release 3.0.37
Contents of delivery.
The package includes: processing "ACC_ACC8", transfer rules "ACC_ACC8" and processing Transfer of Data from Information Bases of 1Enterprise77. If your organization does not have a full-time programmer to carry out the work, we are ready to offer the services of our specialist (the programmer will connect to your computer via the Internet, via special program for remote work and will perform the necessary work). If possible, provide a working base "1C: Accounting 7.7", we can transfer the data ourselves and transfer the file " 1C: Accounting 8" with transferred balances. The cost of this service is not included in the total cost of the package.
© Boris Balyasnikov, January 2014, last changes January 2019
Most users of the 1C 7.7 program imagine the transition from 1C 7.7 to 8.3 (8.2) as something complex and subject only to programmers. If the organization does not have a completely redesigned configuration, then this article was written for you and will help with the transition to 1C 8.3 or 8.2.
How to prepare a 1C 8.3 (8.2) database for subsequent data transfer from 1C 7.7 step by step
Before starting work, you need to prepare the 1C 8.3 (8.2) database for subsequent data loading.
Step 1
Update the 1C database to the latest release, use the latest version 8.2 or 8.3. You can check the relevance of the current release on the 1C technical support website.
How to install or update the 1C 8.3 platform, see our video tutorial:
Step 2
Carry out routine month-end closing operations. Additionally, you can check your accounting records via Service – Data verification for transition to 1C Accounting 8. If there are errors, correct them.
Step 3
Step 5
Create a clean database for loading data. This is necessary to promptly cancel the data download in case unforeseen situations arise. Top Menu select programs Administration – Upload data, specify the name of the upload file and the location where it will be saved.
Thanks to these preparatory measures, unnecessary objects will be removed from the database, the 1C database will become smaller. The results will be recalculated and the logical integrity of the database will be checked. Now you can start transferring data from 1C 7.7 to 1C 8.3 (8.2).
How to add an information base in 1C 8.3, see the following video lesson:
Transferring data from 1C 7.7 to 1C 8.2 Accounting 2.0
In the latest version of the release of the 1C 8.2 Accounting 2.0 program, translation from 1C 7.7 information databases is not supported. In accordance with the requirements of the 1C company, it is necessary to do. Therefore, if in the 1C 8.2 database you select Service – Transfer of data from information databases 1C Enterprise 7.7, then we get the error:

But what should you do if you really need to transfer it specifically to version 1C 8.2?
Step 1. Uploading data from 1C 7.7
It is necessary to download files that were previously supplied by 1C for uploading to 1C 8.2 Accounting. These files must be placed in the ExtForms folder from your database. In the example, this is D:\1с\77\unp_demo\ExtForms. You can view the path to your database when loading the 1C program:

Let's run this processing: If everything is done correctly, the message “Uploading data for 1C Accounting 8” should appear, select it by clicking the Open button:

- Upload rules – a file named Acc77_80.xml, we copied it to the ExtForms folder;
- Start date and end date – the period during which the data will be downloaded;
- Rules for uploading data – objects to be uploaded, directories and documents that need to be uploaded to a file.
The data file in the example will be copied to the desktop, but you can select any other folder. Click the Load exchange rules button. A list of objects that will be unloaded from 1C 7.7 will open and which can be edited by removing or checking the selection boxes:

Depending on the situation, you can upload data either all at once or in parts. First, we unload the directories - 95% of them are unloaded without problems. With the second file we upload balances and turnover by accounting sections. This option is convenient to use if some data is not uploaded quite correctly.
Step 2. Loading into 1C 8.2 Accounting 2.0 from 1C 7.7
Choose Service – Transfer of data from information databases 1C Enterprise 8, in the window that appears, select Load from file:

Select the file that was downloaded from 1C 7.7 to the desktop. After clicking the Next button, data will be loaded from the file. If accounting in the 1C 7.7 database has been maintained for a long time, then loading may take a long time.

If errors occur during downloading, only part of the data will be downloaded and therefore will have to be downloaded again.
Transferring data from 1C 7.7 to 1C 8.3 Accounting 3.0
The algorithm for transferring a database from 1C 7.7 to 1C 8.3 is slightly different in detail, but in general it is similar to that described above for 1C 8.2 Accounting 2.0.
Step 1
After updating the 1C information base, it is necessary to update the data upload rules. This can be done as follows.
Open 1C 8.3 Accounting 3.0 and select the Save transfer rules button in the lower right corner, select version 1C Accounting 7.7 and save the rules by specifying the path to the ExtForms directory of the information database:

Step 2. Uploading data from 1C 7.7
The ability to upload from 1C 7.7 to 1C 8.3 is made by default, that is, there is no need to download additional files and add them to the database.
Let's start unloading processing: Service – Additional features. We find the inscription Transition to 1C 8.3 Accounting ed. 3.0 and click Open:

In the window that appears, you must fill in:
- Upload rules - a file named ACC_ACC8.xml, which can be found in the folder with your database (how to determine the path to the database was described above), the ExtForms folder. This is the one copied from 1C 8.3;
- Start date and end date – the period for which the data will be downloaded;
- Data file name – the place where we will copy the file with the uploaded data;
- Rules for uploading data – objects to be uploaded, directories and documents that will be uploaded to a file:

Click the Load exchange rules button. A list of objects that will be unloaded from 1C 7.7 will appear, which can be edited by removing or checking the selection boxes.
You can upload in parts, creating several files, or upload all the data at once. What to do depends on the specific situation. In the example, we upload all the data at once.
Let's open 1C Accounting 3.0 (8.3) and select Here we will see 2 ways to load data:
- Load data from the information base - the 1C 8.3 program will find it itself installed bases and will try to connect to this infobase by copying data from there. Using the settings, you can specify what needs to be loaded and click the Load data button:

- Loading data from a file is just our option. You must specify the file that was downloaded from 1C 7.7 and click the Load data button. If a window like the one below appears, it means that the download was successful. Otherwise, you need to download either in parts and correct the errors that the program produces in 1C 7.7:

Transfer of data from the modified standard configuration of 1C 7.7 to 1C 8.3 (8.2)
Transferring data from changed 1C 7.7 configurations is much more complicated due to rewritten business processes that do not exist in the edition of the program to which we will transfer the data. In most cases, such transfers should be done by a specialist with experience in data transfer or good knowledge of Data Conversion configuration. Exist general principles transfer, which can be used to transfer the following configurations:
- Transfer of functionality. In the new configuration, it is necessary to repeat the functionality that is present in 1C 7.7. Additional documents, reference books and details. Unload -CF of this database.
- at the end of the year. Compare account turnover before convolutions and after- they must be equal.
- Transfer of data from a collapsed 1C 7.7 database to a standard clean database of the new edition. Check the turnover data on accounts in 1C 7.7 and 8.2 or 8.3. If there are errors, correct them.
- Into the clean database into which data was loaded from 1C 7.7, it is necessary to upload a CF configuration file in which the functionality from 1C 7.7 was repeated.
- Additional directory details can be transferred using the Data Conversion configuration.
Checking data after transferring data from 1C 7.7 to 1C 8.3 and 8.2
Using the Turnover Balance Sheet report, generate a report with data on subaccounts, accounting types, off-balance sheet accounts, currencies and compare with the same report from the 1C 8.3 (8.2) database into which the data was transferred:

Exercise: Need to transfer necessary documents from one database to another 1C database. And not manually, but in one fell swoop.
Solution:
Let's consider an example of transferring documents as follows: uploading information to a text file from any configurations "1C: Enterprise 7.7" for loading into exactly the same configuration
This requires processing, which can be downloaded. Download, unpack and save the “import-export” folder somewhere on your computer near the databases.
Next we go point by point.
1. Open database No. 1, which is full of documents, reference books, etc. We open the document log and see which documents we need to copy to another database. For example, we need to transfer only invoices for December 2012.
2. In the menu, select File - Open - open the "import-export" folder (downloaded earlier) - select the file "Export771.ert".
In the "Data Upload" dialog box, enter the following parameters:
- data upload interval: 01.12.12 - 31.12.12
- upload documents: check the "Invoice" document

A window with the upload process should appear at the bottom. Be sure to wait for the "Processing Complete" message.

After successful unloading, close and exit the database.
3. Open database No. 2, which is supposed to be empty, in monopoly mode. Data is loaded into the database only in exclusive mode!
In the File - Open menu - open the "import-export" folder (downloaded earlier) - select the file "Import77.ert".
- upload file name: folder "import-export" - file "transfer.txt"
- check the box "Show message"

Here, no matter how much you wait, there will be no message about the completion of the download. Just make sure the last document you upload is the end date. In our case it is 12/31/12. Or remember the number of the last document.
Click the "Close" button.
4. Now you can go to the “document log” and view all downloaded documents (invoices for December 2012). 
Small note: bases for testing processing were created by copying. Thus, in database No. 2 all documents were deleted, but reference books with elements were available.
In any other case, it is unknown how the processing will take place and in what form the documents will be uploaded and downloaded.
Currently, the transition from 1C:Enterprise 7.7 to 8.3 (similar to 8.2) has become a headache for accountants. Preferably as quickly as possible and without errors. If you are a 1C:Accounting programmer and you need to convert documents from the seventh version to the eighth, then this article is for you.
Take just a few steps and your data transfer problems will be solved. Read on these instructions to the end, and the way to do this will be revealed to you. First you must prepare workplace on your computer for the necessary manipulations. Firstly, yours HDD must be at least 100 GB in size. This is necessary because it is multi-level. And you will need to work with several 7.7 configurations.
If you need a quick and high-quality transition from 1C Accounting 7.7 to 1C 8.3, contact us! Our average turnkey cost is 6,600 rubles.
Transferring data from 1C 7.7 to 1C 8.3 accounting 3.0
So, before working with transferring data to version 1C 8.3, you need to prepare this data in version 7.7. To do this you must do the following. Let’s say you have a working database “Accounting for an Enterprise” on your computer, which your accountants work with. Using Export77 processing, upload all the necessary documents to a text file and from that moment on, never return to the main working database. Your further manipulations will occur with other configurations.
Install the latest Release 1C:Enterprise 7.7 into the new directory. (the package includes a standard empty version (without data) and a demo version). We will work with the standard version. Now run this database and use Import 77 processing to load from text file data from your main database.
When converting data, some documents may not be processed. It's not scary. The trick is that you can easily fix this after the transfer, since in the standard database you work with the main standard chart of accounts. Therefore, no matter how sophisticated the subaccounts are, it is easy to fix this in your working database in about 3 hours by going into each unposted document and changing the accounts that you have in your configuration in the account fields.
Naturally, before the transfer, you first bring the chart of accounts of the standard configuration into line with the chart of accounts of your main working base. The options are purely individual depending on the specifics of your organization. Having done this work, you receive a standard configuration filled with data from your working database.
Now we need to do another data transfer. To do this, install the standard zero configuration again in a new directory. And transfer the data there from the standard configuration with your data. As a result, you will get an ideal version 7 database, ready for transfer to version 8.2.
The fact is that data is transferred directly to the eighth version exclusively from the “untouched” standard version 7.7. And now you have just such a configuration. But now it is not empty, but with your work data.
All! We launch 1C:Enterprise 8.2. Select “Data transfer from version 7.7.” and enjoy how the program itself transfers data from your processed 7.7., transfers documents and displays a comparative table of the balance sheet of versions 7.7 and 8.3.
Of course, there will not be a 100% result. But at 70-80 percent you will get a match. And then your work will be done only in version 8.3.
Possible inaccuracies are easily corrected. It's another 3-4 hours. You go to the document journal and either adjust accounts or fields (for example, “Agreement” or “Main cash desk”). It depends on the degree of difference between your 7.7 base. from standard. As a result of all these actions, your working configuration of version 8.3 will be able to produce accounting data through the balance sheet in an ideal form.
After the transition, it will be useful for you to learn how to work in new program. For this we have prepared a section.
By the way! If you need modification of 1C programs, you can contact us!
Video on the transition from 1s 7.7 to 8:
