Instructions for creating a bootable USB flash drive on Windows. Creating a bootable USB flash drive for installing Windows Windows 7 bootable USB flash drive from a license disk
Gone are the days when to install a system you needed a DVD, which in turn could get scratched and freeze during installation. An installation flash drive for Windows 10 or Windows 7 to install the system on your computer will be faster and more convenient. Let's look at how to create a bootable Windows 10 USB flash drive using Rufus standard methods And without programs. When installing the system, I recommend inserting the drive into the rear USB ports of the computer.
Creating a bootable Windows 10 USB flash drive
Let's start the procedure for a PC with a UEFI bios (you can read the types of bios) because They may not be suitable for old computers and laptops; for older PCs we will consider them below. This utility was developed by Microsoft itself and this method can be considered standard for Windows 10 and Windows 8.1. Download Windows 10 Installation Media Creation Tool, run the downloaded program and select “Create installation drive”.
There must be a checkmark, then the tool will automatically adapt to your system.

We indicate the medium that will be a USB flash drive.

- You specify (select) the path to the flash drive. We are waiting for the download and recording to finish. That's all!!!

How to create a bootable Windows 10 USB flash drive without programs
Let's look at the option without programs (suitable only for UEFI bios). You will need a downloaded distribution in ISO format and a USB flash drive formatted in FAT32.
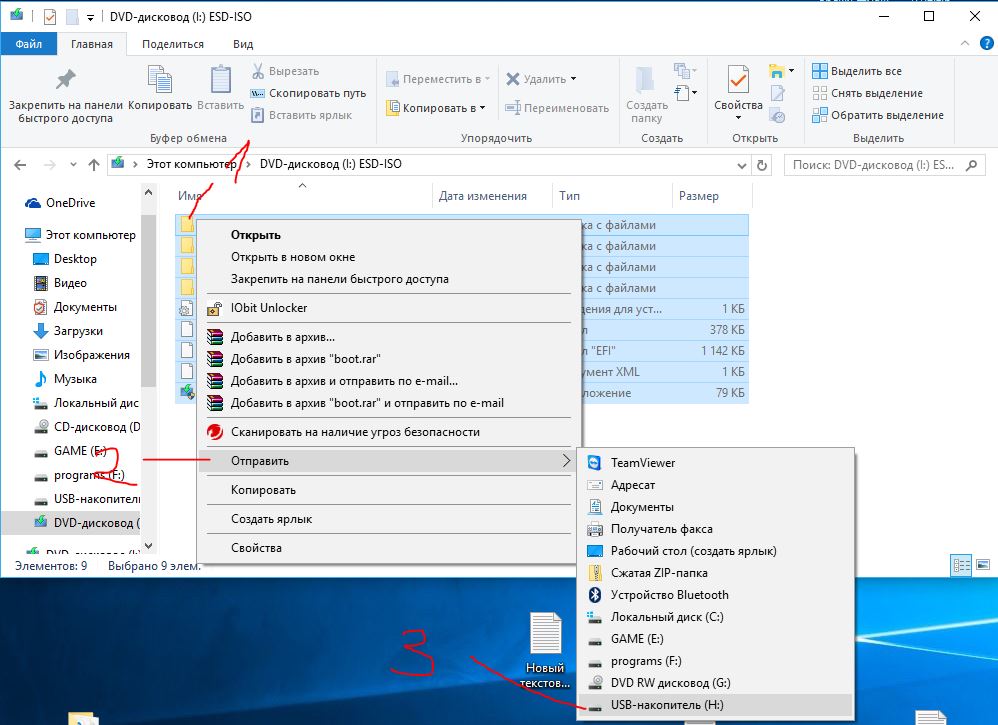
- Select the windows image and right-click on it.
- In the context menu, click "connect".
- A disk like the one in the picture with Windows files and folders will appear.

- Select everything and right-click on any folder.
- Click "send" in the context menu.
- Select a USB device. We are waiting for the end of the process and you can use it.
Create a bootable USB flash drive using Ultraiso
With this program you can burn not only Windows 10, but also Windows 7 and XP to a flash drive. Download the program and install it.
- Open our downloaded image with Windows 7, 8, 10, xp.
- Make sure the disk icon is highlighted.
- Select "Burn Hard Disk Image".

- We look carefully to see that he is standing USB drive so as not to format your hard drive.
- Select the recording method "USB-HDD+". (When booting the computer, select USB-HDD+ in BootMenu).
- Click "record".

Creating a bootable USB flash drive using Rufus
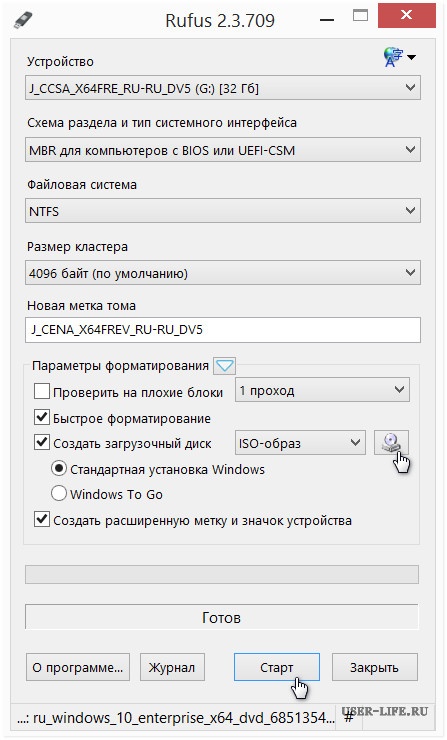
If your bios is old, not uefi, then Rufus is created for this. Suitable for all versions of Windows. Select in the "Partition layout and system interface type" column: For old BIOS, select MBR. For modern UEFI. Download and install the rufus program.
Creating a bootable USB flash drive using USB/DVD Download Tool
A utility from Microsoft created in ancient times is very relevant to this day. Download and install the program. Great for Windows 7.
- Select USB drive.

- Click "Erase".

- We press “Yes”, it formats the drive, writes it, and everything is ready.

Make a bootable USB flash drive with Windows 7
Where to download the Windows 7 image - watch the video below
Very often, when reinstalling Windows, you need a bootable USB flash drive with Windows 7. How to do it? The process itself is not complicated, but let's try to figure it out.
Here we will describe 2 very different methods in order to create a bootable USB flash drive from an iso image.
We will analyze everything from beginning to end, we will try to clarify all the details of creating a bootable installation flash drive with Windows 7
We also recommend reading the article on how to properly install Windows from a flash drive; sooner or later it may come in handy. All programs used here work perfectly under Windows 7, 8, 10.
The 2nd method is also very noteworthy; with it we will make a bootable Windows 7 flash drive without any programs, using the Windows command line, although it is noticeably more complicated.
It is important to keep in mind that the USB ports must be in order (or at least one of them is what we need). The fact is that if we use a faulty USB, then there may simply be a loss of contact and nothing may work out. Plus, of course, the flash drive should also be in order, in general, keep this in mind.

Original Windows 7 images for flash drive here: http://nnm-club.me/forum/viewforum.php?f=504
Let us clarify the following points when creating a bootable USB flash drive with Windows 7:
- First we need to find a windows iso image(to do this, in any search engine we write - download Windows 7 torrent, download one of the proposed options using the free torrent program. However, do not forget that you have a good antivirus, plus you can download only from trusted sites, ask your friends and acquaintances about such ). We will assume that we have found
- Let's move on to the flash drive, we will completely clear it, so copy all important data from it in advance
- Also, don’t forget about the size of the flash drive.. You need at least four GB, although more correctly it is no less than the size of the iso image
How to make a bootable USB flash drive for Windows 7-10? Step-by-step instruction
Now let's prepare the flash drive, for this we need to format it. We do it like this:
- We go to “My Computer”, find the flash drive we need there
- Right-click on it
- Select "Format"
- In the window that appears, you can also check the box for “Quick, clearing only the table of contents” - this will be quite enough in most cases
- That’s it, click “Start”, an additional warning may appear, we agree
- We wait for the process to complete (usually no more than a minute)
- At the end, the flash drive is ready for further actions, it is completely empty

If you have any questions with formatting or would like to learn more about this important and useful process for information storage devices, we recommend that you view the corresponding section. In which, by the way, you can select a program for formatting a flash drive, if it does not want to succumb to this process in the standard way (as described above), plus with the help of additional programs for formatting a flash drive, you can improve its technical condition.
Now we are almost close to the process of creating a bootable USB flash drive with Windows 7, for this we will consider a very interesting and simple program .
Download the original ISO image of Windows 7
The simplest, most convenient and free program to solve our problem is Windows 7 USB/DVD Download Tool
Very convenient, bootable fleshka is done in just 4 clicks, and it can also be made into a boot disk.
Or you can do it from the official website using this direct link http://wudt.codeplex.com/ (copy, paste into the address bar of the browser and press enter).
The Microsoft .NET Framework_Online_Setup is also required in the system (completely free, online loader, which means the Internet must be turned on), usually this utility is already installed in different windows assemblies. In general, this is an official application from Microsoft, it is also important for the operation of other programs and games.
And so, you downloaded Windows 7 USB/DVD Download Tool. Now install it.
Open the program. We see this window.

Click on “Browse” and look for the Windows iso image we need on the computer.

Now if you specified an iso image, click “Next”. Now click on “USB device”.

Here we click on “Begin copying”.

And so began the process of recording an ISO image of Windows 7 onto a USB flash drive. We are waiting for the end.
The Windows 7 bootable USB flash drive is ready.
We recommend that you read the article on how to properly install Windows 7 on a netbook. So you will know what to do if the question arises of reinstalling Winows 7 on a netbook, laptop or computer without disk drive.
The second method is not simple. It is interesting for those who do not want to install any additional programs on their computer
This method uses the Windows command line, through which, by the way, you can do many more interesting things.
And so, let's go. We connect the flash drive to the USB port. Please note that a 4 GB flash drive will be used here. Open the command line like this, “Start” - “Run”:

Enter the command “cmd” and press “Enter”:

This is what should appear:

The first command we enter is “diskpart”, a special editor that gives us the ability to manage disks, press “Enter”:

Now we write “list disk” and press “Enter”, thereby getting a list of devices:

Now you need to determine without errors where your flash drive is located, in our case it is “Disk 3”. It most likely will not match yours, just make sure that you have found your flash drive correctly. If you have, for example, a flash drive “Disk 1”, then write it in the line and press “Enter”.
Attention! If you do not correctly identify the flash drive, you can format one of your hard drives and lose all the information on it.
- So, enter “select disk 3″, press “enter”
- The program detects our flash drive
- Now enter “clean”, which will delete files on the flash drive, press “enter”
- Next, enter “create partition primary”, press “enter”
- With this command we created a section
- Now enter “select partition 1”, press “enter”
- Now enter “active”, again “enter”
- Now we need to make the file system format for the flash drive NTFS by formatting it using “format fs=NTFS” or for quick formatting we write “format fs=NTFS QUICK”, press “enter”
- We are waiting for the completion of the formatting process
- All is ready
- We write “assign” and the flash drive will automatically receive a letter, for us it is J
- Upon completion, a window with the flash drive will automatically open
- Now we need to exit using the “Exit” command
- That's it, the bootable USB flash drive has been created, now you need to copy all the files from the installation operating system to it
It’s just important to understand that it’s not the iso image that should be copied in one file, but all the folders that are included in this iso image. To do this, you just need to mount it with some program, for example DAEMON Tools.
That's all, we have looked at the question of how to create a bootable USB flash drive with the Windows 7 operating system.
Windows has long occupied the leading position in the field of home computer technology. The share of 99% are cases when Microsoft OS is installed in the house where there is a computer. This article is aimed at covering in great detail the procedure of how to create a bootable USB flash drive for Windows 7, functional properties and difficulties.
Why create a bootable USB flash drive for Windows 7
Mobile technologies also do not stand still. Just 5-6 years ago everyone had regular cell phones, but today almost everyone has their own smartphone. And the vast majority are running Android OS. You can read more about how to create your account on Android.
And of course, every day more and more people are trying to make money using the Internet, there are many effective ways, but the most effective one today is traffic arbitrage. If you want to try to gain financial independence and make money on the Internet, then detailed step-by-step instructions are described in the article.
But today we will talk about more familiar things, in particular about creating a bootable flash drive. Effective mastery of a topic can only be achieved with a complete approach to the content of the question. Therefore, you first need to understand the question of the necessity of the process itself. Traditionally, all Microsoft products were shipped on disks. But often there is a need for a bootable USB flash drive, and here are the main reasons that cause this need:
- The process of technology development is continuous. Try to remember the last time you used disks on your computer? For a computer, disks are gradually becoming an unnecessary appendage. Some computer manufacturers have completely abandoned the disk drive on some devices. And creating such a flash drive is a simple necessity.
- Fast installation speed of Windows 7. About 10 years ago, the USB 3.0 interface appeared, which significantly reduces installation time if it is inherent in a specific media. So, installation from a Windows 7 disk will take about 20-40 minutes, and from a flash drive it’s twice as fast. Later we will reveal in detail the process of creating a flash drive that supports such an interface.
- This is simply more convenient than storing all the necessary information on disks. One small bootable USB flash drive can fit Windows 7, leaving room for other programs your computer needs.
It’s worth mentioning one more thing: you can create not only a flash drive, but also an SD card, but not all laptops and computers will be able to accept them; this entirely depends on the device on which the system will be installed.
An easy way to create a bootable USB flash drive
This subsection of the article will reveal the essence of two methods that will help you create a bootable USB flash drive for Windows 7. Both of them are quite simple, but the first is characterized by greater stability of the software. What is needed for this:
- Disk image. You can download it using the Internet on any torrent tracker. If you want a “clean” system, you can make an image from a disk, but we will describe this process a little later in the article.
- UltraISO software. The free version does not allow you to work with images larger than 300 megabytes, so you need to purchase a licensed version for 1,400 rubles or download a hacked one.
- Flash drive with a capacity of 8 gigabytes or more. It is recommended to format it using the NTFS file system before starting work. If you do not perform this procedure yourself, UltraISO will automatically perform this action for you. Therefore, you first need to make sure that there are no important files or information on the media.
Let's take a step-by-step look at how to create a bootable USB flash drive for Windows 7:
- Launch the UltraISO program. This must be done on behalf of the administrator.

- Open the file tab located on the left. Here you need to specify the path to the image intended for transfer to a bootable USB flash drive. The image creation process will be described in more detail below.


- The image is ready. Now we indicate the path to the flash drive intended for creating the image. You need to select “Boot”, then “Burn Hard Disk Image”. Next, in the Disk Drive area, you need to select the required flash drive.


- Click record. Here the system will notify you that the data has been deleted. The process of creating a flash drive has begun.
This is how, with four simple steps, you can easily create the media we need.
Create a bootable USB flash drive for Windows 7 using the official Microsoft program
If some reasons prevent you from using UltraISO, for example, you don’t like to purchase software from government enterprises, and you can only use licensed software, you can use a free utility - USB DVD Download Tool. The official website contains a source where you can download it for free. This program will allow you to create bootable media if necessary.
- After completing the downloading process of the required program, you need to launch it, select a ready-made system image in ISO format in the window that opens, then click “Next”.

- After this, we will be prompted to write the image to the media. We select a flash drive from the presented options.

- Next, you will need to select the media on which the image will be created. As is the case with UltraISO, the system will ask for your consent to format the flash drive, and then start the process.

Creating a Windows 7 image before writing to a USB flash drive
When downloading an operating system from the Internet, there is a high probability that the finished image downloaded will already be in iso format. But if you have a disk with the system, and also the need to create a bootable USB flash drive for Windows 7 with this particular system, then the proven UltraISO program will help you in this situation. Here are the detailed instructions:
The left column should show the disc inserted into the drive. This disk must contain the required operating system. Click tools, then the first item in the drop-down window is to make an image
After which the program will begin creating a disk image. Upon completion, you will be asked to open the resulting image - we refuse.
Thanks to these simple instructions, you can create an image of any disk that you need. Windows 7 is no exception.
Installing Windows 7 from a bootable USB 3.0 flash drive is an important preparation step
Creating a bootable USB flash drive, as we have already found out, is quite simple, but then serious problems can begin. One of which is the lack of support for the required USB in the Windows 7 bootloader. The problem can be solved in a simple way - by plugging a flash drive into a USB 2.0 port. However, this move will not always help solve the problem in this way. But the presence of another method that allows you to solve this issue with a completely different approach.

To begin with, it’s worth saying that on media and on computers, USB 3.0 ports are marked in blue or light blue, so you won’t confuse them with others. Let's look at detailed instructions on how to install Windows 7:
- You need to download drivers for the motherboard of your device that are responsible for supporting such USB. You can download them from the manufacturer's website. They are always available for free. Be sure to unzip them. Be sure to make sure that the files are in .inf format.
- The next step is to create a winpe folder. Then you need to create a usb3 folder and a mount folder inside it. For convenience, this is best done in the root directory of drive D, since then we will have to enter some of the commands manually.
- Place the unzipped drivers in the usb3 folder.
- You should already have created a bootable USB flash drive by following the instructions above. Then in it you need to go to the sources folder, where you can then find the boot.wim file. It needs to be duplicated in the winpe folder.
- Then we launch the command line (the Win+R key combination will help open a window where you need to enter cmd). In the Command Line we indicate the path to the winpe folder, this is done like this: we write cd /d the path to the folder, in our example we get cd /d D:\winpe, press enter.
- Then you need to write three commands, pressing enter after each: They need to be written in strict sequence. Thus, we write the drivers for the required USB into the bootloader.
- After that, copy boot.wim from winpe back to sources. When prompted to replace, click yes.
Now your bootable flash drive can work with USB 3.0.
Conclusion
Today we looked in detail at how to create a bootable USB flash drive for Windows 7. We looked at the two main methods and programs that you need to work with. With the help of these instructions, even the most inexperienced user can not only create a flash drive, but also teach it to work with the increasingly popular USB3.0.
How to create a bootable USB flash drive with Windows to install the operating system from a flash drive? You can create a bootable USB flash drive with the Windows operating system using various programs specifically designed for this purpose.
Now you will learn how to create a bootable USB flash drive to install the Windows operating system using the free Windows 7 USB/DVD Download Tools.
As the name of the program suggests, it is designed for recording the Windows 7 operating system onto an external USB drive or DVD. This program also allows you to create a bootable USB flash drive with the Windows 8 or Windows 10 operating system on computers using the old BIOS.
Why might you need such a bootable flash drive? Most netbooks and some laptops do not have an optical DVD drive. In the absence of a DVD drive, these devices have a pre-installed Windows operating system.
In the event that you need to reinstall the operating system, or install a different edition of the operating system, netbook users will have to buy a rather expensive external DVD drive. Using a Windows disc, you can do this if the operating system for some reason does not boot on the computer.
The way out of this situation is to install the operating system from an external USB drive.
In this way, you can install the operating system on a regular computer. You can create a bootable USB flash drive with Windows 7, Windows 8 (Windows 8.1) or Windows 10.
Installing an operating system from a flash drive is no different from a regular installation of the Windows operating system from an optical DVD.
The advantage of storing a boot image of the operating system is that an external USB drive takes up little space; is it more portable? and is also resistant to mechanical damage.
If you simply copy files with the Windows operating system to an external drive, you will not be able to create a bootable USB flash drive this way. To create a bootable USB flash drive, you must use a special program.
Windows 7 USB/DVD Download Tools for burning a bootable USB flash drive or DVD
To create a boot disk with the Windows 7 operating system, you will use the free Windows 7 USB/DVD Download Tools program produced by Microsoft Corporation.
The Windows 7 USB/DVD Download Tools program works in English, but it is easy to use and will be understandable to every user.
Owners of netbooks that do not have an optical DVD drive will need to copy the ISO image with the operating system to the hard drive of their netbook in order to be able to write this image to a flash drive.
To avoid any problems in the future, it is better to use the original image of the Windows 7 operating system or the image of the Windows 8 operating system to install it on your computer. You can activate the operating system after installation on your computer.
Download Windows 7 USB DVD Download Tools
After downloading the program to your computer, start installing the application. The program installation wizard works in English, but this will not cause any difficulties during the installation of Windows 7 USB/DVD Download Tools.
Bootable USB flash drive in Windows 7 USB/DVD Download Tools
After installing the Windows 7 USB/DVD Download Tools program on your computer, you will need to launch the program from the program shortcut on the Desktop or from the Start menu. Before starting the program, you need to insert the USB flash drive into the USB connector of your computer.
The flash drive will be formatted using Windows 7 USB/DVD Download Tools. Before formatting, in order not to lose the files on the USB drive, they will need to be moved to another location, otherwise they will be lost after the formatting process is completed.
The entire process of recording an operating system image occurs in several stages and takes four steps.
In the first step, you need to click on the “Browse” button. In the Explorer window that opens, you must specify the path to the ISO image with the Windows 7 or Windows 8 operating system.
In this example, I have selected a disk with an image of the Windows 7 SP1 Maximum 32-bit operating system, which is located on the external hard drive “K:”. After selecting the operating system image, you must click on the “Next” button.

In the second step, you need to select an external USB drive. The program can transfer operating system installation files to a DVD disc. In this case, when you select a DVD optical drive, the program will write the operating system image to a DVD disc.
After selecting the USB drive, click on the “USB device” button.

In the third step, the program detects the connected external USB drive. If several external drives are connected, then select the one on which you will write the operating system image. After this, you will need to click on the “Begin copying” button.

Now the fourth step of the program begins. Windows 7 USB/DVD Download Tools formats the USB drive and then writes an image of the Windows 7 operating system.
The operating system image recording time depends on the power of your computer.

The Windows 7 USB/DVD Download Tools window appears with a message indicating that the process of recording the operating system image has completed. A bootable USB flash drive with an image of the Windows operating system has been created.
In this case, recording an image of the Windows 7 SP1 Maximum 32-bit operating system took me 12 minutes with antivirus enabled.

Now you need to exit the program and then open the USB drive. After opening the flash drive, you will see the recorded files of the Windows 7 operating system on your removable drive.

To install the Windows 7 operating system, or the Windows 8 operating system, you need to insert a flash drive into the USB connector of your computer.
After this, you should turn on the computer. At the very beginning of the boot, you will need to enter the “BIOS” (by pressing the “Delete” key on the keyboard or another one, which is indicated at the bottom of the monitor screen when you start the logo of your computer’s motherboard). In the BIOS settings you will need to set the boot priority from a USB drive.
After this, the process of installing the Windows operating system on the computer begins. The process of installing the operating system is exactly the same as from an optical DVD.
Conclusions of the article
The Windows 7 USB/DVD Download Tools program allows you to quickly and easily create a bootable USB flash drive for the Windows operating system, or burn the installation image of the system to a DVD disc.
Creating a bootable USB flash drive in Windows 7 USB/DVD Download Tools (video)
Currently, flexible storage media, or rather CDs, are being replaced by more advanced ones - solid-state drives or flash drives. Today, the data transfer speed of some flash drives is comparable to the speed of a full-fledged hard drive. And I'm sure this is just the beginning. Flash drives are very compact and convenient storage media with high data transfer speeds. Today, almost everyone can purchase a flash drive with a USB 3.0 interface, the peak speed of which can reach 5 Gigabits per second. This, of course, sounds a little unrealistic, but still... On average, a flash drive accessible to any user supports writing and reading speeds of 30-40 Megabytes per second. This is somewhere around twice the maximum read speed of conventional floppy disks. A bootable USB flash drive with Windows 7 64-bit will allow you to install the operating system two to three times faster than a boot disk. And this, I hasten to tell you, is true. But how to create a bootable USB flash drive with Windows 7? Everything is very simple.
To create a bootable USB flash drive with Windows 7 64-bit, you will need the flash drive itself, an image of the operating system and a program with which we will do all this. For this purpose, I always use a professional program for working with images - UltraISO version 9.5.3.2901. At the end of the article I will leave a link to download this program from the Internet. However, before directly creating a bootable flash drive, it is necessary to check it for errors. To do this, open “My Computer” and on the icon of your flash drive, for example, for me it is “Disk H”, right-click once. After that, in the menu that appears, select “Properties” (just click on it once with the left mouse button). 
A window will appear in front of you in which you can see information about your flash drive (total volume and amount of free space). 
Here you need to select the “Service” tab, and then click on the “Run check” button with the left mouse button. 
Another small window will appear with scan parameters, where the checkbox should only be on the “Automatically fix system errors” item. Click on the "Launch" button. 
When the scan is complete, a message appears indicating that the device or drive has been verified. If everything is fine with the flash drive, the message will read “No errors found. The device is ready for use”, as shown in the picture. 
Now the flash drive needs to be formatted. To do this, you need to right-click on the flash drive icon and select “Format” from the pop-up menu, as shown in the picture. But before that, save all the files you need from the flash drive to a local disk, because after formatting all files from the flash drive will be deleted. 
A window with formatting options will appear. The actual capacity of the flash drive is indicated at the top. The default file system will be "FAT32". You can leave it or select “NTFS”. I won’t stop here - the only thing you need to know is that the NTFS system, unlike FAT32, supports files larger than 4 Gigabytes (these can be movies, images of games, programs or operating systems) . Let it be "FAT32". Leave the cluster size at “Standard”. The volume label is the name of your flash drive; the system will see your flash drive under this name. I usually name a flash drive depending on what I store on it. In this case, “Windows 7”. Check the “Quick clear table of contents” box, then click the “Start” button. 
A window will immediately appear warning that all data from the flash drive will be erased. To start formatting, click on the “Yes” button. 
After formatting is complete, a small window will appear, as shown in the picture. Click the “Ok” button and close the formatting window. 
Now we run the program to create a bootable USB flash drive with Windows 7 - UltraISO. A main window will appear in which you need to click on the “Open” button, as shown in the picture. 
Let's select the operating system image that needs to be written to the flash drive. I hope you know where exactly it is located on your hard drive. Click on the required file twice with the left mouse button or once with the left mouse button, first on the file and then on the “Open” button. It will look approximately as shown in the picture. 
And this is what the program window will look like with the Windows 7 image open in it. 
Now you need to select the “Burn hard disk image” menu item in the “Boot” tab. The picture shows what it will look like. 
A window will open with options for writing a Windows 7 image to a USB flash drive. Disk Drive is the device on which the image will be written. If you have one flash drive on your computer, it will be automatically selected. The recording method should be “USB-HDD+”. We don't touch the rest. Click the “Record” button. 
A confirmation will appear indicating that all data from the flash drive will be erased. We agree by clicking the “Yes” button. 
The process of writing your chosen image of the Windows 7 operating system to the USB flash drive will begin. 
After the operation is completed, the message “Recording complete!” will appear in the window. You can close the UltraISO program. 
Burning a bootable USB flash drive with Windows 7 is complete. You can proceed directly to the installation of Windows 7. I wish you success! Be on friendly terms with your computer!
