Installing Remix OS on VirtualBox. Select an operating system based on Android OS: Android x86 and Remix OS Ritmix os installation on a PC
On January 12, the official release of the Remix OS 2.0 shell took place, which is based on Android x86 and is intended for computers and hybrid tablets. We decided to look into installing this system on computers and prepare an article about this process for Trashbox readers.
Summer 2016 Remix OS 3.0 released. Read more about it on Trashbox: Before the instructions itself, it’s worth telling what this Remix OS 2.0 is. This fork of Android x86 aims to bring the Android app ecosystem to computers with a desktop-friendly interface. In the second version of Remix OS, developers from the startup Jide added a convenient windowed interface where you can use several Android applications at the same time. At the same time, applications are scaled to fit the size of the window, and the entire interface has normal controls for the mouse and keyboard - no bottom bar with three buttons.
How to install Remix OS 2.0 on your computer
To install the system, you will need a USB flash drive that supports the USB 3.0 standard, a write/read speed of at least 10 Mbit/s, a memory capacity of at least 8 GB, as well as the computer itself on which you are going to install the system. It is worth noting that the requirements for a USB drive are quite formal - many users installed Remix OS 2.0 using an old USB 2.0 flash drive with 4 GB of memory.1. Download the image and install it on the flash drive
You can download the system image on the official website of the startup Jide via direct link (687 MB, torrent). Available image with EFI support (torrent). You can also download the image for 32-bit systems (torrent). Inside the archive you will find both the image itself and a special utility for installing it on a USB flash drive. Before you proceed to install the image, you need to format your drive for the FAT32 file system and delete all data.Updated: On March 1, 2016, the first beta version of Remix OS 2.0 was released. Latest links to download the system:
- 64 bits (UEFI + Legacy BIOS) - direct link + torrent.
- 32 bits (Legacy BIOS) - torrent.
The Remix OS USB Tool utility, which you can find in the archive with the image, is a special variation of Unetbootin. Launch the utility, select the Remix OS 2.0 ISO image, as well as the USB drive on which you will install it. Next, click the “Ok” button, after which the installation of the image on the flash drive will begin. You can also use the original Unetbootin utility by selecting the FreeBSD distribution and the Remix OS 2.0 image. The result will be similar.

If everything went well, the utility will immediately prompt you to restart your computer to boot into Remix OS 2.0 from the flash drive. If you are installing the system on the same computer where you are recording the image, then you can safely press the reboot button, but before that it is better to read the next paragraph of the instructions.
2. Boot from USB
After restarting the computer, you need to call up the alternative boot menu. On different computers this is done in their own ways. On ASUS laptops - with the Esc button, for example. On regular PCs, mainly using F8 or the buttons next to it. It’s better to find out about this on the Internet in advance. Also , before such a boot, you should check the Legacy Boot Mode Enabled function in the BIOS. It must be enabled.
After turning on the computer, call up the alternative boot menu and select your USB drive in it. Next, a menu with two items should appear on the screen - “Guest Mode” and “Resident Mode”. The first is the normal Live CD mode, where the user boots the system from disk and tries it out without saving all the data. The second mode allows you to use Remix OS 2.0 as a full-fledged system on a USB flash drive. When this mode is selected, the OS boots in a mode where all the user's progress and manipulations are saved on the drive and can be accessed the next time.
It is for the “Resident Mode” that a USB 3.0 flash drive and fast write/read speed are required. The developers suggest that it is in the mode of saving all data to USB that you need to use Remix OS 2.0.
If your system does not boot after such an installation, you can try the same process, but enter a different command to call the installation programs: /kernel initrd=/initrd.img root=/dev/ram0 androidboot.hardware=remix_x86_64 androidboot.selinux=permissive quiet INSTALL=1
4. Alternative installation
You can also install Remix OS 2.0 from another Linux system, in particular Ubuntu. To do this, you must already have Ubuntu installed on your computer with the Grub bootloader.Instructions:
- Create a “remix” folder (without quotes) in the /directory directory on Ubuntu.
- Open the ISO/IMG image of the Remix OS 2.0 operating system with some archiver or simple explorer; take files from the image initrd.img, kernel, ramdisk.img, system.img and move them to the “remix” folder.
- Inside the “remix” folder, make another “data” folder.
- Open the console and enter the command gksudo gedit /etc/grub.d/40_custom
- The console will ask you for an administrator password - enter it.
- Next, a text editor window will appear with a specific document; at the end of the text you need to insert the following text (in order not to lose formatting, it is better to copy the code from there):
menuentry "Remix OS" --class android-x86 (
insmod part_gpt
search --file --no-floppy --set=root /remix/system.img
linux /remix/kernel root=/dev/ram0 androidboot.hardware=remix_x86_64
androidboot.selinux=permissive CMDLINE
initrd /remix/initrd.img
} - Save your changes and close the editor.
- Enter another command in the console - sudo update-grub
- Now after rebooting there should be a line in Grub with the launch of Remix OS 2.0. The system should work.
5. Another way to install from Windows
The community has also found another way to install Remix OS 2.0 on a hard drive using Windows and get a dual boot.To do this you need:
- Create a new partition on a disk with a capacity of at least 8 GB and the FAT32 file system. This can be done with a simple tool in Windows by typing the word “partition” in the Start menu search. Name the partition REMIX_OS.
- Download the Remix OS 2.0 image (in the first section of the article), if you have not already done so, as well as the EasyBCD program.
- Completely unpack the Remix OS 2.0 image (you can use WinRar) and copy all the files from it to the partition that you previously created.
- Install the EasyBCD application and launch it.
- In the program, select the menu “Add New Entry” → ISO.
- In the “Portable / External Media” section, in the Name field, enter Remix OS and click on the “Path” button and select the Remix OS 2.0 image that you downloaded.
- Next, click the “Tools” → “Restart Computer” button.
- Voila, you should see a dual boot menu on the screen - Windows or Remix OS. The system should work.
6. Install on a virtual machine
If you don’t want to install Remix OS 2.0 on your hard drive at all and risk the stability of other operating systems in case something goes wrong, then you can use a virtual machine, namely VirtualBox.Instructions for installing Remix OS 2.0 in VirtualBox (assumes that you already have a virtual machine program and a system image):
- Launch VirtualBox and bring up the menu for creating a new virtual machine. Call it any name, select the Linux type and the “Other Linux 64-bit” view.
- Allocate half (recommended) of your RAM to the virtual machine.
- Create a new virtual disk for the system, allocate 16 GB of memory for it.
- After creating the machine, run it and when selecting the disk from which it will boot, specify the Remix OS 2.0 image.
- If everything goes well, you will see a menu for choosing between Guest and Resident modes. Select Guest, but press Tab rather than Enter. After this, a line with text will appear below. After recording DATA_IN_NEM=1 need to add vga=791
- After that press Enter.
- Remix OS 2.0 should appear on the screen.
What you need to know about Remix OS 2.0
The Remix OS 2.0 shell is well optimized for working with a mouse and keyboard. Basic keyboard shortcuts like Ctrl + C / V / Z / X, Alt + Tab, Alt + F4 and others are supported. The Num Lock buttons work correctly with the entire number pad and Caps Lock.


How to install Google Play and its services on Remix OS 2.0:
- Download installation file
advertising
For a whole month, the site's laboratory was engaged in tests. But what if you need a full-fledged operating system built on the source code of that system? Perhaps it's time to consider a couple of contenders.We currently have two participants in the list of test systems - the original Android-x86 and the deeply customized Remix OS. These operating systems differ markedly from each other, and their common points of contact are the source code and support for the corresponding applications.
Let's take a look at each of the systems separately, consider all the details and note the “everyday nuances”. And to get a complete picture, at the very end we will say a few words about another developing operating system, which is built on Android, but has not yet left the test mode.
The test equipment used was a Lenovo Y510p laptop (Intel Core i5-4200M 2500 GHz, GT 755 SLI with 2 GB of memory, 4 GB of RAM, 1 TB HDD, Full HD, OS Windows 10 64-bit), as well as Acer W701 tablets ( Intel Core i5-3337U 1800 GHz, Intel HD Graphics 4000, 4 GB RAM, 120 GB ROM, Full HD, Windows 8) and Lenovo Miix 2 10 (Intel Atom Z3740 1330 MHz, Intel HD Graphics, 4 GB RAM, 64 GB ROM , Full HD, Windows 8).
advertising
Android-x86 (Android 5.1)

Acquaintance
A pure classic Android system is always good because it does not contain anything superfluous and provides a decent level of performance. But this is only on those smartphones and tablets that are approved by Google. What about the operating system created based on the original image?
Android-x86 is a user project that has nothing to do with Google and is supported only by the users themselves.
Beginning of work

To download the system image, you need to go to the official Android-x86 website, which does not shine with design and beauty, and select the required OS version. And since the project originated in the summer of 2009, the choice of operating systems is wide, ranging from Android 2.2 Froyo to the more or less current revision of Android 5.1 Lollipop. We will be testing the latest version - OS Android Lollipop.
Download the image, write it to a USB drive and install it. By the way, from “everyday experience” I will say that the drive on which the system will be installed is best formatted in EXT4 for Lollipop and EXT3 for other versions. Otherwise, Google applications and system maintenance software (such as SuperSU) will display a drive error.

After all the manipulations, the system boots, naturally, a little longer than usual. And then we need to go through the process of pre-configuring the operating system: select the language of use, connect to a wireless network, add your Google account, and so on.


advertising

Then we find ourselves on the main screen of OS Android 5.1.1, which does not differ in anything supernatural from the classic image of the operating system.
Accordingly, the menu with applications, the curtain with notifications, settings and all other elements have retained their original appearance: nothing has been redesigned, nothing has been changed. Only adapted for computers.

advertising
There are a minimum of pre-installed applications, basically all standard programs are present and nothing superfluous. Even GAPPS is not included in all assemblies; in our version, a couple of Google programs followed the standard.Since there is nothing new in the Android-x86 system image, let's talk about operational details. Let's start with the main thing, namely management. Due to the fact that the system is completely original, and the Android OS is not intended for use on a PC, corresponding management difficulties arise. Most modern games require using two or three points of contact with the screen at the same time, but this is not possible here - most computers are not equipped with a touch screen. If it is, then the display will work, but if not, then you need to use the Tincore Keymapper application for these purposes.
Android-x86 has a sleep mode that is automatically activated after closing the laptop lid or tablet case (of course, with a magnetic sensor or if there is a proximity sensor). True, depending on the build and version of the system, the operation of sleep mode and even its presence may change. In the case of the “original” OS Android 5.1.1, everything is exactly as described above.
And one more important point. In Android-x86, by default, all combinations of the Fn function keys work, as well as Print Screen - one press and the screenshot is saved in the system. It's comfortable.
advertising
Application testing

To my surprise, Android-x86 works great with almost all applications and games. Everything we tried launched and worked without any problems, even Real Racing 3.
advertising

The WOT Blitz game on both Lenovo Miix 2 and Lenovo Y510P worked with the maximum number of frames - 60 FPS. Only sometimes the number of frames per second dropped to 45-50. You can even install higher quality textures, increase detail and enable effects - with this set we will get 30-35 FPS.
Here is a summary table of application performance.
A small nuance. If any game crashes with an error or does not start, you need to go to the following path: “Settings” - section “Device” - “Application Compatibility” - and check the box next to “Enable native bridge”.
advertising

And if in some games you have problems with textures, from which no one is immune, then you need to wait for the system or game to be optimized, or install GLTools or Chainfire3D and try to configure the game for a specific device.
Performance

Android-x86 latest build is based on Android OS 5.1.1 and contains all the necessary security packages. The system boot speed depends on the device configuration, generally up to one minute even on the most ancient device.
advertising
Hardware acceleration works with video adapters from Intel, AMD and Nvidia. But you need to be more careful and familiarize yourself with technical forums in advance, since GMA series video cards, which are based on PowerVR, and AMD Radeon up to the seven thousandth series are adequately supported. Various problems arise with other hardware. In this case, you need to test various assemblies, including custom ones, but all this is at your own peril and risk.Wi-Fi and Bluetooth can be problematic, especially if the device is very old and lacks software support. Basically, only Broadcom chips work well. You can check support for a specific model in a special table on the official website of the project.
The results of synthetic tests are quite average, say, a little better than those of emulators. True, depending on the build and version of the system, the performance and operability of the system can change dramatically.
| Test | Version programs | Grade |
| AnTuTu Benchmark | 6.0.4 | 110 000 |
| Geekbench | 3.4.1 Build 1047 | 1 300 and 2 200 |
| Quadrant | 2.1.1 | 7 300 |
conclusions
advertising
Android-x86 is a good option for those who know first-hand all the intricacies of using the Android system. In this case, users may have to struggle with hardware compatibility, look for a suitable OS version, and install the operating system more than once. And if you are ready for this, then it will please you with good performance and stable operation.Every Android user dreams of installing this operating system on their computer. Remix OS is a new OS based on Android with a desktop interface, and we'll install it now!
Remix OS was created by former Google employees, based on the Android operating system, but by default it has a convenient desktop interface (like Windows), opening and running applications in multi-window mode, a taskbar and notifications, millions of programs and games, and all this for desktop computer completely free!
Now from words to action! In this article, we will learn how to install it on your computer or laptop so that you can later boot into both Windows and Remix OS.
Download the Remix OS image
In order to install Remix OS, you must first download it; this can be done by going to the official website of the developers.

There are versions for both 64-bit and 32-bit systems. You can find out which version your computer supports by looking at the characteristics of your processor on the Internet (almost all processors after 2011 are 64-bit).

Creating a separate partition
The developers of Jide Company have provided for installing the Remix OS system directly on the disk C:, where Windows is already installed, is not quite the right approach, so we will create a separate partition for our desktop Android!
What and how to create a Section?
We will create a partition using standard Windows tools, through disk management.
To go to disk management:
1 . Go to " Control Panel» -> « System and safety»;


Create a section
1
. If you have two or more logical drives, right-click on the one with the most free space and click " Shrink Volume"if you only have one partition C:, then the choice is not great, we compress it. 


Everything is ready, now we proceed to the stage of preliminary installation of Remix on the computer.
Pre-installation of Remix OS
After we have created a partition for Remix OS, we move on to the stage of installing the operating system on a hard drive under Windows.
1
. Unpack the archive with Remix OS;
2
. Run the supplied utility remixos-installation-tool;


3 . We select the image, installation on the hard drive, as well as the partition that we created for our desktop Android.


All is ready! Now all that remains is to restart your computer and finish the installation!
Installing Remix OS on your computer
1 . After the computer reboots, you will be asked to boot into Windows or Remix OS, select the second option, after which further installation of the operating system will begin, approximately this will last from 5 to 15 minutes.
2 . At the end, you will be asked to select a language and the Remix OS desktop will appear in front of you;
3 . In the settings you can set the localization to “Russian language”.

(rutube)872aa95900eb7a368c22f6cac7401123(/rutube)
On January 12, what tens of thousands of users had been waiting for happened! The official version of the Remix OS operating system has become available for download online. For those who have not yet heard anything about it, let us explain that this is a version of Android that runs on personal computers and laptops running Windows, Linux or OS X.
Remix OS is perfectly adapted for working on a computer using a keyboard and mouse, supports multitasking and working in windowed mode, has a nice interface, a start menu, support for hotkeys, etc. But most importantly: it can run any Android applications from Google Play market!
What the system looks like in operation:
Installing Remix OS on a PC is quite simple, but for ordinary users this task can be difficult. Therefore, as always, he promptly comes to the aid of his readers! :)
So, what do you need:
- Computer or laptop running Windows, Linux or OS X and having a USB output
- USB flash drive with a capacity of at least 4GB with the FAT32 file system. It is highly desirable that the USB version be 3.0 and not 2.0 - this will increase the speed of Remix OS
- ZIP archive downloaded from the developer's site (updated: the developer's site is no longer available)
To any folder on your hard drive. It will contain three files:
Run the file named “remixos-usb-tool-B2016011102.exe” (don’t forget to plug the flash drive into the USB port first).

Click the “Browse” button and specify the path to the system image (ISO file). Make sure that the correct letter corresponding to your flash drive is selected in the USB Disk field.
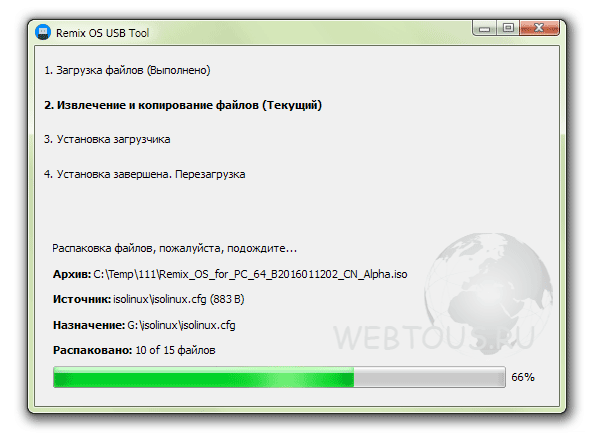
After clicking the “OK” button, the process of copying Remix OS files to the USB flash drive will begin. It takes on average 10 minutes, and up to 93% the copying process is very fast, but the remaining 7% moves very slowly.

After installation, click on the “Restart Now” button that will appear inside the installation window.
When you start loading the BIOS, press the F8 key to go to the menu for selecting the system boot (from which device):

Please note: on some motherboards this may not be F8, but another button (this should be indicated in the manual for the motherboard or laptop). For example, for ASUS laptops this is the ESC button.
In the boot menu, select your flash drive, after which the following window will appear:

There are two Remix OS operating modes to choose from:
- Guest Mode – without saving data at the end of the session (all installed applications, settings made, etc. will be lost after finishing work)
- Resident Mode – installed applications, changed settings, created files, etc. are saved on the drive and will be available the next time the system starts.
Tip: select Resident Mode only if you have a USB 3.0 flash drive
After selecting the operating mode, the system startup process will begin, and you will become a happy user of Remix OS and receive all the benefits of the Android system on your computer).

A short video demonstrating how Remix OS looks and works on a regular Windows laptop:
You cannot enable the Russian language at startup, but you can select it later. Just go to the system settings along the path: Settings -> Language&Input -> Language.

True, not everything has been translated into Russian, but downloaded and installed applications work in Russian, which is a big plus. (Thanks to user Ruslan for describing this method in the comments to the article).
We are waiting for your comments about how helpful these instructions for installing Remix OS were, how quickly everything worked out, and of course, your impressions of this system :)
P.S. According to information received from user Ruslan, the Russian language can still be set in the settings after starting the system (see comments to the article).
Hi all. I recently learned about the operating system Remix OS, built on Android.
Quite interesting system, optimized for laptops and PCs. There is a windowed mode, that is, you can open programs in windows, and not like in Android, in which you need to switch between them.

Of course the system Remix OS still raw, I hope that they will bring it to mind. 🙂 For example, due to some games, the system freezes completely, only a reboot helps. Maybe this is due to application incompatibility, or maybe because of the windowed mode.
Remix OS is installed on a flash drive with USB 3.0 support and can be used from any PC, just boot from it and not from the hard drive. The system also stores all data (downloaded applications, etc.) on a flash drive.
Personally, I recorded the system on a 2.0 flash drive, the write and read speed of which is 25 - 20 MB / s - this is quite enough. And it won't load Remix OS from a flash drive with a write speed of less than 10 MB/s. So, you can try recording on 2.0, it will tell you whether the flash drive is suitable or not. 🙂
Well, now let's get down to business and put Remix OS as a second system:
1. We will need EasyBCD and EaseUS Partition Master, download them here TYK TYK
3. Download the system itself from the official TYK website
5. We pull out the file from the archive, or rather the system image.
Using the EaseUS Partition Master program, we edit the partition from which we want to take at least 16GB.
— Select the partition from which we want to take 16GB and click “Change/move partition”, reduce it so that the unallocated space remains 16 gigabytes


- Now click on “unallocated” and create a partition, in “Name” we write REMIX OS, “File system” - FAT32


— Click “Apply” and get your 16GB partition.
Now you need to extract the files from the image itself onto the created partition. This can be done using the 7-Zip or WinRAR archiver.
Open EasyBCD, click “Add entry”: in the “Removable/external media” column - select the “ISO” tab, in the “Name” field write “REMIX OS”, in “Path” select the image of our system (from which we dropped the files into the section ) and click add. By the way, the image cannot be deleted or moved (the system will not start), so it is better to throw it into the created partition too.

