How to clean iPhone 4s completely. Factory reset and hard reset of Apple iPhone. Disable Find My iPhone service
Due to various circumstances - malfunctions, loss or sale, for example - the owner has a need to either partially or completely erase all the information in his “six”. The manufacturer took care of several different options for performing this procedure.
Reset current settings
If you want to clean up your smartphone’s memory, which is already quite cluttered with programs, or recover from an unsuccessful installation of the iOS 8 update, this method will be useful to you. With its help, you can reset all its software settings to their original state, and only these, all the owner’s personal data will be saved.
This is especially true for a model with sixteen gigabytes of internal memory, when every free megabyte counts. And it’s good to clean it from time to time of software “garbage” that regularly accumulates, even if we seem to be installing nothing new. It’s just that existing programs are constantly updated in the background, and thereby fill up the already limited memory bins.
To do this, go to the settings menu, find the tab in it - General, in it, at the very bottom - select Reset.

After you launch this operation, the phone’s system settings will be “rolled back” to factory settings. However, all content: photos, music, videos, addresses, passwords, applications and others will remain untouched.
Delete everything!
But in some situations you need to thoroughly clean the system and permanently delete the contents of the sixth iPhone. How can you be sure to erase all the data so that there are no “loopbacks” or “tails” left anywhere for strangers to restore it - in case you are thinking about selling the gadget?
To do this, partially repeat the previous procedure, going all the way to the Reset menu. In it, this time select the offer to erase content and settings. The system will warn you that starting this process will lead to the loss of all existing data and media files and a reset of settings.

After you confirm twice that you agree to delete all data and enter your Apple ID password (password confirmation will be required if you previously activated the Find My iPhone function), the erasure will begin. Upon completion of the process, you will receive a pristine gadget, with basic factory presets.
Don't forget to make a copy of all personal information in iTunes or iCloud before erasing it so you can restore it to a new device if necessary.
Erase via iCloud
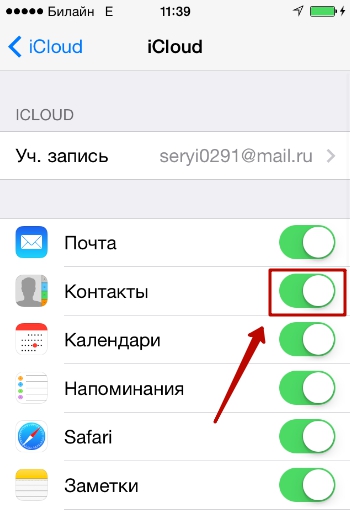
Another possible way to delete all data is through the above-mentioned proprietary Apple option Find iPhone. It is more labor-intensive, but no less effective. First of all, you will need to activate it if it has been disabled. To do this, connect your smartphone to the Internet. In the phone settings, find iCloud, in it - Find iPhone, and switch the sensor on the side of it to the active state.

The system will again ask you to confirm the activation of this responsible and important function - with a password, as well as an Apple ID.
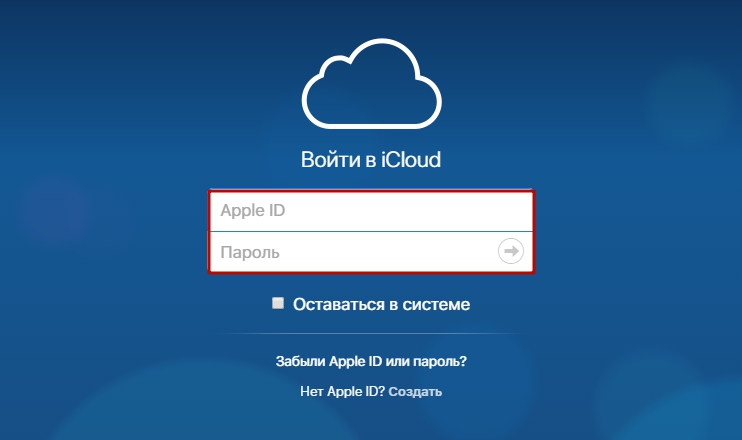
Then, using any third-party device - computer, tablet - go to the iCloud website. In the dialog box on the site, enter your Apple ID and password. After that, go to the site attachment - Find iPhone. Find the all devices tab in the top panel, click on the one you need from the drop-down list. Your iPhone will appear at the top right, with three action options - select erase.

When prompted for activation lock (preventing potential scammers from wiping your device after it's stolen), enter your ApID password again.
Then click “Next” and “Done” - the remote erasing process will start. Once it is completed, when you try to turn on the iPhone, you will again have to enter your Apple ID with the password.
After this manipulation, all changes you made while using the device are canceled. But the created iPhone backups still remain in the cloud, and you can use them to transfer them to a new gadget or when restoring the current one.
If, after erasing, you plan to sell your device, disconnect iCloud from your account so that the new owner can add and install his own without any problems. To do this, in settings, in iCloud, click the red “sign out” tab.
Plus, on the iCloud website, erase it from your Apple ID account. That’s it, your “six” is now clean and ready for sale!
Other erasing methods
You can also erase all data and settings through the iTunes program menu. After updating to the latest version and launching iTunes, connect your iPhone with a cable. In the overview menu on your computer, select your gadget, and in the window that appears, click on the offer to restore your iPhone.

If you previously activated the Find iPhone option, the program will ask you to disable it. Therefore, go to iCloud on your smartphone using the link described in the previous method and deactivate it. After disconnecting, click on “restore” again in the iTunes window. A recovery will start, erasing all user data and settings, and iOS will automatically update to the latest version. Ready.
That's basically all that needs to be done. As you can see, there is nothing complicated; even an inexperienced user can easily cope with the task and erase everything that was created on the iPhone. Sometimes erasing helps to successfully avoid certain system problems.
And we remind you once again, take care of your data and do not forget to make backup copies regularly. A few minutes of your time will allow you to save years of invaluable information accumulated. And removing it is a matter of seconds.
If you want to sell, give away or release your used iPhone to others, the first thing you should do is to erase everything on iPhone completely to keep your personal information safe. When you buy a second-hand iPhone, you may need to erase all the content and settings on the iPhone before using it to avoid unnecessary troubles. If you have deleted some private data on your iPhone, you must want them to disappear permanently to prevent your secrets being revealed.
Apple have considered these situations and erasing iPhone is rather easy. In this tutorial, 5 ways to erase iPhone will be introduced:
1.
2.
3.
4.
5.
Method 1: Erase iPhone directly with your iPhone (FREE)
1. Make sure that you have backed up your iPhone with iTunes or iCloud, and the backups are up to date if you need to restore the iPhone later;
2. Tap “Settings” > “General” > “Reset” > “Erase all Content and Settings” on your iPhone.
Method 2: Erase iPhone using iTunes with iPhone connected (FREE)
1. Disable “Find My iPhone” in “Settings” > “iCloud” if you have turned it on;
2. Connect your iPhone to your computer and launch iTunes;
3. Select the iPhone when it is found by iTunes;
4. In the “Summary” tab, backup your iPhone with either iTunes or iCloud using the “Backup Now” button if you want to restore the iPhone again;
5. When the backup is finished. Click the “Restore iPhone…” button in the same panel and then hit “Restore” in the pop-up to erase all the content and settings on your iPhone.
Method 3: Erase iPhone remotely with iCloud if your iPhone is lost or stolen (FREE)
You are able to erase iPhone only if you had enabled “Find My iPhone” before it was lost;
1. Log in to https://www.icloud.com/#find with your Apple ID, then click “Find My iPhone”;
2. Click “All Devices” and choose the iPhone you want to erase after it is located;
3. In the iPhone’s Info window, click “Erase iPhone”;
4. Click “Erase” in the pop-up window;
5. Enter your Apple ID password;
6. Click “Next” and all the content and settings on your iPhone will be erased.
If your iPhone is running iOS 7 or later, you are allowed to input a phone number and a message to display on the iPhone after it’s erased.
The remote erase of your iPhone will start immediately if it’s online; if it is office currently, the iPhone remote erase will start the next time it’s online.
Note: After easing an iPhone, you cannot use “Find My iPhone” to locate it any more. So, it’s recommended to locate it or play a sound on it before you decide to erase it remotely.
All the 3 above methods provided by Apple are not 100% safe since iPhone “Restore” does not delete personal data and there are so many iPhone data recovery tools available. If you want to erase your iPhone securely and completely, download the professional iPhone eraser SafeEraser.
SafeEraser is an easy-to-use but professional iPhone erase tool to erase all data (all the content and settings), only deleted data or just private data (Safari history, cookies, input history, search history and so on) on iPhone and overwrite the data with junk files using US Military specification over-writing technology to ensure the erased data is not recoverable. In addition, it also enables you to clean up iPhone data (such as log files, cached files, temp files and junk files) to free the storage space on your iPhone.
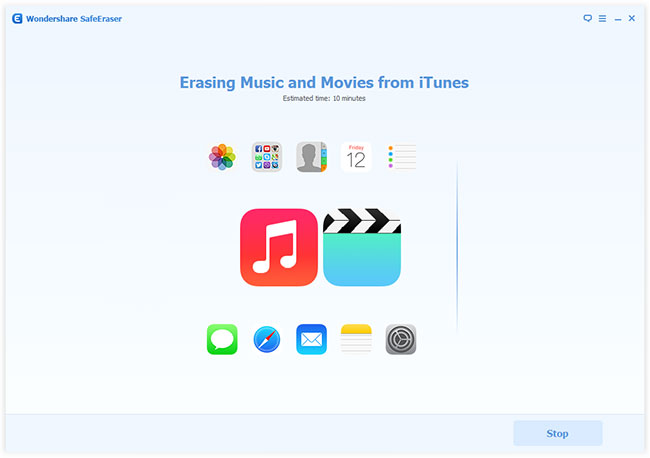
Method 4: Erase iPhone data completely and securely with SafeEraser
With this method, you can erase all the content and settings on your iPhone 4, iPhone 4S iPhone 5, iPhone 5s, iPhone 5c, iPhone 6, iPhone 6 Plus, iPod touch 4/5/6 and all iPad generations and restore the device to factory settings no matter whether the device is jailbroken or not, carrier-locked or not.
1. Connect your iPhone to your computer and launch SafeEraser;
2. After the iPhone is found by the software, choose “Erase All Data” on the right;

3. Click the link of “Security Level:” and change the “Security Level” as “High Level (3 Times)” in the “Settings” window;


4. Input “delete” in the box to confirm the iPhone erase and click “Erase Now”, then the iPhone eraser will start to erase your iPhone.
The “High (3 times)” Security Level uses the DoD 5220.22-M data sanitization standard originally defined by the US National Industrial Security Program (NISP) in the National Industrial Security Program Operating Manual (NISPOM). There is no possibility to recover the erased data on iPhone any more once the iPhone is erased with this method even if the government’s state-of-art data recovery technology is used.
Method 5: Erase deleted data on iPhone completely using SafeEraser
1. Get your iPhone connected with your computer using the USB cable came with the iPhone;
2. When the iPhone appears on the SafeEraser, select “Erase Deleted Files”;

3. The software will automatically start to analyze and scan the deleted data on your iPhone;

Many people have hundreds of posts and reposts accumulated on their social network walls. Since hobbies, tastes and views on life can change over time, some entries become embarrassing, some need to be deleted because they no longer seem funny. And it also happens that you need to delete everything. Then the question arises: how to remove all posts from the wall without wasting a lot of time on manual deletion? There are several fairly simple methods that you can use if you need to quickly clean VKontakte.
The first method is the most difficult, but is suitable for those who have few records and do not want to use special program code. You just need to delete it manually. We will now consider three other methods - through the address bar, a console command and using a special extension.
Don't worry in advance: you won't have to write unique code yourself for such a simple action. There is a special script and programs that will delete all posts from the wall in a couple of clicks.
How to delete all VK entries through the address bar
If you want to know how to delete all posts from a wall in VK, then the simplest answer is using a script. You will need to give the browser a special command in the address bar and the wall will be cleared without difficulty.
Note! If you use quick wall cleaning on VKontakte, then remember that by doing this you may arouse suspicion on the part of the administration of the social network. Support may think that someone is trying to hack you. In such cases, the administration freezes the page. Restoring it is not very difficult, but to do this you need to have access to the phone number to which the VK page is registered. If for some reason you don’t have a number left, and you don’t want to lose access to the page for a long time, it’s better not to use quick clearing. After all, recovery without a phone takes up to several weeks and requires a lot of effort.
If you want to know how to delete all posts from a VK wall using the address bar, carefully follow the instructions below:
java****script:var h = document.get****Elements***By***Class****Name("ui_actions_menu _ui_menu"); var i = 0;function del_wall())(var fn_str = h[i].get***Elements****By***Tag****Name(“a”).onclick.to***String (); var fn_arr_1 = fn_str.split("("); var fn_arr_2 = fn_arr_1.split(";"); eval(fn_arr_2);if(i == h.length)(clear***Interval(int_id) )else(i++));var int_id=set****Interval(del_wall,500);

If you did everything correctly, you will need to wait a while and the wall on VKontakte will clear. However, the method may not work not only because of your error, but also because there are internal changes in the browser or because the VK administration will limit the ability to delete all entries in VK in this way. If that doesn't work, you can try one of the methods below.
How to delete VK entries via console command
This method is more complicated than the one described above, but it is almost 100% likely to clear the entire wall of writing. In order to do this, you need:
- Open your browser and go to your VKontakte page.


- Rewind the wall to the very bottom, to where the first post is located. If you do not scroll to the very bottom, only those entries that are currently displayed for you are deleted. Rewinding may take a few minutes, but without this the console command will not produce the expected results. In order not to do this yourself, you can hold down the space bar or the End key with something and you can go about your business. You can put a small figure, a light pebble or a small magnet on the key, you can glue it with tape, the main thing is that it is constantly pressed. Soon, even a page with a thousand entries will reach the end without your participation.


- After this, you need to open the browser console. To do this, you need to call up the context menu (Shift + F10 for Windows or hold down the Ctrl key and click on the left mouse button if it’s a MacBook). Next, you need to select the “View code” option. In the menu that opens for you after this, you need to click on the Console tab.
- Please note that the command name for viewing the code will differ in different browsers. So, in the Firefox browser it will be written “Examine element”, you should select this option, and then go to the Console. You can also open the console using a combination of hotkeys, which are different for each of the popular browsers. For example, in order to open the console in Google Chrome, you must simultaneously hold down three keys - Ctrl+Shift+J. If you use the Mozilla browser, then the hotkey combination will be different - it is Ctrl+Shift+K. If you use Opera or Safari, as well as other browsers, you can search the Internet for a combination of hot keys in your specific case.

- After that, use the mouse or use a hotkey combination to copy the code below.
(function () ( 'use strict'; if (!confirm('Delete all posts from the wall?')) return; var delete***Post***Link = document.body.query****Selector** *All('a.ui_actions_menu_item');for (var i = 0; i< delete***Post****Link.length; i++) { delete***Post****Link[i].click(); } alert(delete***Post****Link.length + ‘ posts deleted’); }());
- From here you also need to remove all asterisks (*), no need to leave spaces or other characters.
- Then you should place the cursor in the console window and hold down the hotkey combination Ctrl+V. After this, you need to press the button to enter - Enter.
Please note that the wall does not clear instantly and the console command also needs to be given time. How quickly the wall will clear depends on how many entries you had. But in any case, cleaning will happen faster than Note: cleaning the wall does not happen instantly. The speed of deletion depends on the number of posts in your VK microblog. Regardless, it's much faster than deleting posts manually.
Cleaning Extensions
There is another simple way to clean a wall in VK, but you must remember that any unofficial extension like these can bring with it malware that will harm your computer, so you should not download this cleaning extension if you have you don't have a very good antivirus.
There are several browser extensions that can help you quickly clear your social media wall. For example, the VkOpt program. It is easy to use with a simple and clear interface. And the fact that the program is most likely safe is confirmed by the fact that the program is available for download in the Google Chrome store. If you use another browser other than Chrome, then in order to download it, you should go to the official website of the program vkopt.net.
After you have visited the site, you must:
- Download and install the browser extension.
- Open it.
- Click on the “Posts” tab; it should display the number of posts on the VKontakte page.
- After this, you need to select the Action tab.” Next, in the list that opens after this, you need to select the “Clean the wall” item.
- After this, you just have to wait until the program does its job and the wall on the social network becomes empty.
Conclusion
It is still necessary to clear the wall on VKontakte from time to time, since the posts you post can reveal too much about you and even serve as a reason for opening some criminal cases. Therefore, you need to not only carefully monitor what you post, but also periodically delete what you no longer find interesting, truthful or relevant.
We have given three simple ways to clean a VK wall. If you are not afraid of temporarily losing access to the page and you have a phone number in order to quickly restore it, then you should not bother and delete each post with your own hands.
Interestingly, previously it was possible to remove all posts from the wall in just a couple of clicks. But the developers specifically abandoned this option. The fact is that it was often used by ill-wishers who hack pages. They deleted records that were important to the user, which could not be restored later. We hope that you will use the above tips only for peaceful purposes in order to delete all unnecessary posts from your page.
Apple devices are in good demand in the secondary market. The Apple corporation has been supporting the iPhone, iPad, MacBook and other of its products at the software level for several years, which makes it attractive to purchase a device that has previously been in use. With careful use, externally and internally, Apple devices may not undergo changes over years of active use. Before you sell your iPhone or iPad, you need to completely clear it of accumulated information and reset its settings. This article will look at three ways to erase all data from an iPhone or iPad.
Formatting iPhone via iTunes
The best way to delete information from an iPhone or iPad involves using the iTunes application. This is because when connected to a computer, the user has the option to take a full backup of their device before wiping it. The backup will contain all the information from the iPhone:
- Individual settings for key system applications, including fingerprint information (Touch ID), data from medical programs, information about bank cards in Apple Pay;
- PDF files that were downloaded to the iBooks app on your device;
- Applications from the App Store;
- Videos, music and other content from the iTunes Store;
- Information synchronized with iTunes: books, photos, videos, music and more;
- Data saved in iCloud.
To create a backup in iTunes, you need to connect your iPhone to your computer, synchronize and select the appropriate item in the program menu. Later, the backup copy can be used on another iPhone to instantly set it up for normal use.

Once the backup is made, you can begin to clear the device of the information on it and reset the settings. To completely erase your iPhone you need to:

Important: While restoring your iPhone, you should not remove the wire from the device, otherwise a software glitch may occur that will cause errors.
Also, if you delete all data, you can revert to earlier versions of the software.
How to erase all data from iPhone or iPad remotely
Apple services allow you to remotely interact with devices if you know your Apple ID. If you want to erase all data from your iPhone or iPad, you can do it via iCloud as follows:

In this way, you can delete all information from the device, even if it is turned off. The signal will be sent through iCloud, and it will work the moment the iPhone or iPad turns on and connects to the Internet.
How to erase everything from iPhone or iPad
Completely clearing an Apple device of information is possible without connecting to a computer or remote control via iCloud. To carry out a full formatting you need to:

Note: Depending on the total amount of memory on the device, smartphone model, firmware version and other parameters, the formatting procedure can take from several minutes to half an hour or more. It is important that the smartphone is not discharged at this moment, otherwise it will have to be restored after
A user who has just switched from Android to iPhone will probably be surprised at how complicated and confusing the procedure for deleting a number on an Apple device is. On an Android smartphone, you can simply open the contact’s context menu and press “ Delete" There is no context menu or delete key, which would be located in a visible place. The owner of the gadget will be forced to climb through the book of numbers to find the required button.
We will simplify the task for a novice user and tell you how to erase a contact directly on the iPhone. In addition, we will describe methods for mass deletion of numbers that require the use of special software.
Manually deleting numbers involves performing the following actions:
Step 1. Go to the application " Contacts» on your iPhone and select the contact you want to delete.
Step 2. Click on the button Change" in the upper right corner of the screen.
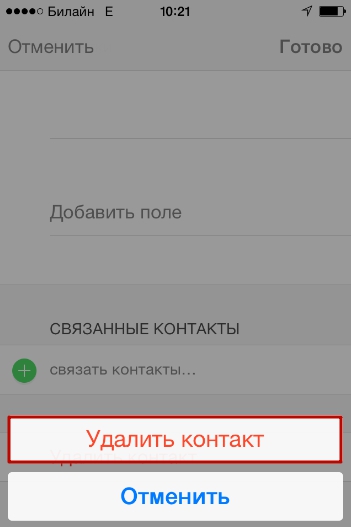
Step 3. Scroll down the next screen to the bottom - there you will find the button " Delete contact».

That's what you need. Click on it.
Step 4. Confirm that you want to say goodbye to the contact - click " Delete contact" again.
This deletion method is suitable if you need to erase a single number. If you need to clear the directory completely, deleting contacts one by one will take a lot of time. To perform this task, it is better to use special software.
How to delete all contacts at once on iPhone?
There are several ways to clear the phone book on iPhone. The most famous involves using the iTunes media combiner. Here's what you need to do to delete all contacts:
Step 1. Connect your device to your PC with a USB cable and open iTunes.
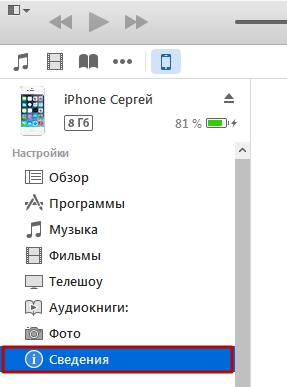
Step 2. Click on the button " iPhone».

Step 3. On the menu " Settings" Choose a section " Intelligence».
Step 4. Check the box next to " Sync contacts with" and in the drop-down menu select any option: " Windows Contacts" or " Outlook" Make sure that next to " All contacts" there is a period.
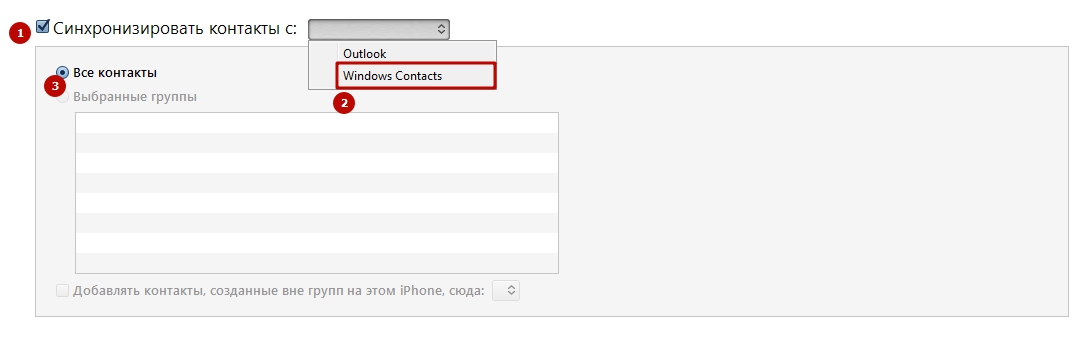
Step 5. Scroll down the page to the block " Add-ons" and check the box next to " Contacts».
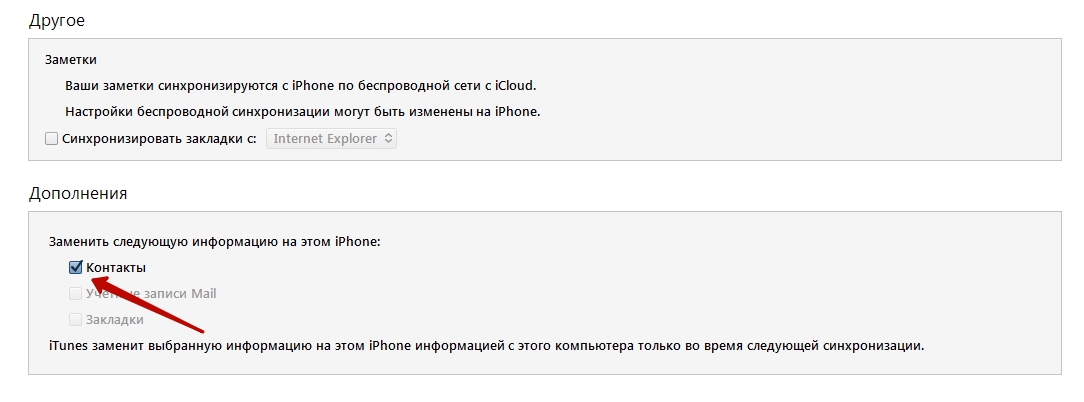
Step 6. Start the synchronization process - click " Apply».

As the synchronization progresses, iTunes will replace the contents of your iPhone phone book with information stored on your computer. If there is no file of the appropriate format on the PC, it is obvious that the directory will be empty.
There is a faster way to delete all contacts from iPhone – completely reset the device. To do this you need to follow the path " Settings» — « Basic» — « Reset" and select the option " Erase content and settings».
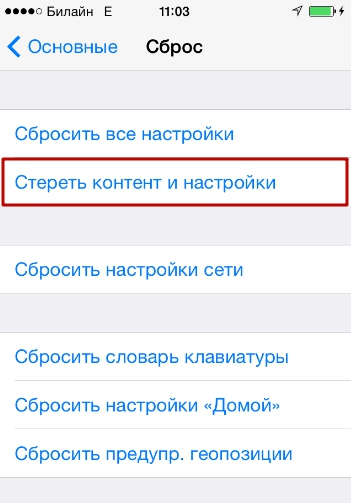
As a result, not only contacts, but also all user data will disappear from the device. It is better to perform a full reset procedure immediately before selling your iPhone.
How to quickly delete multiple contacts at once via iCloud?
If you need to delete several contacts at once (but not the entire phone book), you should turn to the iCloud cloud. For the method to work, you must log in with the same Apple ID on your PC and iPhone.
We will describe the entire procedure for deleting numbers via iCloud from beginning to end:
Step 1. IN " Settings» iPhone select section « iCloud».

Step 2. Enter your Apple ID and password in the appropriate fields. Then click " To come in».

Step 3. The iPhone will ask if you want to merge the information on your device with the data stored in iCloud. Select the option " Merge».

Step 3. Switch the toggle switch " Contacts» to the active state.
After this, you can put your iPhone aside.
Step 4. Go to www.icloud.com from your PC and enter your Apple ID/password.
Step 5. Hold CTRL on your keyboard and select the contacts you want to erase.

The selected contacts will appear in the list on the right side of the screen.
Step 6. Click on the small gear in the lower left corner.
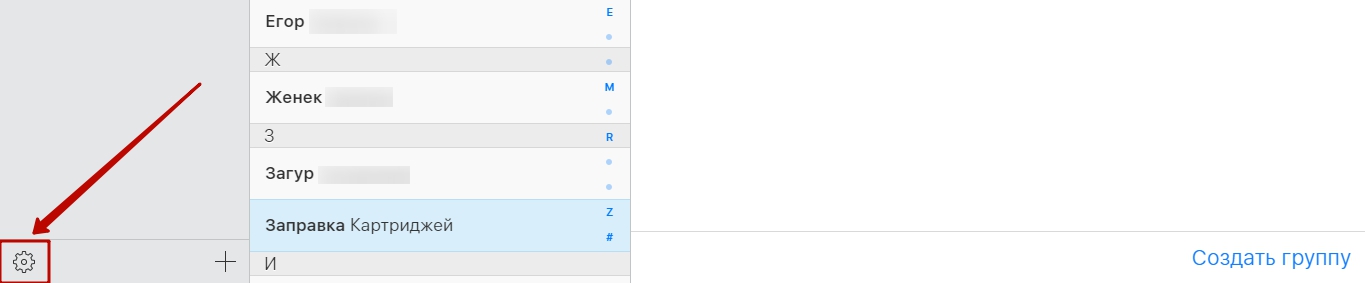
In the menu that appears, select the option “ Delete».
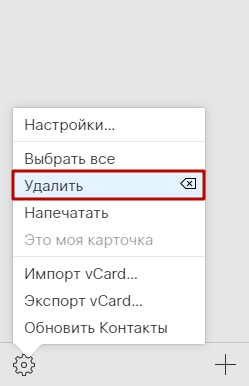
Step 7. Confirm that you really want to erase the number - click " Delete».

Wait a few seconds and you will see how the contacts you erased via iCloud will one by one disappear from your phone book.
How to delete numbers from a jailbroken iPhone?
The owner of a jailbroken iPhone has more options for deleting contacts from the mobile device. For example, he can use a tweak called Erase Contacts. The tweak is available in the BigBoss repository and is distributed completely free of charge. After installing the application, the following icon appears on the iPhone screen:
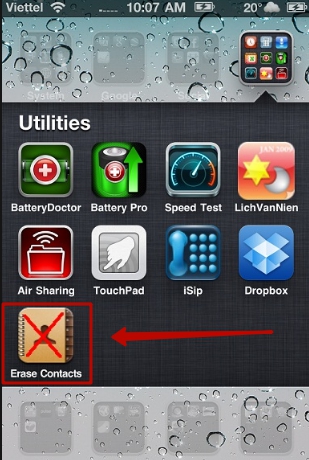
Image: 2mobile.com
Just click on the Erase Contacts icon and confirm the operation - all contacts from the phone book will be deleted.
There is another way - connect the jailbroken device to your PC and erase contacts through one of the file managers (say, iTools or iFile). In the file system, the telephone directory is stored at privatevarmobileLibraryAddressBook. If your iPhone is not jailbroken, this method will not work - in the “ User system"you just can't find the folder" Private».
Conclusion
There are many ways to delete contacts from an iPhone. It is necessary to choose a specific method based on the goal. If a user believes that a number of useless numbers are cluttering his phone book, he can erase several entries at once via iCloud. To delete one number, there is no need to contact iCloud - you can perform this operation directly on the device. If the user is preparing the gadget for sale and wants to erase all contacts, he will have to choose one of two options - use the iTunes media harvester or simply perform a complete reset of the gadget via “ Settings».
