What should the printer not do? What to do if the printer does not print
It doesn’t matter at all what manufacturer your printer is from, what model it is, and what printing method it uses (laser or inkjet), the reasons for equipment failure can only be of two types: technical and software. By technical reasons The device cannot operate if there are problems in its various modules. For example, problems with connection, mechanics, electric drive, or with the cartridge, etc. If there are software glitches, then, as a rule, they are associated with the interaction of printing equipment with a computer.
At first glance, this sounds implausible, but when it turns out that there is no connection with the printer, it turns out that some owners of this equipment forget to do basic things. For example, connect the device to the network or connect it to a computer using a special cable.
But, when the connection is made correctly, and the machine still does not print, then first of all, you need to make sure that serviceability of the USB cable itself. Sometimes it fails, and a message may appear on the PC screen that the OS does not recognize the device.

In this case, you need to purchase a new cable, preferably of high quality, with protection against interference.
Also, after connecting the device to the PC, it is necessary in the system itself select the desired printer, because Windows (versions 7, 8 and 10) may have multiple printing devices installed, and some of them are virtual.
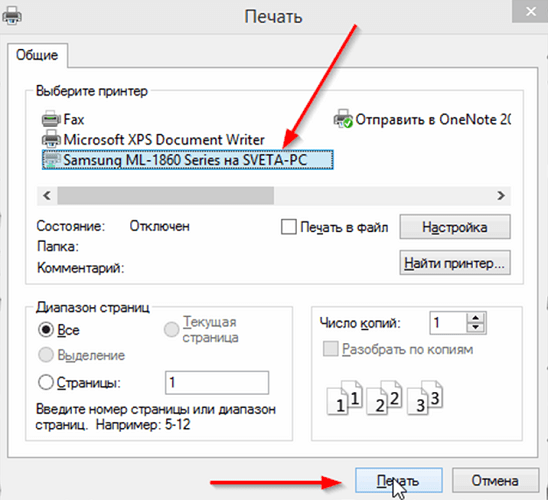
Printer users often, through inattention or because of haste, do not pay attention to the choice of equipment at the moment when a document is sent for printing. In the picture above, you can see that the Samsung device installed in the OS was selected.
Default printer can be selected in another, alternative way:
- log in to the “Control Panel”;
- LMB (left mouse button) click on the line or icon called “Devices and Printers”;
- a window will open displaying all the peripherals installed on the PC;
- find the required unit and right-click on it (right mouse button);
- A menu will appear where you need to select “Use as default”.

If the device does not work, you can try restart print manager. Making it restart is simple:
- disconnect the cable connecting the printing device to the PC;
- go to the “Control Panel” through the “Start” button on the PC screen;
- further, follow the path: “System and Security”, “Administration”, “Services”;
- In the “Services” window, find the line “Print Manager” and highlight it.
You can also click on the “Stop” item in the upper left corner of the window, after which the “Run” item will appear, which you will also need to click on. Another option: right-click on “Print Manager” and select “Stop”, and then “Start”, or immediately select “Restart”.

Checking drivers
A problem with drivers—special programs that control equipment connected to a PC—could be the reason why the device stopped working normally.
The driver problem occurs after:
- reinstalling or updating the OS;
- software failure of unknown cause;
- virus attack;
- connecting new peripherals to the PC that conflict with the connected printing equipment.
What to do in such a situation? First, you need to go to the “Control Panel” again, turn on the display of small icons and open the “Device Manager”. Next, while in this window, find the line related to your printing equipment. It may have different names. In the figure below, the line is called “Print Queue”.

You should also check on the dispatcher page to see if there is any equipment opposite a circle or triangle with an exclamation point. Thus, the system flags devices that have a driver problem. If you find an icon next to the name of a printer, you will need to install a driver for it. The driver is installed either from the disk that came with the device, or after downloading it from the Internet.
Typically, drivers can be found on the official website of the equipment manufacturer.
When no warning icon is found, but the device still does not turn on, it is still recommended to reinstall the driver. To do this, in the device manager, select the desired unit and at the top of this window, click on the screen image with a cross. This procedure will remove the hardware from the system.
After removing the device from the system, you will need to reinstall the drivers. This can be done, as already mentioned, either from the installation disk, or by running the downloaded file. Sometimes drivers do not have an installation startup file, and to install them, you need to click on the “Update hardware configuration” button in the manager window and find the line that appears with the equipment, opposite which there is an icon (!). Next, having selected it, click on the “Update driver” icon located at the top of the window and follow the instructions that appear. The system will prompt you to find drivers on the Internet or install them from your computer. Specify the folder into which you unpacked the drivers downloaded from the Internet. After installation, it is recommended to restart your PC.
Setting up a print queue
A very common reason why your printing device refuses to work is a failure that is directly related to the print queue. In this case, the system queues the document, but the unit does not start working. This can happen due to a power surge in the network or for software reasons if the device is used as a network device and is connected to several PCs. In this case, a special file created by the system when the user sends the file for printing is damaged. However, the equipment is often gives a printing error.
To fix the error you need to do the following.

After carrying out this simple procedure, the printing equipment, in most cases, returns to working condition. But, although rare, a situation arises where the print queue is not cleared and the print error continues to appear. In this case, you can resort to the following method:
- disconnect the cables connecting the printing device and the PC and disconnect the unit from the network;
- go to “Services” as indicated above and stop “Print Manager”;
- next, open Windows Explorer, and paste C:\Windows\System32\Spool\PRINTERS into the address bar, then press Enter;
- in the folder that opens, delete the files in it;
- turn off the PC;
- Before connecting the printing device to the network, make sure that at least 60 seconds have passed. after unplugging it from the outlet;
- Having connected the device cable to the PC, you should turn on the unit with the button intended for this;
- After turning on the PC, wait until the operating system boots completely;
- Now you can try sending the file for printing.
If this method also turned out to be ineffective and the document could not be printed, then it is recommended to use special programs that the equipment manufacturer offers for users of their equipment. For example, for HP printing devices, there is “HP Print and Scan Doctor” program, which can be downloaded for free from the official HP website.
Typically, these programs search for and correct problems with equipment automatically.
Checking ink and paper
When the machine refuses to print or comes out with blank sheets, it may be out of ink. Although the equipment self-diagnosis program successfully detects this fact and generates an alert with an error code, in some situations there may not be a warning, for example, if a CISS is used or the toner level count on the cartridge is frozen.
Determining the ink level in the inkjet
If you use original cartridges, then to find out at what stage the ink level of an inkjet printer is, you can use the service program that comes with the printing equipment. Using the Epson device as an example, this is the “Status Monitor” program. To open this program, just find the printer icon located in the tray and double-click on it with LMB. Next, on the “Service” tab, select “Status Monitor”.

If you don't find the tray icon, you can find the hardware in Control Panel by going to Devices and Printers.
For HP devices You also need to double-click on the unit icon in the tray. Further:
- you should select “Settings” and open the “Functions” window;
- In the tab that appears, click on the “Printer Services” button;
- After that, select the “Ink Level Information” tab.

For Canon units The actions are similar to those described for Epson devices, only in the “Service” tab you should select the “Printer Status” line, after which a window will appear where data on the ink level will be displayed.

In the case of using CISS, the ink level in the containers is determined visually, since they are transparent.
Determining the amount of toner in a laser printer
If you need to determine the toner level in a laser printer where the chip is “frozen,” this can also be done visually: the unit prints poorly (the image or text on the pages becomes faded), white streaks appear, or a blank sheet comes out altogether. These signs indicate that the toner cartridge is running low.

If you are using original cartridge or self-zeroing When counting the amount of toner is possible, do the following:
- press the “Print Screen”, “Print”, “Cancel” button (depending on the equipment manufacturer) and hold it for at least 5-7 seconds;
- As a result, the machine will print a page with a report, where you should find the line “Toner Remaining”, which translates as “Remaining toner”.

It should be remembered that this information is inaccurate, and the error can reach up to 50% of the actual amount of powder.
Sometimes, if your device begins to produce poor quality when printing, the following method helps: take the cartridge and shake it, then insert it back into the laser printer. This method sometimes helps when, by all indications, the toner is running low, and the document urgently needs to be printed.
Checking the paper in the device
If the machine stops printing due to paper running out or jamming, a warning with an error code should appear. But sometimes this does not happen, so you will have to inspect the “insides” of the unit.
Paper jams often occur because the user uses to save money. used sheets, for example, by printing information on the reverse side. Such paper, in some cases, may be wrinkled, have kinks, etc. Therefore, it is not always possible to place it in an even stack in the paper tray. During operation of the device, when a sheet is grabbed, it can become skewed and crushed, which is why the equipment stops.
If you see that the paper has jammed, then you need to remove it carefully, without much effort or jerking. Users sometimes make this mistake, as a result of which they may remain in the device case. small scraps of paper, the location of which cannot be immediately determined. This may cause a crash. To find a piece of paper, you need to open the cover of the unit and remove the cartridge from it (if it is a laser printer), or with the device turned off, move the carriage with cartridges (if you have an inkjet printer). After finding scraps of paper, carefully remove them from the unit body. They are usually located on a shaft or rollers.
You need to print text or photos, but you are using a printer for the first time and don’t know where to start. Use simple tips to set up your HP printer to print.

The following video will tell you more about all HP printing settings:
If you need to print color pictures or photos, you should set the settings for their size and quantity in the “Select Layout” menu. Then click Next to have the HP printer begin printing.


If the printing device has not been connected to the computer before and you do not know how to set up the printer to print on your own, then use the following tips.
The correct sequence of installing and setting up the printer for printing
The latest versions of Windows require scanning of new equipment connected to the computer and automatically setting up the printer to print. But sometimes after self-configuration the printer still does not print, and the Epson CX4300 MFP does not copy documents. Why doesn’t the computer’s automatic setting for printing work and why does the device stop working normally? Try setting up your Epson CX4300 for printing yourself.

If the disk is lost or simply stops being readable after a while, then you should download the drivers from the official Epson website, selecting the desired printer or MFP model from the list, as well as the version and bit depth of the installedWindows.
If you want to download a driver for Epson, but don’t know where or how, watch the video:
Drivers for printers from HP, Brother and other companies can be downloaded in the same way; you just need to go to the corresponding official website.
- In the “Installation Wizard” that opens, go through all the setup steps, following the system prompts.
- Once the process is complete, try sending the text or photo for printing, following the above procedure.
For installation assistance, watch the following video:
Sometimes you may encounter a problem printing with a Brother printer, on which text and photos were previously printed repeatedly, but after a crash or reinstallation of Windows, the printing device stopped working.
Why Brother refuses to print or no longer copies
To figure out why the printer stopped printing from a computer, you need to consistently eliminate all possible problems.
Hello, dear office workers and home users! I think that many of you quite often nervously shouted out the following phrase in your hearts, and perhaps in reality: why doesn't the printer print? from a computer?
I undertake to assert this only because, at least in my work, such a phrase is heard regularly. I would like to say that especially women are waging an irreconcilable war with printing technology. Well, it infuriates them when the ill-fated plastic box is meanly silent, like a guilty drunken husband. ; — )
This instruction will be universal. It is suitable for solving problems with various brands of printers and MFPs, such as HP, Canon, Kyocera and many others.
So, if you send a print job and nothing happens, the first thing you need to do is make sure that the printer is generally accessible and can be seen by the computer. Naturally, in this case we mean that the drivers were already there.
Using good old Windows XP as an example, it looks like this. We follow the path:
- Start - Printers and Faxes
Then we look at the state of the device. Ideally it should be in Ready mode:

If this is the case, then right-click on the printer icon and make sure there are no checkboxes next to items like “Delayed printing” or “Pause printing”. If there are any, be sure to remove them:

Also pay attention to the green checkmark next to the icon. This indicates that this printer is the default. If you don’t have one, you should get one by selecting the item of the same name in the additional menu:

After this, it makes sense to go to the “Properties” section (see the picture above) and try to do a “Test Print”. If it doesn’t work, quite often a simple reboot of the computer helps:

So what do we end up with? If the printer did seal, that’s good, but if not, continue reading the article further. But now let's talk about the situation where the device status is defined as Not Connected. Here's a sad picture:

Then you should pay attention to whether the printer is turned on with the power button. That is, at least some lights and indicators glow on it? Yes, friends, such incidents happen quite often. For example, your a colleague at the end of the day I wanted to drink coffee and plugged the kettle into the outlet instead of the printing box.
Also, when cleaning offices, the USB cable that connects the PC and the printer is often disconnected. You should also pay attention to this. In principle, this is all that an ordinary user can do in such a situation. If after this the device is “Not ready,” then a qualified specialist is needed to analyze the situation.
Now let's go back to the fact that the printer is available, but still does not print. What else can you do? First, pay attention once again whether you select the same model in the application from which you want to send the print job:

And after clicking the “OK” button, find the printer icon in the system tray next to the clock and click on it to open the print queue. In the Printer section, please note that on against the items “Pause printing” and “Work autonomously”, again, there were no checkboxes. That is, these items must be disabled:

After these procedures, we try to print the treasured page again. If unsuccessful, select the item “Clear print queue” and make sure that this queue, motherfucker, is actually cleared. This is what the quest window should look like, pristinely clean:

If, after this, documents with the status “Deleting” and the like still continue to hang in the list, it means that the print queue is frozen. As a rule, this is guaranteed to be cured by restarting the computer, which is not very convenient.
Therefore, already in, I will tell you how this can be done quickly and easily without any unnecessary hemorrhoids. So stay tuned for blog updates. And with this, the article about why the printer does not print from a computer comes to an end. As they say, I told you everything I knew.
It only remains to add that if anyone has difficulty finding the installed printing devices tab, for example, in Windows 10, then look for it at the following coordinates:

- Start - Settings - Related devices - Devices and printers
That's all, comrades! Still have questions? Ask them in the comments and share your opinion. We’ll discuss or take note of something interesting. And in conclusion I would like to say a couple words to people who They read this manual, but they didn’t succeed.
People, rejoice! You will be healthier! If anyone doesn’t quite understand what I’m talking about right now, I suggest watching a very informative video. I think many will be shocked.
Working in support of a corporation with numerous branches, during calls dozens of times a day I heard the words “my printer is not printing, what should I do?” There are many reasons why a printer stops printing, and in today’s article we will describe the main part of them and describe how to troubleshoot the printer.
One day an employee calls me:
Sasha, my printer is not printing, what should I do?;
What is written on the printer screen?;
It says “toner is low, replace the cartridge”, so what should I do???;
And literally after 5 seconds she starts laughing herself :) The problem was at the top, just the toner had run out... This often happens, we don’t notice the little things, and today we’ll try to notice those little things that cause the printer not to print.
The very first thing: as they say “turn it off and on,” many people restart the computer if something doesn’t work, but you try turning off and on the printer again. Did not help? - let's move on :)
Check the Printer Status Screen
If you have a printer with a screen, it may say: you need to replace the cartridge, or you have a jam and you need to find the jammed sheet (pull it out), or the screen may be dark, that is, the printer is not turned on, or you may write an error on it You can find the cause of the problem on the Internet.

Is the printer connected?
If you send documents for printing, but nothing happens, check the printer connection. There are two cables coming from the printer, one to the outlet, the other to the computer. Check both of these cables whether they are inserted normally or not, you can distort them (that is, pull them out and reinsert them). If you are sure of the power supply and the lights on the printer are on, then you can try connecting the cord going to the computer to another USB connector; sometimes one of the USB inputs stops working, and sometimes the cable itself from the printer to USB dies.
To understand whether the computer sees the printer or not, go to the device manager:
1 . In the search bar or in the Run menu (Run is called with the Win+R keys) write the command devmgmt.msc and press the Enter key.

2 . If your printer is listed in “Other Devices,” then you need to install drivers for it. That is, find the website of this device, find the drivers by model and install them. More details to

3 . If there are no “Other devices”, look for the installed printer. By default, printer devices are hidden, but to see them go to “View” => “Show hidden devices”.

4 . If there is no printer in “Other Devices” and the “Printers” item does not appear, then you need to try changing the USB connector or the cord from the printer to the computer; there may also be a problem with the connector on the printer itself. If the “Printers” item appears, but still does not print, move on.

Check your default printer
If more than one printer was installed on this computer, then your printer may not be the default and all output documents may be sent to some disabled printer. If you have not installed other printers, you still need to check this item, because Windows installs additional printers itself, and accordingly other printers may be by default:
Windows XP: Start => Printers and Faxes (or Start => Settings => Printers and Faxes);
Windows 7: Start => Devices and Printers;
In Windows XP, 7 - there is a checkmark on the printer by default, if yours does not - right-click on it and select "Set as default". Please note that the printers with which there is no connection (they are disabled) are lighter, and the working ones are more contrasting.
Windows 8, 8.1, 10: enter “Devices and Printers” in the search bar and select them from the list.

The default printer has a checkmark; if yours doesn’t, right-click on it and select “Set as default.” Please note that the printers with which there is no connection (they are disabled) are lighter, and the working ones are more contrasting.

Another way to select the default printer in Windows 8, 8.1, 10: Settings (in 10 they are in Start, in 8.1 on the right side is the “Computer Settings” panel) => Devices => Printers and scanners => select the desired printer with the left mouse button and click "Set as default"

Test print
As in the previous paragraph, go to “Printers and Scanners”, find your printer and right-click on it => in the window that opens, select “Printer Properties” => in the “General” tab, select “Test Print”

If the printer prints, then you need to look for a problem in the application from which you are printing; most likely, the wrong printer was selected for printing in the application. That is, in the application from which you cannot print, select “Print” (Ctrl+P print keys in almost all applications) and look at which printer is selected, select the one that is your default (the one that printed the test page).

If the printer does not print, then you need to look for the reason in the printer itself. We do the following points
View the print queue
Just like in the points above, you need to go to “Devices and Printers” and open your printer by double-clicking (or right-clicking and selecting “view print queue”). Here you will see all the documents that have been sent for printing; it happens that the document is huge and it is buffered here (that is, the window will show that the document is being loaded for printing in %, when it is loaded, printing will begin). It may also be that one of the documents is in error; you can right-click on it and restart it, or delete it. The printer may also have "Pause Printing" selected. Also in this window you can delete all jobs and resume printing.

Check the paper
If you don't have a screen, let's see what other reasons the printer may fail. For example: there is no paper, or perhaps the paper is jammed - you need to pull out the cartridge and look at the jam all around, on all sides of the printer. It may still not take paper, but you will hear about it if the printer starts printing and tries to take paper, but nothing happens, after several attempts an error appears. How to deal with something that doesn’t take paper? Often this problem is due to the printer being contaminated with toner, that is, you need to pull out the cartridge and clean everything of toner, including the mechanism that picks up the paper. You can clean it with a brush, a napkin, the same paper, but more difficult.
Check the toner or ink
Often, if the toner (or ink) runs out, you see a faint print, but still, if the ink (or toner) runs out completely, the printer may stop printing. If the printer has a screen, it will be written there that the cartridge needs to be replaced; if there is no screen, the easiest way is to insert a spare cartridge, don’t you have a spare one? - often utilities that are installed with the printer indicate the amount of toner. Each printer has its own utilities and you can find them in Start - All Programs, or try right-clicking on your printer in "Devices and Printers" => go to "Properties" and look for the ink control tab.
Also, if you have a 3-in-1 printer, that is, an MFP, you can try xerising the document; if xeritising, everything is fine with the toner.
If after all these steps the printer does not start printing, this may be a hardware error, and it is better to seek help.
If you forgot something, or someone has additions or questions, write comments! Good luck to you :)
All printer owners sooner or later encounter a problem when the printer refuses to print for some unknown reason. It either simply does not react at all to the print command, or starts working and immediately stops. If this happens to you, do not rush to get upset and take your printer for repair. In most cases, the above-mentioned malfunction is not the result of a serious breakdown and can be corrected by the user himself.
The main reasons why the printer does not print
There may be several reasons why the printer does not print, and they are all quite simple. Of course, this list does not include such obvious reasons as the device not being connected to the power supply and the computer, or the lack of paper in the printer tray.
- Paper jam. This happens quite often, especially when it comes to frequent use of the printer and large volumes of printing. The first step is to inspect the printer to see if there is a jammed piece of paper and if the paper jam indicator on the printer is blinking. If you can grab part of the jammed sheet with your hands, try gently pulling it out. If paper is stuck inside the printer, you must open the back cover of the product and carefully remove the sheet. It is recommended that you remove the print cartridges or image drum before removing paper. Jams also often occur in the paper feed tray.
- Out of paint. When a printer runs out of ink, depending on its design, it either prints blank sheets or stops printing altogether. To find out information about the amount of ink remaining in the printer, you need to go to the Windows control panel and open the section Devices and Printers. It is worth considering that Windows may not always correctly determine the amount of ink, so it is better to play it safe and inspect the cartridge. Better yet, install a CISS (continuous ink supply system), which makes it very convenient to monitor the ink level.
- Incorrect printer selected. Sometimes it happens that in the print settings of a text editor, the printer selected is completely different from the one connected to the computer. Most often this happens after reinstalling or restoring the operating system. In this case, you need to go to the program settings and in the section Seal specify the printer correctly.
- Print queue hangs. A very common problem, to solve it you need to clear the print queue. You can learn how to get rid of a stuck print queue from.
- Driver failure. Driver problems are another common reason why a printer does not print. To determine whether the printer driver has crashed, go to the Windows control panel in device Manager and see if there are yellow or red exclamation marks in the printers section. If there are any, then you will have to reinstall the driver. This can be done either from disk or in other ways, which are discussed in.
The printer prints in stripes
Another “popular” problem is when the printer prints in stripes. If this happens with a laser printer, then the reason is obvious - the device simply runs out of toner and needs to be replaced. However, when you need to print a few more pages quickly, you can resort to a little trick - remove the cartridge from the printer and shake it slightly (be careful not to get it dirty). After this, the printer will be able to print normally for some time.
When an inkjet printer prints in streaks, the list of problems is not limited to running out of ink. In inkjet printers, the print head nozzles become clogged quite often. To fix this problem, you need to go to the printer management window and run the automatic cartridge cleaning function.
Also, an inkjet printer may print in stripes due to a faulty cable or damage to the print head. Unfortunately, it is quite difficult to fix such problems yourself, so if they occur, it is best to contact a service center.
Still have questions? - We will answer them for FREE
