Change the theme of windows 10. Edge browser has a dark theme
One of the features of the latest version of the Microsoft operating system, Windows 10, is a large number of options and settings that offer the user advanced capabilities. In this article we will talk about themes for Windows 10, their configuration, installation and removal.
Go to the “Personalization” section in one of two ways.

How to Download and Apply New Themes on Windows 10

How to Use Third Party Themes on Windows
In addition to the themes that you can find on the official Windows media, there is a tool called UltraUXThemePatcher. It allows you to install other themes you find online on Windows 10 with the Creators Update.

The next step is to download the themes.

Windows will ask for permission to move files to this folder, after receiving permission the picture should look like the picture. Thus, you have downloaded the theme on Windows OS. Now you need to double click on the selected .theme file. The changes will be applied.
How to remove themes in windows 10
Use one of three methods.
Via control panel

Via Settings

Note! Original operating system themes cannot be removed from settings.
Via Explorer

How to activate black theme?
Many people prefer text on a dark background, especially when navigating menus on their computers. Some visually impaired users also find that a "dark" or high-contrast theme is much easier to read.
By default, Windows widgets, menus, the email client, and the Edge browser have black or blue text on a white or gray background. However, by tweaking a few settings, you can give the entire OS a dark theme.
- Go to Run using the key combination “Win+R”; enter regedit in the field.
- In the window that opens, click HKEY_LOCAL_MACHINE.

- Then press the SOFTWARE button.

- Then click the Microsoft button

- Click the “Windows” button.

- Next step, “Current Version”.

- Click the Themes button.

- Right-click on the panel window and select “New” - “Key”.

Select “New”, - “Key”
- Name the key "Personalization" and open it.

- Right click - click “New - DWORD 32 bit”.

- For the new section, use the name "AppsUseLightTheme".

- Open the DWORD by double-clicking and see if the value “0” is displayed, if not, you need to enter the number “0”.

- Go to the "Personalization" section.

- Repeat steps 9,10,11.

- Close Regedit and restart your computer.

The settings menu should now have white text on a black background (as shown below).

Installing the default aero theme
The storage location for standard Windows 10 themes is the Themes folder.
This PC → system drive → Windows → Resources → Themes.

Save the file and double-click it on your desktop.
The Aero Lite Theme will be applied.
Find out detailed information with step-by-step actions in the new article -
Video - How to install a theme on Windows 10
Many users were dissatisfied with the appearance of the radically new Start menu in Windows 8 and in the new version of the operating system, Microsoft decided to listen to the demands of millions of users from around the world and gave them a choice: use the full-screen Start menu or install the classic version familiar to users Windows 7 and older versions of the operating system. Are you new to Windows 10? Here are instructions for changing the appearance of the Start menu in Windows 10.

The traditional Start menu, installed by default in Windows 10.
By default, Windows 10 comes with the classic design, which looks like a combination of the Start menu from Windows 7 and Windows 8. On the left side, you will find a list of frequently used applications and recently added ones, as well as a button that will open you a list of all installed applications. The right side of the menu displays all of your apps' pinned tiles, just like Windows 8.
The Start menu personalization window in Computer Settings.
If you prefer full-screen display mode or just want to try an alternative interface, you can change it as follows:

Full screen Start mode in Windows 10.
This will switch the Start menu to full-screen mode, similar to Windows 8. Note that in this case, the computer's power key will appear at the bottom left, along with the all applications button. A list of installed apps will open in the sidebar, and a button in the top left corner will take you to a panel with frequently used apps and four links to File Explorer, PC Settings, All Apps, and Power Management.
How do I turn off frequently used and recently added apps from showing in the Start menu?

Alternative Start Menu from Stardock.
Bonus.
Of course, no one has canceled third-party applications with which you can change the appearance of the Start menu. If you're still unhappy with the way Microsoft has changed the menu, you can install the classic option, which will look exactly the same as what is used in Windows 7. Please note that you need to use third-party applications for this. Stardock provide a great app called Start10 for just such purposes.
You can start customizing the appearance of Windows 10 in the same way as in previous versions of the operating system, from the desktop context menu by selecting “Personalization”. But instead of the old “Personalization” panel, you will see a new one, which is one of the sections of the “Options” panel.
Don’t be confused by the “Gadgets” item - this works great in Windows 10 too.
Desktop wallpaper
You can replace the desktop background image in the section with the obvious name “Background” ( Settings → Personalization → Background). There you can select one of the standard images or specify the path to your own, and also specify the position for it: Fill, Fit, Stretch, Tile, Center expansion.

If you have a large selection of desktop wallpapers, it is convenient to use them as a background in a slide show. To do this, you just need to select the “Slide Show” item in the “Background” drop-down list, and then specify the path to the folder with the image using the “Browse” button. You can also select the appropriate position for the images in the slide show, and of course set the frequency of their change: 1, 10 or 30 minutes, 1 or 6 hours, daily.

If you wish, you can use a solid color as the background, but in Windows 10 their choice is very limited and there is no option to select a custom color.

Start Menu, Taskbar, and Action Center Colors
You can choose the appropriate color for the Start menu, taskbar, Notification Center, frames around program windows, as well as individual elements of the system application interface in the “Colors” section ( Settings → Personalization → Colors). The color can be selected automatically by the system, based on the background image of the desktop, or can be selected manually by the user from several dozen proposed by the system developers.

If desired, the use of the selected color can be disabled for the Start menu, taskbar and Action Center (in favor of dark gray), while maintaining it for other interface elements. Fans of the Aero Glass effect have the option to make them transparent. In the same section of the panel there is a link to go to the “Accessibility” section, where high contrast is adjusted.

Lock screen
For the lock screen in the Personalization panel (Settings → Personalization → Lock screen), just like for the desktop, you can select a background image or set up a slide show. In the Home edition, this list is complemented by the Windows Spotlight feature, which automatically downloads new background images from Microsoft servers. Application notifications provide useful information to the lock screen. For one of the applications selected by the user, it is possible to display detailed information, for another seven - brief information.

Interestingly, you can use multiple image sources for the lock screen slideshow; you can always remove an unnecessary folder from the list of albums by highlighting and using the “Delete” button.

By clicking on the “Advanced slide show options” link, a panel for fine-tuning this mode opens, in which you can enable the display of photos from the “Film” folder of the computer and OneDrive, selection of photos to fit the screen, activation of the lock screen instead of turning off the screen when the computer is idle, and also set the time for the screen to turn off in slide show mode: after 30 minutes, 1 hour, 3 hours, or not turn it off at all.

From the “Lock Screen” section, you can also go to the classic “Screen Saver Settings” panel, where you can configure the screensaver. This tool has not yet moved entirely to the “Options” panel.

Themes
In the "Themes" section (Settings → Personalization → Themes) You can go to the desktop settings that are familiar to users of previous versions of Windows: choosing the theme to use, sound scheme, desktop icons and mouse pointers. To change them, classic tools are used, launched by clicking on the corresponding links.

Most likely, in the future, Microsoft will completely abandon the design themes we are used to, but for now you can use them. You can select one of the default or installed themes using the “Theme Options” link. It's funny, but at the time of this publication you cannot change any theme parameters there.

Not everyone liked the new sounds for standard system events; you can replace them with your own in the “Sounds” panel using the “Advanced sound options” link. This can be either a ready-made sound scheme or separate sound files. In the second case, you just need to select an event from the list, and then specify the path to the audio file (.wav) by clicking on the “Browse...” button.

Mouse pointers (cursors) are replaced in the same way using the “Mouse Pointer Options” link. Among other things, in the “Properties: Mouse” panel that opens, you can turn off the shadow of the pointer if it bothers you. Sets (schemes) of sounds and cursors (.cur, .ani) can be found on the global network, sometimes they are supplied with themes.

You can select your own icons for the Computer, User Files, Recycle Bin, and Desktop Network shortcuts using the “Desktop Icon Options” link. You just need to select a shortcut, use the “Change Icon” button and select an icon from the system set, or specify the path to your own file with icons (.ico, .icl, .dll, .exe). Here you can disable the display of unused shortcuts, restore standard icons, and prevent themes from changing them.

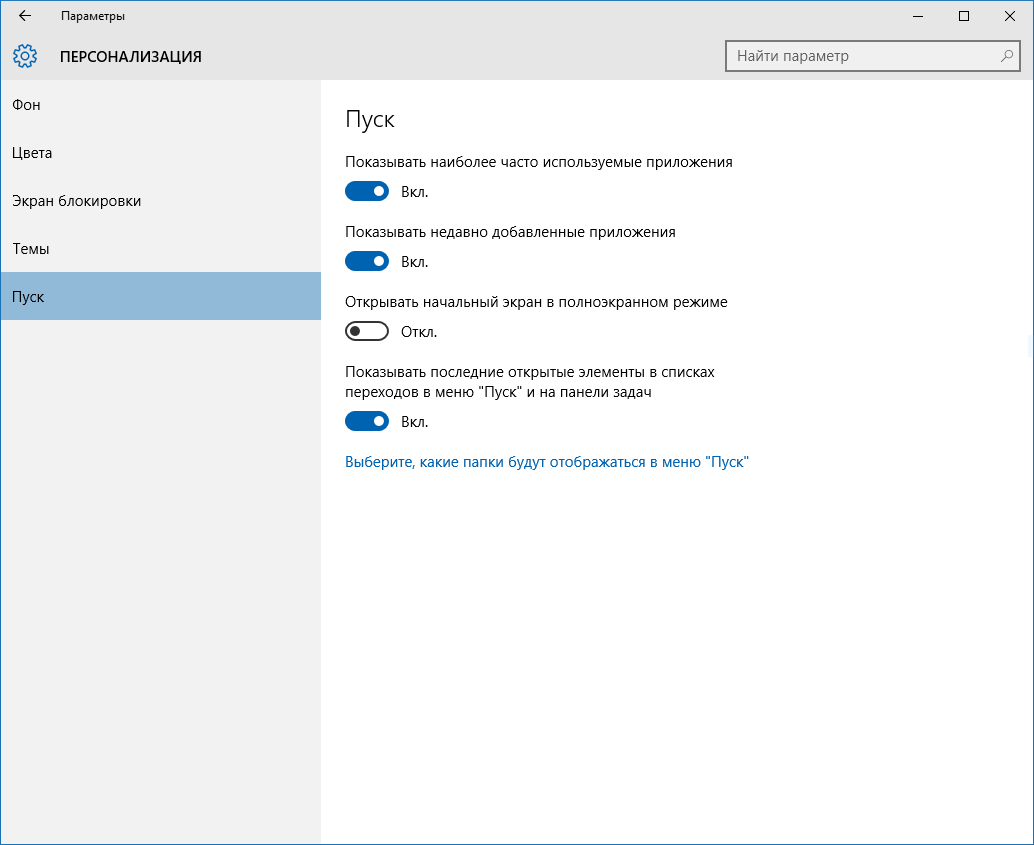
Start
We will not repeat ourselves about using and customizing the Start menu. In short, in the panel Settings → Personalization → Start You can enable full-screen menu mode and disable unused functions.

If we forgot to mention something or you still have any questions, leave them in the comments below, we will try to answer your question and will be happy to supplement the article.
Hello dear readers.
Continuing on changing the design in different operating systems, I would like to tell you how to use third-party themes for Windows 10. The fact is that this version provides a new algorithm for the security system compared to previous parts. In addition, the update center works independently, independent of the user, and therefore installs additional packages without asking permission. Therefore, you need to resort to non-standard solutions. In this article I will tell you how to change the OS interface using other tools not provided by the developers.
Probably all computer users know that Microsoft is trying to do more than just offer new versions of the product. At the same time, developers constantly release various updates to help improve the operation of the operating system.
It is known that new versions of Win do not have standard features that allow you to install third-party themes. To do this you need to use special software. Moreover, for different OS builds you need to find your own version. And first, I will tell you what you need to do to change the design in Windows 10 1511.
Important! Before you begin, it is worth warning that all actions related to changing the operation of the system through a patch for third-party themes may lead to partial or complete failure of the OS. Therefore, users should understand that they do this at their own risk. Even with complete and consistent implementation of each step of the instructions. It is in this regard that before starting any action, it is better to create a restore point. If something happens, it will help you quickly return everything to its place.

The whole process is divided into two main steps: preparation and installation of themes from third-party developers. How to patch Windows 10 for the desired result?
We need to perform a series of movements:
How to install another theme? We make several movements:
For update 1607( )
It’s worth saying right away that for Windows 10 build 1607, installing the patch is easier than in the previous version.
The new operating system from Microsoft offers the user a powerful set of tools for personalizing the OS. But to make your computer truly unique, read how to install a theme on Windows 10 and customize it (also see "").
Where are they stored and how to configure them?
To enable and customize a pre-installed theme, use the Settings app.
RMB on the desktop → Personalization → the “Personalization” section will open in the Settings application.
Here you can configure the desktop image, the color of windows and the Start menu, and the transparency of interface elements.
Go to “Themes” → Theme Options → the “Personalization” window familiar to older operating systems will open, in which you enable and configure the themes offered by the system by default. 
Removal
If you are going to remove window designs that are not used on your computer, you can do this in .

Important! Themes pre-installed in Windows 10 cannot be deleted - they are protected.
Installation
If you don’t like any of the proposed interface design options, download and install new themes.
From the official website

From third party portals
Installing third party themes on Windows 10 is done using the UxStyle patch.
- Download and install the utility.
- Find a suitable OS design from a third-party creator and download it to your computer.
Good to know! All extraneous topics are in archives, so for each of them it is better to create a separate folder with the appropriate name.
- Unpack the archive into a folder and move all the files that appear to the Themes directory, where standard Windows 10 themes are stored.
- You can enable the new OS design option in the same window where the standard themes are located.
How to activate black theme?
Windows 10 does not have a black theme by default, so users who are used to using it are immediately upset. But you can independently enable the dark interface of the OS design.

The video shows the process more clearly.
Video
The video will allow you to clearly see how to perform each step correctly.
Conclusion
The user has the opportunity to customize the Windows 10 interface at his own discretion. It can activate standard themes, download new ones from the official Microsoft website or third-party developers, or use a dark design option. Changes are made in the Personalization window.
