How to recover data on Android using Dr.Fone. Wondershare Dr Fone (Data Recovery) - effective data recovery on Android Recovering contacts using dr fone
- Part 1: Recover Data from iOS Devices
- Part 2: Recover Data from iTunes Backup
- Part 3: Recover data from icloud backup
Part 1: Recover directly from iPhone, iPad and iPod touch
Wondershare Dr.Fone for iOS allows you to recover deleted contacts, messages, call history, messages, calendars, reminders and Safari bookmarks from iPhone 5S/5C/5/4S/4/3GS, iPad Air, iPad mini 2 (mesh), iPad mini , iPad with mesh display, new iPad, iPad 2/1 and iPod touch 5/4, new iPad, iPad 2/1 and iPod touch 5/4. Meanwhile, you can use it to scan your camera roll, photo stream, photo library, attachments and voice memos that exist on your device.
Note: Do not use your device if you have lost data on it. Any operation on the device can generate new data, which can overwrite lost data and render it unrecoverable.
1
Connect your device to your computer
Launch the program on your computer and connect your device (for example, iPhone 4). Then you will see a window on the right.
Note: If you are using an iPhone 4/3GS, iPad 1 or iPod touch 4, you can switch to "Advanced Mode" with the button in the lower right corner.

2
Check your device for lost data
You can simply click on the "Start Scan" button to immediately scan your iPhone, iPad or iPod touch.
Note: To enable "Advanced Mode" for deep scanning of your iPhone 4/3GS, iPad 1 and iPod touch 4, follow the description in the window.

3
View and recover data from your device
The scanning will take some time. Once it is completed, you can see the scan result generated by the program. All lost and existing data on the device is displayed in categories. Select the menu on the left side and view the content one by one. You can check any item and save it on your computer by clicking on the "Recover" button.
Note: If you try to recover text messages and iMessage, a pop-up will ask you whether to restore to computer or restore to device. If you want to restore these messages back to your iOS device, click the Recover to Device button.
Part 2: Extract iTunes Backup to Recover Data for All iOS Devices
This data recovery mode allows you to recover not only the existing backup data, but also the data that was deleted from the device before you made the backup, if it was not overwritten.
Note: Do not sync your device with iTunes when you realize that you have lost data, or the iTunes backup files will be updated after syncing if you want to restore them through this recovery mode.

1
Select iTunes backup to extract and scan it
When you start the program, recovery mode will start from your iOS device (default mode). Switch to "Recover from iTunes Backup File" at the top of the main window and you will see a window on the right.
Here, all iTunes backup files from your iPhone, iPad and iPod touch that have never synced with iTunes on this computer will be automatically found and listed. Select the one you need and click the "Start Scan" button to extract it.

2
Preview and restore previous data
After a few seconds, all the data in the backup will be extracted and displayed in categories. You can view them one by one before restoring. Then, you can selectively mark and restore the ones you want by clicking on the "Recover" button below.
Note: The data displayed as a result of the scan includes deleted and existing items on your device. Each of them has its own color. If you want to separate them, you can use the button at the top: Only display the deleted items.
Part 3: Recover Data from iCloud Backup for Any iOS Device
Didn't find data from your iOS device and iTunes backup file? There is a third way: restore from iCloud backup. This will allow you to view and restore all the data in your iCloud backup. Therefore, do not back up your device with iCloud immediately when you discover data loss.

1
Select recovery mode and sign in to iCloud
After launching Wondershare Dr.Fone for iOS, select the recovery mode "Recover from iCloud Backup Files" at the top. Then, you will see the window below. Enter your iCloud account and password to sign in.
Note: Wondeshare takes your privacy seriously. We never keep a record of any of your Apple login information or content during any sessions.
The scan will be completed within a few minutes. Once it stops, you can view almost all the data in your iCloud backup file, such as contacts, messages, photos and more. Check them one by one and check the correct box. Then click on the "Recover button" to save them to your computer with one click.
Note: Before exiting the program, you can return to the Home screen to delete downloaded iCloud backups from your computer so that others have no way to access them. Then sign out of your iCloud account.
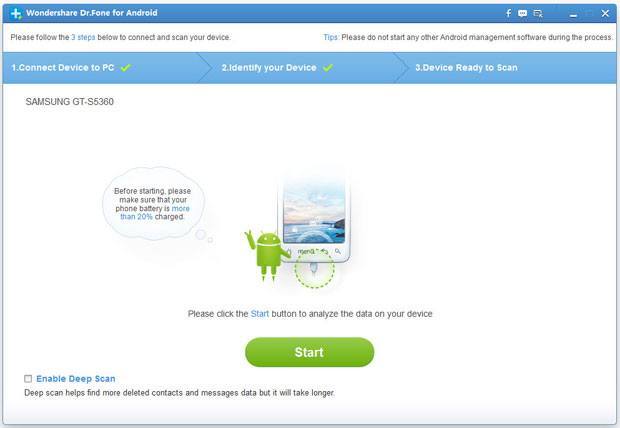
Download Wondershare Dr.Fone for Android and install it on your computer. Then, follow the instructions below step by step to recover lost contacts, messages, photos and videos from your Android device.
Step 1: Connect your device to PC
After launching Wondershare Dr.Fone for Android, you will see the main window below. Please connect your Android device to your computer using a USB cable.
Note: It's better to connect one device at a time and make sure your phone is available for Wondershare Dr.Fone for Android ().
Step 2: Enable USB Debugging (Optional)
If you do not enable USB debugging on your device, you will see the below window. Follow the detailed explanation on the window to install it now.
Note: If you have enabled USB debugging on your device previously, you can skip this step.
1) For Android 2.3 or earlier: go to "Settings"< нажмите "Applications" < нажмите "Development" < проверьте "USB debugging"

2) For Android 3.0 to 4.1: go to "Settings"< нажмите "Developer options" < проверьте "USB debugging"

3) For Android 4.2 or later: go to "Settings"< нажмите "About Phone" < кликните "Build number" несколько раз, пока не появится "You are under developer mode" < вернитесь в "Settings" < нажмите "Developer options" < проверьте "USB debugging"

Step 3: Start Analyzing and Scanning Data on Your Device
Once you have done USB debugging, connect the device to your computer again and it will detect it. Click "Next" to analyze the data on the device. Before starting, make sure the battery charge is greater than 20% to ensure a full scan.

Note: For a device that Wondershare Dr.Fone for Android does not currently support, this may result in installing USB Mass Storage to scan photos, videos, music and documents, or setting up the devices yourself (if there is no USB Mass Storage option). All major Android devices are also supported.
If you have set up your device before, you must allow the program to authenticate as a superuser on your device's screen before scanning begins. Just click the "Allow" button when a message pops up on your device's screen. Now, go back to your computer and click the "Start" button on the program screen to scan your device.

Note: If the program does not scan anything for a long time after you clicked "Allow" on your phone, please check your phone again. Some devices display the Allow button multiple times. It does not matter. Just click on it until it appears again or the program starts the actual scan.
Step 4: Select File Types to Scan
To save time for the scanning process, after clicking on the “Next” button, you will be asked to select file types to scan: photos, videos, messages, contacts, etc. Select the one you need to recover from your device. Of course you can select "Select all".

After that, in a new pop-up window, you can choose to search "deleted files" or "all files" in standard or advanced mode. At your discretion.

Please do not disconnect your device during the scanning process.

Step 5: Preview and Recovery
The scanning may take some time. After that, you can view all the recoverable data found by the scan one by one. In fact, current messages, contacts, photos, videos and documents are also scanned. Deleted SMS and contacts are displayed in red. You can separate them by color.
After previewing, mark the ones you want and click "Recover" to save them on your computer. As for contacts, you can save them in CSV, vCard or HTML format; Save messages in CSV or HTML format.
Today's article will talk about data recovery on Android using a computer and the wonderful Dr.Fone utility from Wondershare. Thanks to it, you can recover images, videos, documents, music, contacts, messages and other lost data.
As already mentioned, Dr.Fone is a product of a famous software developer in the field of not only data recovery, but also multimedia, business and other useful PC utilities Wondershare. Therefore, it is not surprising that the program is paid. But you can use the free trial (30 days) version. You can download it on the official website.
Dr.Fone supports many models of Samsung, LG, HTC, Sony, Huawei, ZTE, and other brands. Unsupported devices may require root access. You can read about obtaining them in the following articles:
You can also restore data using other methods, which are described in detail on our website:
And to prevent file loss next time, I can advise:
Now launch Wondershare Dr.Fone. The program itself will detect your phone or tablet and download the necessary drivers to your computer (if you don’t have them). You need to agree. You also need to confirm debugging from this computer on your Android device.

If you have root rights, your device will ask you to provide them.
Click “Start”, after which the process of scanning deleted information will begin. The search can take quite a long time. This depends on the size of the drive.
After this, you will see a list of found messages, contacts, images, audio, video, documents, etc. You can preview them.

To restore the necessary data, select it with a checkmark and click “Recover”. An additional window will appear in which you need to select the path to save the data.

You should not have any difficulties working with the program, and in terms of the number of supported devices and the quality of data recovery, Wondershare Dr.Fone is ahead of its competitors.
It can be frustrating to lose your personal data, especially when you could have prevented it. In order to prevent yourself from losing data, the best thing to do is to take regular data backups, using either iCloud, iTunes, or a third-party application. Unfortunately, if you have not yet taken a data backup, then when it comes to Android log recovery challenge, you may face a difficult task. However, this is not an impossible task, and in this article, we will walk you through some of the best programs that offer and how to use these recovery features, so let's get straight into it.
Can call logs be extracted from Android phones?
The short answer to this is yes, and there are methods out there that allow you to recover the Android call log.
Two of the programs that we are going to focus on in this article are and FoneLab for Android. Both of these programs include a wide range of different features and will help you recover your call logs in just a few minutes.
Part 1. Using Dr.Fone Toolkit - Android Data Recovery for Android Best Call-Recovery Log
First, we're going to show you how you can use Dr.Fone Toolkit - Android Data Recovery to recover call logs of an android device. This simple method will get the job done efficiently and within minutes.
Before following these steps, make sure you have downloaded and installed video recovery for Android program.
step 1- After installing the program on your computer, connect your Android device using the appropriate USB cable and launch Dr.Fone Toolkit - Android data recovery.
step #2- About the program, You will be prompted to enable USB debugging mode if you have not already done so. You will be shown how to do this, and if your Android version is 4.2.2 or higher, you will receive a notification on your Android device to do this.
step #3- You will be given the option to select specific types of data viewed for Android data recovery. Choose " Call history” to recover Android call log. Click “ next" continue.
The note: While we are focusing on recovering your Android call logs in this article, feel free to select the “Samsung Android devices” option at the top of the program to have all data types scanned or select a different data type. The same method will apply.
step #4- Next, you will be shown two different recovery modes. Choose " Scan for deleted files“, check “I agree with the warning and am ready to continue.”
step #5- The scan will begin, and during this time, Dr.Fone Toolkit for Android will perform a deep scan to detect any data that may have been accidentally lost.
step #6- Once the scan is completed, you will be able to view all the data that was detected. How long this scan takes depends on how much data is currently stored on the device.
step #7- Select “ Call history” data type, using the menu on the left and from here, you will be able to view all the information about the call log that has been detected.
step #8- Take a few minutes and select any of the call log information that you want to recover, and once you are done, click on “ recover” and call log data will now be available on your Android device.
As you can see, this is not a difficult method. No matter when you have used the program before, the simplified interface makes Android call log recovery a simple process.
Part 2. Using FoneLab for Android as Best Android Call-Recovery Log
In this second method, we will show you how you can use FoneLab for Android to recover your Android call logs. Similar with Dr.Fone for Android, it is not a complicated method and is very effective too.
Before using this guide, download and install FoneLab for Android on your computer.
step 1- Launch FoneLab for Android on your computer and connect your Android device using a USB cable.
step #2- When you are ready to begin, select the “Android Data Recovery” feature from the left panel. If you haven't already done so, you will be prompted to connect your Android device now.
step #3- In order to start the method, you must enable USB debugging mode on your Android device. If you have Android version 4.2.2 installed, then you can do this by simply clicking “OK” on the notification that appears.
The note: If you accidentally click on the “Cancel” button instead, click the “Show again” button on FoneLab and it will push the notifications to appear again.
step #4- Next, you will be asked to select different types of data that you want scanned. For this method, you only have to select the “Call Logs” option, but you can select any of the other data types.
The note: If you have lost many different types of data, select the “Select All” box at the bottom of the display. Although it may take longer, it will perform a full scan and detect any type of data.
step #5- The scan will take a few minutes, but once it is completed, you will be able to view the call logs that were detected before restoring them.
step #6- When viewing detected data, all deleted data will be highlighted in red, and data that is untouched will be in black.
step #7- Simply select data for Android call log recovery, click on the “recovery” button, and within a few seconds, you will be able to access the call log on your device again.
This method is very similar to Dr.Fone Toolkit, and again, the program is incredibly user-friendly, so this method is not difficult to follow.
While the methods are similar, both programs we showed you are very different, and come with their own feature sets.
About Dr.Fone Toolkit - Android Data Recovery
To give you a deeper understanding of Dr.Fone Toolkit - Android Data Recovery and what this program has to offer, below we have described some other features that it has to offer.
Recover data directly to your device. Unlike some other programs that can be used to recover Android data Android SD card recovery You can use Dr.Fone to recover lost data directly on Android device. This means that you should not restore data to your computer and then to your device.
Data types. You can recover much more than just call logs with Dr.Fone. From lost video files to damaged documents, if you accidentally deleted a valuable piece of data from your device, then you can use Dr.Fone to get it back in no time at all.
View recovered files. So you don't waste time recovering data that you don't want, you can preview all the recovered files before restoring them to your device.
As you can see, you can not only use Dr.Fone Toolkit to recover Android call log, but you can use it for so many more such as .
About FoneLab for Android
As we have done above with Dr.Fone Toolkit, below we will discuss some other features that FoneLab for Android gives its users access to.
Compatible data types. You can recover a range of different file types with FoneLab. message attachments, WhatsApp messages are just some of the types of data that can be recovered using FoneLab. He may also & recover snapchat photos.
Broken Android Phone Data Extraction. This is one of the other main features that you get access to when using FoneLab for Android. If your Android device is damaged, won't turn on, and you need to retrieve data from it, then this is not a problem. This feature allows you to recover data directly from the device, regardless of whether it is turned on, and there is no risk of data corruption that comes with it.
It is clear that just like, Dr.Fone, FoneLab is a fantastic program that has so much to offer than just Android call log recovery.
To conclude
Now we have shown you two very effective and useful methods Android call log recovery and also discussed some of the features that these programs have to offer. Now that you have a general idea of what these programs have to offer, there is no reason not to check them out for yourself. Considering the features that both of these programs include, there is no doubt that they are the best out there for Android call log recovery.
It has happened to almost all of us that we accidentally deleted some files on our smartphone or tablet running Android OS and then thought for a long time about how to restore files on Android. This is also true for situations where files are deleted due to a virus affecting the system or for some other reason. In fact, recovering deleted files can be quite simple.
For this, there are a number of special programs that take data from a phone or tablet that is inaccessible to the user (even in developer mode) and, based on this, show which files were on the device before and have now been deleted. The easiest way to complete this task is with the help of such programs. Let's look at the most popular of them.
Wondershare Dr.Fone
This program can very successfully recover deleted photos, videos, contacts and other information. In this case, everything happens automatically. When connected to a phone or tablet, the program automatically gives it root rights, and upon completion of the recovery, removes them to avoid unforeseen consequences. To work with it on your phone, you need to enable USB debugging in developer mode.
How to enable USB debugging in Android
To do this you need to do the following:
- Go to the “About device” item in the settings. There, open “Software Information”.

- Click on the build number 7 times.

- Go to the main settings menu and click on the “Developer Options” item that appears.

- Place the switch opposite the inscription “USB Debugging” in the position that corresponds to this item being enabled, as shown in Figure No. 4.

Note: These instructions show how to work with Android 6.0.1; on earlier versions, most likely, you will not need to go to the “Software Information” item. There, the build number will be shown when you go to the “About device” menu.
It is worth saying that USB debugging will have to be enabled in most cases if we are talking about a program for a computer. Now let's move on to using the program directly.
How to Use Wondershare Dr.Fone
Let's say right away that the program is paid, but it has a trial version for 30 days. You can download it on the official website (here is the link). There will be two options offered - “Try It Free” (try it for free) and “Buy Now” (buy now). Accordingly, we need to select the first one and click on its button.

The installation is very simple - click the big “Install” button and wait for the installation to finish.

Actually, after this all that remains is to follow all the assistant’s instructions and connect your phone or tablet to the program. The connection itself consists of taking a very ordinary USB cable, connecting one end to the computer and the other to the Android device, and after the corresponding message appears, click OK.
After this, the connection will occur automatically. On the left side of the program there will be menu items for recovery from the device’s internal storage, memory card, from a broken phone or tablet, and a button for other tools. We need the very first one. Actually, you don’t need to press anything to do this.
Icons of contacts, galleries, messages and other sources from where you can recover deleted files will appear on the screen. This window is shown in Figure 7. There you need to check the boxes next to the sources from which we will restore information and click the “Next” button.

Now you need to read the recovery conditions and click the “Start” button. It will be located in the same place as “Next”. Then all that remains is to wait for the end of the analysis, collection of information and restoration of the selected files. After this, the user will see the window shown in Figure 8. There you just need to check the boxes next to the files that need to be recovered and click the “Recovery” button in the lower right corner of the program window.

Attention: The program does not work with some phone models, so if your phone simply cannot be detected with USB debugging enabled, the problem is not with it, but with the program. Unfortunately, it is impossible to fix this problem only through the efforts of the developers.
Thus, if your device is detected by Wondershare Dr.Fone, this will be the best option to recover deleted photos, videos and other information. And if not, then you will have to use another program from this review.
By the way, after pressing the “Recovery” button, a lot of time may pass for analysis and recovery, but you should not be afraid of this. In this case, the device will reboot several times; if it has a SIM card, the user will have to constantly re-enter the PIN code. All these are completely normal processes.
GT Recovery
This option is even simpler - you just need to download the program to your phone, launch it and click on one of the buttons: “Photo Recovery”, “SMS Recovery”, “Contacts Recovery” and so on. The program interface can be seen in Figure 9.

GT Recovery also independently scans and searches for the necessary hidden files, with which you can perform recovery. You can download it freely from the Play Market, and there is no charge for use. Judging by the reviews, this program works very well and can restore files that were deleted quite a long time ago.
However, for it to work at all, the phone must be rooted. We'll look at how to install them below.
How to root a device
The easiest way to complete this task is to use the iRoot program. It is installed on your computer, and you can download it here (this is the official website). After installation, you just need to launch the program and connect your phone or tablet to your computer via a USB cable.
iRoot will automatically detect the connected device and show it in its window. Everything will look something like what is shown in Figure 10. The user just has to click the “Connect” button.

Then everything will happen automatically, the user will only have to wait for the end of the process. Perhaps in new versions you will need to agree to something else or click the “Next” button several times. For now, clicking on “Connect” is enough. During the process, the phone or tablet will also reboot, you should not be afraid of this.
This program also has a version on Android. It can also be downloaded from the official website as a file with the extension .apk or on the Play Market. In this case, everything is even simpler - you need to launch the program and click the “Get” button in the ROOT section. You don't need to click anywhere to go to it. When you first launch the program, it looks exactly as shown in Figure 11.

EASEUS Mobisaver
The program in use is very similar to Wondershare Dr.Fone, but it has a much larger base of phones and tablets, so the chances that the program simply will not detect your smartphone are extremely small. True, in comparison with the same Wondershare Dr.Fone, it can detect fewer deleted files, although the difference is not critical.
That is, the algorithm for searching for deleted information in EASEUS Mobisaver is somewhat worse, but it is completely free. There are no trial periods, guarantees or the like.
Important: To use EASEUS Mobisaver on your phone and tablet, install root rights manually. How to do this is described above.
You can also download this program on the official website (here is the link). You also just need to install it, connect the device via USB cable, wait for the end of synchronization and see a list of all files available for recovery.
Next, you also need to check the boxes next to the files that need to be recovered and click the “Recover” button in the lower right corner of the program window. As you can see, everything is also very simple. And the likelihood that EASEUS Mobisaver will actually work is much higher.

7-Data Android Recovery
Another popular and very effective program for recovering files from a device on Android OS. At least this can be judged by the many positive reviews about this program. In general, 7-Data products are reliable and efficient. This command also has a well-known utility for recovering data from a flash drive. In addition, 7-Data Android Recovery is completely free.
The process of use is almost the same as that of other programs from this review. First you need to install the program on your computer (here is the download link), connect your smartphone or tablet via a USB cable, wait for synchronization (it is very short here), click the “Next” button and select the media from which the information will be restored - internal memory or removable media information.
Then the recovery process will begin and as a result the user will receive a list of files that can be recovered. Opposite the ones you need, you need to check the boxes and click the “Save” button in the lower right corner of the program window.

Tenorshare Android Data Recovery
Also popular among many experts is a program that allows you to recover a variety of files from a phone or tablet with the Android operating system using a computer.
The process of use is very similar to what we saw with the first program in this review - first there will be connecting the device, instructions for installing USB debugging, a long scan with reboots and the usual window with files available for recovery. There, too, you just need to check the boxes and click the “Recover” button and select the folder where the recovered data will go.

Tenorshare Android Data Recovery is very effective for recovering contacts from your phone book. It is quite possible that for these purposes it is generally the best. But this program also recovers other files quite well. The program is paid (here is its official website), but it has a free trial period. In order to try Tenorshare Android Data Recovery, you need to click the “Free Trial” button.
iSkysoft Android Data Recovery
It makes sense to use this program only on Windows Vista systems. Most other programs do not work on this OS or work, but incorrectly - not all files are restored, phones are not detected, or the program does not start at all.
Various driver problems may also occur. Of course, it works on Windows 7 and 8; it almost always doesn’t work on Windows 10, except in rare cases. Its usage is almost identical to what we saw with Wondershare Dr.Fone. Moreover, their interface is almost the same. This is clearly seen in the example of a window with files available for recovery.

The program also recovers messages, contacts and files quite well. The program is also paid, but there is a trial period (here is a link to the download page on the official website).
There is also a paid, but very good program for recovering files on a smartphone or tablet, which does not require a computer to use. It's called Disk Digger Pro. Below is a video on how to use it.
