Setting a password on a flash drive or memory card. How to protect files on a USB flash drive A program for password-protecting a flash drive
Very often, users store important information on their media. The most convenient of all media is, of course, a flash drive, but it can be easily lost or stolen, and I suggest protecting yourself from such situations using encryption.
There are only 3 ways to protect your media:
- Built-in Bitlocker.
- Hardware level protection ( when there is a display on the flash drive with input of various characters).
- Third-party encryption program.
The most popular solutions to this problem:
- Myfolder— allows you to simply set a password for a separate folder, but uses an unreliable encryption algorithm.
- TrueCrypt- the most popular encryption program. Recently, the developers reported the vulnerability of its security algorithm. Therefore, it is better to find a safe analogue.
- Rohos mini drive- a simple program that does not require installation. Perfect for protecting information on your storage device.
All of them are partially free. I believe that the last of these programs is the best at the moment and I will demonstrate it.
Setting a Bitlocker Password
This utility is great for ensuring media security. Create a strong password and remember it. If you forget it, then you most likely will not be able to recover the data.
This method is only suitable for those with the following operating system:
- Windows 7 Ultimate/Enterprise
- Windows Vista Ultimate/Enterprise
- Windows 8
Find out which one you have and if it’s suitable, proceed to these instructions. The utility is not present in earlier versions. If the system is not suitable, then proceed to the next method.
This utility does not encrypt individual folders.
It may be more convenient for you to watch a video of how this is done.
Go to My Computer and open the context menu by clicking on the icon of your flash drive. Enable Bitlocker there. It is built into the Windows system and there is no need to download anything.
In the window that appears, select the blocking method. After entering your password, click next.

Save the recovery key. If you lose your password, the recovery key will give you access to your data. Save it to a file.

This is what it will look like.

Then start the process of encrypting the flash drive.

Wait for the encryption to finish. The process can be long. It all depends on the capacity of your device.

After successful completion, you can unlock your flash drive for your computer and check the encryption. You will be required to enter the password specified before encryption.

You have successfully installed protection. Now I will demonstrate how to remove it. The principle is almost the same.
How to remove encryption
Go to Start >> Control Panel >> Bitlocker Drive Encryption:

In the window that appears, select the line “Turn off Bitlocker” as in the image below.

And then click “Decrypt disk” and you will remove the password from the flash drive.

Now let's look at a third-party program.
Setting a password using Rohos Mini Drive
If your operating system is not suitable, then use a third-party solution. Download the free program Rohos Mini Drive Portable and unpack the archive.
The free version of this program can only encrypt 2 Gb. I hope this is enough for you. It is lightweight and easy to use. It uses the most popular and reliable AES encryption method.
One very important feature of this program is that it does not require administrator rights for encryption.
Place the program on your flash drive.

I will show an example on my file with the name of my site, and you will have yours accordingly. Launch the program and close the window that appears. Then go to settings as in the image below.

Now you should choose which files you will protect and how. Let me explain what each line means:
- The first line means that you will make an encrypted disk with a maximum capacity of 2 gb ( in the free version).
- The second line means that you will create an already hidden disk with music or video.
- The third line means you will create a hidden partition ( Administrator rights will be required).
I selected the first option and now I need to enter a password.

Then you need to add the data to the encrypted partition. Click on Import and select the required files.

Already added ones are displayed on the right.

Now check if the protection is working. Close the program and launch it again. You will see a window in which you will need to enter a password. By entering it you will gain access to the files.

After this procedure, all information stored on the flash drive will be accessible only with a password. The main thing is to come up with a strong password and don’t forget it. Otherwise, you will have to use hacking programs, and they most likely will not help you.
There are also flash drives with built-in protection already on them, but this is only suitable for their owners and therefore I will not consider them in this article.
Were you able to set a password?
Flash drives are convenient, small, portable and can be read on any device with a USB port. These features make them an ideal means of transferring information from one computer to another.
However, due to their portability, they can be easily lost. Therefore, confidential files recorded on a USB drive must be password protected.
Unfortunately, you don’t have the option to simply password-protect the entire flash drive, like you do on your Facebook account, protecting it with a password.
Special encryption programs are what will protect your information from prying eyes.
If you don't want to spend money on a dedicated secure flash drive with hardware data encryption, you can use free apps to achieve the same level of protection.
In this article, we will talk about some of the simplest ways to protect files and folders on your removable media.
Easily save files with a password
As mentioned above, you can't just go ahead and protect your flash drive with a password without using encryption. However, if you don’t have time or you simply don’t want to deal with the long process of encrypting folders, and you need a quick result to protect just a few files, then you can secure these files by setting passwords on them and then writing them to a flash drive.
Many programs, including Word and Excel, allow you to protect files with a password. For example, in Word, this can be done by going to the “ ” tab in the open document, which is located at Tools > Options. After this, you can enter the password and finally save the document. Just don't forget the password for it.
Create encrypted and password-protected partitions using Rohos Mini Drive
Many programs can encrypt and password protect your data. However, most of them require administrator rights to function fully on any computer. Unfortunately, this also applies to some of the best encryption programs (example: TrueCrypt). Such tools cannot be used if you need to transfer data to another computer on which you do not have administrator rights.
Rohos Mini Drive is exactly the tool that will work if you do not have administrator rights. The free version of the program can create a hidden, encrypted or password-protected partition of up to 2 GB on a USB drive. The tool uses automatic encryption based on the AES algorithm with a 256-bit key. Thanks to the portable Rohos Mini Drive, which installs directly onto a portable flash drive, unencrypted data will be available on the local system. All encrypted data can be accessed from any other computer.

Once you have created a password protected and encrypted compartment on your external drive, you can open it by clicking on the Rohos Mini.exe icon from the root folder. After entering the password, your Rohos disk will be mounted and accessible through the computer, that is, you will be able to use all disks and partitions connected to the system. To close all Rohos sections, you need to right-click the Rohos program icon in the notification area and select “Disable”.

Download the program from the official website: Rohos Mini Drive
Protect your flash drive with USB Safeguard
Like Rohos Mini Drive, USB Safeguard is a portable application that works directly with the USB drive and therefore does not require administrator rights on the local computer. Encryption uses the AES algorithm with 256-bit encryption. In the free version, disk size is limited to 2 GB.
Download usbsafeguard.exe and copy it to a USB drive. Run it from your flash drive and enter the password to lock the drive. To lock, run the file again and enter the password. The locking procedure must be repeated every time you want to lock the drive, so try to remember whether the drive is in locked or unlocked status. By the way, this has its own advantage: you have the opportunity to change the password every time you use USB Safeguard.

Need to download music from VK?
Many of us often carry important, valuable information on external devices. These could be ssd drives or other external drives for storing data. The most popular is probably a regular flash drive, on which a person most often transfers the necessary information. But what to do if you lost your flash drive? Or a portable external ssd drive? Answer: encrypt your external devices and put a password on the flash drive so that if you find it, no one can use your information. There are a lot of third-party software for protecting flash drives, but why is it needed if the program that is installed can be deleted over time due to negligence. In this article, we’ll look at how to use the built-in Windows 10 tool to set a password on a flash drive and disks, and encrypt the contents using Bitlocker.
Note:We will use BitLocker, which is present in versions Pro or Enterprise Windows 10. BitLocker is not capable of encrypting files and folders; it is designed to encrypt disks, partitions, flash drives and other storage devices.
I advise you to look:
What is BitLocker?
BitLocker- encryption function for removable media, including USB flash drives, SD cards and external hard drives. BitLocker supports NTFS, FAT32, exFAT file systems. Formatted with any of these file systems can be protected using BitLocker. Unlike EFS encryption, which is intended for encryption of folders and files, BitLocker cannot work with files; it is designed for removable media.
How to put a password on a flash drive and disks in Windows 10
- Connect a USB flash drive or external hard drive to Windows 10.
- Right-click on the drive you want to protect and click .
- Check the box Use a password to unlock a drive.
- Create your own password to protect your data.

- Select key archiving Save file.
- Save the file in a location convenient for you; you will need it to unlock the flash drive if you have forgotten the password.

- I recommend

- Select encryption mode

- Wait for the process to complete.

Access to password protected data
- Insert your encrypted device into the USB port of your computer and open it.

- Enter your password that you created at the beginning of encryption.
- If you forgot your flash drive password, click Extra options and enter the recovery code that you saved to your computer.

Disable BitLocker and remove password from flash drive or disk
To remove the assigned password and make the flash drive normal again, you need to disable Bitlocker. To do this, insert your USB device into the computer and enter your unlock password.
- After unlocking, right-click on the flash drive and select.

- Find your device from which you need to remove the password, and click below

The Windows operating system has built-in special drive encryption mechanisms that help protect the information stored on them and prevent third parties from accessing your data. The standard encryption tool is called BitLocker and with its help you can encrypt a flash drive, memory card or any other removable drive. When you connect this drive to your computer, the operating system will ask you to enter the set password. This way, no one else will be able to view your collection of memes or any other information stored on the encrypted drive.
Before we delve into the details of how encryption works, there are two types of BitLocker to consider.
- BitLocker. Also known as "full disk encryption". In this case, the bootloader loads (forgive the tautology) with , and then asks you to enter the password or use another decryption method set when setting up BitLocker. After this, the system will decrypt the files and boot Windows. After this, you can work with files as usual, but the entire contents of the disk will be encrypted. The same encryption method can be used to encrypt any other media installed on your computer.
- BitLockerToGo. Using this method, you can encrypt external drives, such as USB flash drives or removable hard drives. When you connect the drive to your computer, the system will ask for a password or other established authentication method. Only after this the user will be able to access the contents of the disk. A great way to hide important information.
Please note that full BitLocker functionality is a separate feature of Windows 10 Professional and Enterprise. It's not available in Home edition of Windows 10. However, you can encrypt flash drives using BitLocker To Go on Home editions of Windows 10.
How to set a password on a flash drive in Windows
You don't need to download any additional software to use BitLocker. Everything is already built into the operating system, so the procedure will be as convenient and fast as possible.
- Connect the drive to your computer. In Explorer, right-click on it and select Turn on BitLocker.
- Wait while the system completes initialization. It is very important that you do not remove the disc during the procedure.

- The next step is choosing an unlocking method. For a regular user, there is only one option - a password. The password must be complex. It must contain lowercase and uppercase letters, spaces, symbols and numbers. The more complex the password, the less likely it is to be guessed using brute force methods.

- Next, you need to archive the key for recovery. This key is needed in case you have forgotten the password for an encrypted flash drive. This can happen to anyone, so make sure you store your recovery key securely.
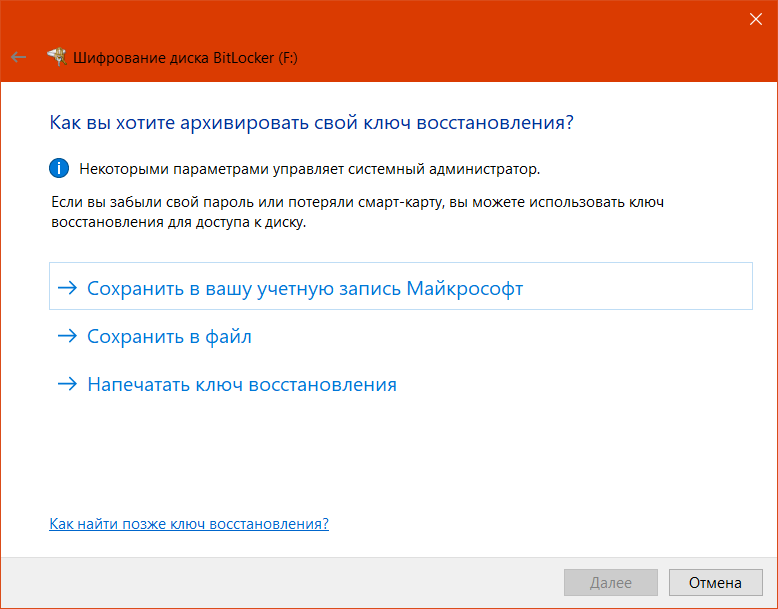 Here the system offers three options. The first is to save to your Microsoft account. If you choose this method, the key will be stored in your OneDrive cloud at onedrive.live.com/recoverykey. It looks like this:
  Another method saves the key in a separate file, and the third one prints it on a printer. If you use the last two, make sure that third parties do not have access to the file or the printed key, otherwise they can easily decrypt the disk and remove the password. We advise you to use all methods of key archiving. If you lose access to one, the second will always be available. The recovery key in a separate file looks like this:
- At the next stage, the system prompts you to choose which part of the disk to encrypt. You can encrypt either the already occupied space or the entire disk. The first option should be chosen for new drives in which information has not yet been overwritten. In other words, on those where there is nothing to restore yet. All new files on this drive will be automatically encrypted. The second option is for disks that have already been used and where deleted information can be recovered.

- Now you just need to confirm the action.

- Next, the contents of the flash drive or disk begin to be encrypted. This process can be quite long. Everything will depend on the size of the disk, as well as the amount of information recorded on it.

- After the process is completed, the system will give you a corresponding notification.

Now, when you connect a drive with encryption enabled, you will see a corresponding notification. It will inform you that this drive is encrypted and you must enter a password or use a smart card to gain access.

In Windows Explorer, the encrypted and locked drive appears with a gold padlock.

"Closed" disk. A password is required to gain access.
Double-click on this disk and a password entry window will appear. After successful authorization, the icon will change to an open gray padlock.

When you remove a drive, the system automatically “locks” it, so reconnecting will again require you to enter a password. This ensures the safety of your data and the reliability of its storage.

"Open disk". No password required.
If you want to add your computer to the list of trusted devices, when entering your password, click Extra options and check the box next to Automatically unlock on this PC. After activating this option, the system will not ask you for a password every time you connect a drive exactly to this computer. For all others, the password will be requested every time.

What to do if you forgot your BitLocker password
In this case, the archived decryption key, which you created at one of the stages of encrypting the drive, comes to the rescue. Keep in mind that if you lose your recovery key, you won't be able to bypass BitLocker.

How to change your BitLocker password

How to remove BitLocker encryption
If you no longer need to keep a flash drive or disk with a password and full encryption, BitLocker To Go can be removed.

Like encryption, decryption takes a certain amount of time. Wait until Windows completes the necessary procedures (do not disconnect the drive from the computer, as this may cause data corruption), and then all encryption will be removed from the drive.

The keys will then no longer be valid and Windows will create new recovery keys when you re-encrypt.
