Appearance and features of using universal data exchange. Appearance and features of using universal data exchange 1c creation of data exchange rules
Automated systems In most cases, management systems consist of separate databases and often have a geographically distributed structure. At the same time, correctly implemented data exchange is a necessary condition for efficient work such systems.
The initial setup of the exchange may require a number of actions, not only in terms of programming, but also consulting, even if we are dealing with homogeneous sources, as is the case with products on the 1C:Enterprise platform. Why setting up 1C exchange (or, as it is also called, data synchronization in 1C 8.3) can become the most time-consuming and expensive task of an integration project, we will look at in this article.
Data exchange in the 1C environment allows you to:
- Eliminate double entry of documents;
- Automate related business processes;
- Optimize interaction between distributed departments;
- Promptly update data for the work of specialists from different departments;
- “Differentiate” between different types of accounting.*
*In cases where the data of one type of accounting differ significantly from another, it is necessary to ensure the confidentiality of information and “delimit” information flows. For example, data exchange between 1C UT and 1C Accounting does not require uploading management data into the regulatory accounting database, i.e. synchronization in 1C will be incomplete here.
If you imagine standard process implementation of primary data exchange, when at least one of its objects is a 1C product, then the following stages can be distinguished:
- Coordination of the composition of the exchange;
- Definition of transport (exchange protocols);
- Setting rules;
- Scheduling.
Identification of the composition of 1C exchange
Objects of exchange can be divided into “source” and “receiver”. At the same time, they can perform two roles at the same time, which will be called a two-way exchange. The source and destination are determined logically depending on the need or functionality systems.*
*For example, when integrating “WA: Financier” - a solution for maintaining financial accounting and managing treasury processes, developed on the basis of “1C:Enterprise”, WiseAdvice experts recommend it as a master system. This is due to the availability of control tools to comply with the rules of the application policy, and, accordingly, to ensure the effectiveness of the solution.
Next, based on the received and recorded requirements from users, a list of data for exchange is created, its volume, requirements for the frequency of exchange are determined, and the process of working with errors and handling exceptional situations (collisions) is prescribed.
At the same stage, depending on the fleet of existing systems and the structure of the enterprise, the exchange format is determined:
Distributed information base
- RIB implies exchange between identical 1C database configurations, with a clear “master-slave” control structure for each exchange pair. As an element of a technology platform, RIB, in addition to data, can transmit configuration changes and administrative information of the database (but only from master to slave).
Universal data exchange in 1C
- A mechanism that allows you to configure the exchange of 1C databases, both with configurations on the 1C:Enterprise platform and with third-party systems. The exchange is carried out by transferring data into a universal xml format in accordance with the “Exchange Plans”.
EnterpriseData
- The latest development of 1C, designed to implement data exchange in xml format between products created on the 1C:Enterprise platform with any automation systems. The use of EnterpriseData simplifies the modifications associated with the exchange. Previously, when a new configuration was included in a system, it was necessary to implement a mechanism for importing and exporting data, both for it and for existing systems. Now systems that support EnterpriseData do not need any modifications, having only one entry-exit point.
Definition of transport (exchange protocols)
For the system on the 1C:Enterprise 8 platform, a wide range of possibilities is provided for organizing exchange with any information resources using generally accepted universal standards (xml, text files, Excel, ADO connection, etc.). Therefore, when determining the transport for exchange data, you should rely on the database capabilities of the third-party system.
Synchronization of directories
The basic principle of effective synchronization of directories is the presence of a single entry point. But if we are talking about working with directories that have historically been filled out according to different rules, it is necessary to clearly define synchronization fields to bring the exchange to a “common denominator.”*
*At this stage, it may be necessary to carry out work to normalize the reference data on the side of the data source. Depending on the state of the directories and their volume, the process of comparing elements, recognizing, identifying errors and duplicates, as well as filling in missing fields and assigning synchronization fields, may require the work of a whole group of experts, both on the part of the integrator (the owner of the master data normalization technique) and from the customer's side.
Setting rules
The ability to display data from source systems in receivers depends on correctly defined exchange rules. The rules, presented in xml format, regulate the correspondence of key details of source-receiver objects. The 1C:Data Conversion solution is designed to automate the creation of rules for implementing both one-time and permanent exchanges.
Guarantees no data loss during exchange Exchange Plan. This component any configuration on the 1C:Enterprise platform, fully describing the procedure for 1C exchange: data composition (documents with “identifying” details) and nodes (receiver-transmitter information bases), as well as activation of RIB for selected exchange directions.
Any change in the data entered into the Exchange Plan is recorded and receives the “changed” sign. Until the changed data matches each other in the receiver-transmitter nodes, the sign will not be reset, and the system will send control messages to both nodes. After uploading the data and confirming their full compliance in both systems, the sign is reset.
Exchange schedule in 1C
To automate regular exchange, the frequency of data uploading is set. The frequency of exchange depends on the need and technical capabilities. Also, configurations on the 1C:Enterprise platform allow you to configure data exchange when an event occurs.
Having considered the standard process of implementing an exchange, let’s pay attention to factors that will require improvements at different stages:
- Non-standard, highly modified database configurations;
- Different versions platforms "1C:Enterprise";
- Configuration versions that have not been updated for a long time;
- Objects of exchange that have previously undergone modifications;
- The need for non-standard exchange rules;
- A very different set and composition of details in existing reference books.
Since even standard actions to implement primary data exchange require expert knowledge, they are recommended to be carried out with the participation of 1C specialists. Only after completing all the steps described above should you proceed to setting up the exchange in the configuration. Let's look at the integration of databases using the example of 1C:UPP and 1C:Retail (exchange with 1C:UT is set up using the same scheme). Also included in standard synchronization is the SCP - SCP exchange, which is typical for large-scale automation systems at the largest industrial enterprises.
In the “Service” submenu, select “Data exchange with products on the platform...” (selecting direct exchange with “Retail” often results in errors at the level of COM objects). Let's pay attention to the service message " This opportunity not available."
 To resolve this issue, you need to select "Configure Communications"
 ...and check the box. Next, ignore the error message.
 In the data synchronization settings, select “Create an exchange with “Retail”...

 Before configuring connection settings through a local or network directory, you should make sure that there is space on the disk for the directory. Although, as a rule, it does not take up more than 30-50 MB, in exceptional cases it may require up to 600 MB. You can create the required directory directly from the configurator.

 When connecting via a network directory, you are prompted to configure the connection using an FTP address and e-mail ignore by clicking “Next”.
 In the settings we manually enter prefixes - symbols databases (usually BP, UPP, RO), we set the rules and the start date for downloading the data. The prefix will be indicated in the name of the documents to indicate the database in which they were created. If the upload rules are not edited, the data will be uploaded by default according to all available parameters.

 We create an exchange settings file for “Retail” so as not to repeat our actions. If you need to immediately send data immediately after setting up synchronization, check the box.
 To automate the exchange process, you need to set up a schedule.
 Menu "Retail".
 Check the box and select “Synchronization”.
 We perform the “reverse” setup by selecting Production Enterprise Management.


Load the settings file created in UPP.
 We put a tick, the system picks up the address automatically.


We act in the same way as in UPP.


Verification data comparison (Manual data comparison is recommended to be done at the preparatory stage, since this work can become the most labor-intensive in the process of implementing the exchange). The comparison window opens by double clicking the mouse.

 In case of an error in synchronization, “Details...” will be replaced with “Never...”.
 “Details...” opens the log with updated information on the exchange.
 Ready.
Hello, dear readers of the blog site! If you have the Data Conversion configuration, then you have all the necessary tools for exchanging data in 1C:Enterprise 8.2, in particular documents and reference books. The article describes working in the Data Conversion configuration, edition 2.1.4.1.
Let's find the processing file MD82Exp.epf as part of the Data Conversion configuration distribution package.
It will be needed to download a description of the metadata structure of the configuration of the source and destination databases.
We will also find the processing file V8Exchan82.epf as part of the same distribution.
It will be needed to unload the source database and load the destination database.
What if your 1C configurations are identical? Then it’s worth trying another method, described in the note It can also be used to exchange data between identical databases.
What if you need to transfer data from version 1C 7.7 to version 1C 8.2? Then you should use the tips described.
So let's get started:
First, let's unload descriptions of the source and destination metadata structure.
- Let's open the source database in 1C:Enterprise 8.2 mode and start processing MD82Exp.epf
to download a description of the source metadata structure.
Let's save the source metadata structure to the Rules1.xml file.
- Let's open the receiver database in 1C:Enterprise 8.2 mode and start processing MD82Exp.epf
to download a description of the receiver metadata structure.
Let's save the receiver metadata structure to the Rules2.xml file.

Let's load descriptions of the metadata structure of both configurations.
- Let's run the Data Conversion configuration in 1C:Enterprise 8.2 mode.
- Let’s open the “Configurations” directory (Directories—>Configurations). It stores configuration information,
between which exchange rules can be configured. - Let's add information about the source configuration. Click the “Add” button or the “Insert” key.
- Let's indicate the path to the file with the source metadata structure Rules1.xml. Click the “Download” button.
Now we see that in the “Configurations” directory there is new element with the name of the source configuration.

- Let's add information about the receiver configuration. Click the “Add” button or the “Insert” key.
- Let's indicate the path to the file with the receiver metadata structure Rules2.xml. Click the “Download” button.
Now we see that a new element has appeared in the “Configurations” directory with the name of the receiver configuration.

So, we have loaded the source and destination information. Now we can configure the exchange rules.
In the next step, we will use the newly created elements of the “Configurations” directory and select them
in the "Conversions" directory.
- Let’s open the “Conversions” directory (Directories—>Conversions). This guide contains information
in which it is determined between which configurations the exchange is carried out and in which direction. - Let's add a new element. Click the “Add” button or the “Insert” key.
- We indicate the source configuration from the “Configurations” directory. Field "Configuration - source:".
- Let's specify the receiver configuration from the "Configurations" directory. Field “Configuration - Receiver:”.

- Click the “OK” button.
- The “Information” dialog will appear, with which you can automatically create all exchange rules based on
matching names of configuration objects, or only one rule manually.

- If you select the first option from the "Information" dialog another dialog with the text
“Create data upload rules?” Click the “OK” button.
Great, we have configured the exchange rules. All that remains is to upload these exchange rules to a file.

Conversion rules are ready! Now let's exchange data.
Let's open the source database in 1C:Enterprise 8.2 mode and start processing
to load source data.
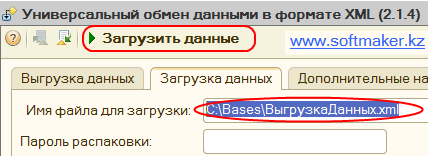
This is the processing file V8Exchan82.epf. Or open “Tools” -> “Other data exchanges” -> “Universal data exchange in XML format”
- In processing, on the “Data Upload” tab, select the name of the rules file (we saved it here: C:\Bases\DataExchangeRules.xml).
We agree to download the data exchange rules. Let's click the "Yes" button. - Let's specify the name of the data file. (For example, C:\Bases\Data Upload.xml). If the file does not exist, it will be created.

- Let's indicate the period. Click the “Upload data” button (Located on the panel at the top).
Now let's load the data into the receiver database. Let's open it in 1C:Enterprise 8.2 mode and start processing
This is the processing file V8Exchan82.epf. Or open “Tools” -> “Other data exchanges” -> “Universal data exchange in XML format”
- In processing, on the “Data Loading” tab, select the name of the data file (we saved it here: C:\Bases\Data Upload.xml).
- Click the “Load data” button (Located on the panel at the top).
Data loaded!
There are cases when certain details differ in the tabular part of the document of the destination and source databases.
The receiver may have an attribute of the “Directory” type, and the source may have an attribute with the same name, but its type is “Enumeration”.
What should I do? How to set up the rules for converting this object correctly? Use the tips from the article.
The same steps apply for versions 1C:Enterprise 8.1 and 1C:Enterprise 8.0. The Data Conversion configuration distribution includes processing files for these versions MD81Exp.epf and V8Exchan81.epf, MD80Exp.epf and V8Exchan.epf.
In addition, using the Data Conversion configuration, you can download data from version 1C:Enterprise 7.7. Attached are the files V77Exp.ert (downloading data), V77Imp.ert (downloading data), MD77Exp.ert (downloading a description of the configuration metadata structure).
The article describes in detail how to use these treatments.
In real life, it’s a rare company that gets by with just one 1C database. The most common situation is two bases, accounting and payroll.
The bases must be connected - salaries have been accrued, accrued taxes must go to the accounting department for payment.
To connect several databases, there is Exchange 1C. How does he work?
What is Exchange 1C?
There is a chain of stores and a central office. Every store and office has a warehouse. Goods are moved from warehouse to warehouse (mainly from the central warehouse to store warehouses), and are sold in stores.
The 1C Retail database is used in the office and the same database in each store. Bases in stores are subordinate to the base in the office.
In the office, documents are created on the movement of goods from warehouse to warehouse, and prices are set. Documents are uploaded to subordinate databases and goods “appear” there.
Stores create documents about completed sales of goods. Documents are uploaded to the office database and sales “appear” there.
This scheme is called a distributed information base (RIB). Procedures for “uploading” documents – two-way 1C exchange. And setting up this scheme is URIB or URIBD (distributed information database management).
Principles of exchanging directories in 1C
1C directories (and the set of all directories “in the complex” is called NSI - normative reference Information) – should usually be the same in different databases. This means that even if there are several databases, the list of goods, warehouses, and contractors is the same in different databases.
A common practice is when a directory is allowed to be edited in one database, and it is copied (“migrated”) to the others. As we have discussed before, each 1C element has a unique identifier - GUID. Directories are usually copied together with their GUID, and are thus identical throughout the distributed information system.
Otherwise, when several initially existing databases are connected, or when directories can be created in different databases at the same time, their GUIDs will be different. There is a matching mechanism for this. In a special information register during 1C exchange, information is recorded that the element from database No. 1 with GUID xxx is equal to the element in this database with GUID yyy. Initially, existing elements that are no longer equal must be compared automatically (using other details, for example, by name or by tax identification number and checkpoint) or manually.
Principles of Document Exchange in 1C
Documents in 1C are posted according to registers and are then considered “posted”. This gives rise to understandable difficulties during transfer.
One option is to transfer only the documents and transfer them again after downloading. This method is often used, but it can give rise to errors - the document may not be posted in the new database, since the conditions during the posting may be different than they were at the time the document was posted in the original database.
Another option is to transfer documents and registers together. As we understand, the question immediately arises - either we transfer all documents in general and then the entire register in general, or we are forced to choose for transfer only movements on the transferred documents.
Let's say we need to transfer an item from the Nomenclature directory. This directory has 10 fields, of which 5 are strings and numbers, and 5 are links to other directories.
Accordingly, when transferring one element of the Nomenclature, we are forced to search for and transfer also 5 elements of other directories.
Thus, when transferring one directory element or one document, 100 or more other 1C objects can be transferred via link.
In fact, it is said that almost all configuration references refer to each other in one way or another.
1C exchange plans
Let's assume that we have created a distributed database and carried out a 1C exchange. Goods have been purchased to the central warehouse and prepared for shipment to stores. In 1C in the office they introduced necessary documents movement of goods. Requires them to be loaded into stores.
What to do? Carry out a full 1C exchange again? Long and ineffective! It would be much better to calculate what exactly was added or changed by users in the office, so that only changes would be sent to stores.
There are 1C exchange plans for this. The programmer creates a 1C exchange plan in advance for carrying out 1C exchanges with some other database, for example with our stores.

The 1C exchange plan notes when users work with directories and documents what has been added or changed since the last 1C exchange with this database.
Creation of URIB 1C
So, we will create a distributed database from scratch. Initially, we have a “parent” office base. From it we will select databases of stores that will be subordinate to it.
Typical configurations already have standard 1C exchange plans. The types of bases for which they are intended are intuitively clear from the name:
- Exchange 1C with a website: exchange with a 1C:Bitrix website
- Exchange 1C UPP-UT or UT-Retail: typical exchanges with sister configurations
- Full – 1C exchange with a database based on the same configuration.
RIB - distributed information base - can also be made on the basis of the 1C “Full” exchange plan. In the configurator, in this 1C exchange plan, the “Distributed infobase” checkbox should be checked.

The 1C exchange plan created in the configurator indicates that we are going to exchange with this configuration. In Enterprise mode, in the same 1C exchange plan, you now need to specify specific databases based on this configuration.
Let's go to the 1C exchange plan (Operations/Exchange Plan; can also be in another menu, often in the Service/XXX menu).

In the list of databases in the 1C exchange plan there is one with a green circle in the picture. This element stands for THIS BASE. The remaining elements indicate OTHER bases with which 1C is being exchanged.
It is necessary that both the name and code of all elements be filled in.

To create a store subbase:
- Place the cursor in the list on the 1C exchange plan element, which we created as a “store base”
- Select the menu item “Actions/Create initial image”.
As a result, one database will be created with the initial data uploaded into it. This must be repeated for each element of the 1C exchange plan, except for the CURRENT BASE.

Theory of 1C exchanges
The theory of 1C exchange is quite simple:
- One of the databases (usually the center’s database) initiates 1C exchange according to a schedule or “by event” (login to the database of a specific user, etc.)
- 1C exchange consists of downloading a file from the database
- The file must be moved to a place where a slave database can pick it up (usually a share or ftp, less often e-mail)
- The slave database downloads the received file
- As confirmation that the information has been received, the slave database uploads a “response” file, which is loaded back into the central database in the same way
- The 1C exchange session is completed.
There are other methods of exchanging 1C, not through files, but, for example, through a direct COM connection between two databases. Its advantages:
- No "space to store and transfer files" required
- No need to re-upload confirmation
- Everything happens faster due to the first two points.
However, the limitation is clear - the bases must be so accessible to each other in order to be able to initiate a COM connection.
Setting up RIB 1C
In constants typical configurations(Operations/Constants; or Service/Program Settings) - usually yes general setup 1C exchanges. This is a prefix in element codes and document numbers to easily determine in which database it was created. As well as an internal method for storing information about the place where directories and documents were created.

Now you need to configure how the process of periodic exchange of 1C information between the created databases will take place.
All RIB settings in 1C are in standard configurations, usually in the menu Service/Distributed information bases/Configure RIB nodes.

For each previously created “remote store base” element, you need to add a settings element.

The settings indicate the 1C exchange method: file (share), file (FTP), file (e-mail).

Creating and setting up a distributed 1C information base in a thin client
Let's look at a similar setting in a typical configuration based on thin client– Trade Management Revision 11.
Settings (and creation from scratch) are located on the Administration tab of the interface. Item “Data exchange”.

Select “Create an exchange in a distributed infobase”.

From the very beginning, 1C will ask us to indicate how we are going to exchange information with the subordinate database. Here is the configuration option “via a file on the ball”.

Here is the configuration option via an FTP file.

The name of our 1C exchange setup.

And immediately a proposal to create an “initial image” - that is, the slave database itself with uploading primary information into it.

Unlike the configuration on a thick client, both 1C exchange settings are in one place.
We know the metadata structure information base source and receiver. This information is quite enough for us to determine which objects of the source information base should be converted into which objects of the receiver information base. That is, we can establish some correspondence between the objects of the source and receiver information base. For example, we can specify that the Nomenclature directory of the source infobase corresponds to the Nomenclature directory (or some other directory) of the receiver infobase.
We will call such a correspondence between the source and destination objects “Object Conversion Rules” or OCR.
The example shown shows that for the exchange (or Conversion) rules “Two objects into one”, the correspondence of objects for the directories “Users” and “Individuals” is established. That is, it is specified that the objects of the "Users" directory from the source infobase need to be transferred to the objects of the "Users" directory of the receiver infobase.
When the correspondence between objects is established, you can determine how to transfer the details of these objects. That is, we need to specify that the “Name” attribute of one directory corresponds to the “Name” attribute of another.
We will call this correspondence between the properties (or details) of source and destination objects “Property Conversion Rules” or PCS.

The example shown shows that for the rules for converting the “Users” objects, 3 correspondences are established between the properties (or details) of the objects. It is indicated that the “Name” attribute of the “Users” directory of the source information base must be converted into the “Name” attribute of the “Users” directory of the receiver information base.
When the correspondence between the properties of objects is specified, the program needs to specify the criteria for matching objects (that is, it needs to indicate how to search for an object in the destination using a source object) in two information bases. For such a comparison, use the "Search" checkbox for the corresponding object conversion rule. If the checkbox is checked, the search for the corresponding object will be performed using this property. In the example given, it is clear that the search for an object in the receiver infobase will be performed using the “Name” attribute. If the search is set using several details, then the search will be carried out using all of them simultaneously (that is, the conditions are imposed by “AND”. In this case, the matching rule is as follows: Search in the information base - receiver for an object for which all search details match the details source object search).
In addition, it is possible to set a correspondence between predefined elements of reference books, plans of characteristic types and enumeration values. We will call such a comparison the “Value Conversion Rules” of the VKZ.

The example shown shows that for the rules for converting objects “Types of Agent Agreements”, a correspondence has been established between the values of the enumeration. That is, the value of the "Rent" enumeration in the source infobase must be converted to the value of the "Rent" enumeration in the destination infobase.
We got acquainted with the rules for converting objects, properties and values. At first glance very simple rules comparisons allow you to transfer data from one infobase to another.
Sincerely, Vladimir Milkin(teacher and developer).
Textbook on 1C Data Conversion (edition 2) Detailed introduction to the rules of exchange
We know what exchange rules are and why they are needed. Let's take a closer look at the additional functionality of working with exchange rules. Let’s open the settings for data exchange (conversion) rules:
The exchange rules specify the source and destination configurations for the data, in addition:
"Advanced" tab:

You can specify the default file name for saving exchange rules, data upload and download modules for 7.7, name of exchange rules.
"Parameters" tab:
Let's say the office accepts orders exclusively for goods, so it is advisable to establish a ban on unloading services. If the reference element Nomenclature attribute Service is set to True, then it is guaranteed not to be unloaded. It is best to immediately make control over the unloading of services optional, so as not to change the rules if the remote office begins to accept orders for services.
For this case, we will have to learn two new techniques for working with the “Data Conversion” configuration - using handlers and setting parameters.
Parameters are a specialized data structure in unloading algorithms that can be used to access processing variables. Setting up the structure of parameters for conversion rules is carried out in the "Data Conversion" configuration, and setting parameter values is possible in the form of processing data upload and download.
To edit the parameters, open the form of the Conversions directory element for edited exchange rules and go to the parameters tab. Let's create a new directory element Parameters. Let's give the parameter name – UnloadServices. The parameter name is used to refer to it in the Parameters structure when writing program code in handlers. The name will be displayed in the tabular part of the Parameters in the processing form universal exchange data. In order for the parameter to be visible in the dialog when setting up the upload, you need to check the "Set in dialog" checkbox and select the parameter value type. To work with parameters in the dialog, you must also select the "Download parameters in version 2.01 format" checkbox in the form of the Conversions directory element.

It is not enough to simply specify the parameters; the unloading algorithm must “understand” in which case to unload an element and in which not. For similar (and many other) cases, the handler mechanism is used. Its essence lies in the fact that at key points in the execution of all basic algorithms for uploading and loading data, the code written by the developer when creating the exchange rules is processed. Naturally, the use of such a delicate instrument requires caution and thoughtfulness. We recommend that before writing your own handlers, you carefully read the help for the "Data Conversion 2.0" configuration, which describes all the variables available in the handlers and how to use them, as well as the types of handlers and the features of calling them in data exchange algorithms.
For our purpose, we need to use the "Before unloading" unloading rule handler. Let's open the Nomenclature data upload rule and place the following program code in the "Before uploading" field on the "Events" tab:

What does our handler do? When writing the program code, we used variables of data upload algorithms. The Parameters structure is used to access the UnloadServices parameter, which is specified in the data exchange processing form. The object variable provides access to the object being paged. And the Refusal variable allows you to control the refusal to unload the current object. The handler is executed immediately before the object is unloaded, which makes it possible to cancel the unloading of the object.

ONLY FOR V8 - V8 EXCHANGE AND UPLOAD AND DOWNLOAD PROCESSING AT LEAST 2.0.18.1
It is possible to transfer parameters from one configuration to another. To do this, it is enough to check the “Pass parameter when uploading” checkbox on the “Parameters” tab and this parameter will be placed in the exchange file and its value can be accessed when loading data. You can specify a conversion rule for a parameter according to which the values should be converted. Using the "Pass parameter when uploading" checkbox, you can transfer only those parameters that are edited in the dialog when uploading data. If you need to pass a parameter that is not present in this dialog, then you need to call the procedure:
On the Upload Parameters tab, a parameter has appeared, changing the values of which services are either unloaded or not unloaded.
