Edit the list of operating systems. How to make Windows boot first in Grub. How to choose the default boot system
The loading screen changes using special programs, you can download the most suitable one on our website, it’s called Windows 7 Boot Updater.
1. Download the program, extract it and run it with administrator rights.
2. Download from our website and extract the files from the archive.
3. If you have a file with the extension " .bs7"then go to the program menu" file->load boot skin...", we check that the file has loaded by clicking the "Start" button to preview the animation. If everything works, then click the "Apply" button and restart the computer.

4. If the archive contains a picture of 105 frames in the format ".BMP, .GIF, .PNG, .JPG" or file " activity.bmp", then extract it to a separate folder. Now in the "" menu " tab animation"select the next option" animation", after which an explorer window should open where you need to specify the path to the folder with the previously extracted boot animation file. Then we check that the file has loaded by clicking the "start" button to preview the animation. If everything works, then click the "apply" button and restart the computer.

Also, if you have read the description of the program, you know that in it you can change the standard inscriptions, their color, size and location on the screen. All this is located in two tabs “Message 1” and “Message 2”. We think setting them up does not require additional explanation, experiment.
Restore the loading screen to standard. how to do it? It’s very simple, go to “settings” and select “restore from backup”.
Hello, readers of our site for beginners. The Internet opens up a lot of useful opportunities for us. This includes searching for information, people, communicating with them through, in addition, we ourselves can share our knowledge and skills through our own website (blog) or using social networks. But one way or another, we constantly download something from various resources: programs, music, files, films, etc. All these downloads are downloaded to a special folder by default. Many newbies don't know where these downloads are. In addition, this folder can be changed, i.e. specify another folder in another location on your computer or laptop.
Today we will look at how to change the download folder in different browsers. Let's start, as always, Google Chrome
How to change download folder in chrome
So, in order to find out where files are downloaded or simply change the location of the folder, go to Browser Settings by entering in the address bar chrome://settings/ and at the very bottom click on the link “ Show advanced settings»
Go down to the settings section " Downloaded files" Here we see the current path to the downloads folder. To change it, click on the “Change” button. If it is convenient for you to choose the download location yourself, then check the box “ Always indicate the download location" Now before downloading a file, archive, etc. A window will open to select the download location.
Let's just change the download path. To do this, click the " Change».

This will open a window where we just need to specify the desired hard drive partition and folder. You can create it in advance or directly in this window by clicking on the “ Create a folder" After you have specified the desired folder for downloads, click “ OK" Now all downloaded files will be automatically downloaded to this folder.
Changing the downloads folder in Mozilla Firefox
This browser also prompts us to change the folder for downloading files. To do this, go to Browser Settings


We have familiar settings before us. To change the download folder, click on “ Review…»

How to change the download folder in Yandex Browser
Now let's change the download folder in Yandex Browser. The standard procedure is very similar to what we did in Google Chrome: go to Browser Settings


And in the group " Downloads", as before in other browsers, click the button " Change" Then we set a new folder for file downloads.
How to change the download folder in Opera
And finally, let's replace the folder in the Opera browser. To do this, go to Settings through the Main Menu

Or by pressing a keyboard shortcut Alt+P

Here we have a familiar panel in the settings tab “ Basic" I think it won’t be difficult for you to change the folder using the above methods.
This is how simple and easy it is to change the folder for downloading files through different browsers. And that's all for today. Until next time.
In honor of the New Year, make decorations from fir trees, amuse children, and ride down the mountains on sleds. But adults shouldn’t indulge in drunkenness and massacres—there are plenty of other days for that.
Hello admin, question! I had an old SATA 2 hard drive running Windows 7 on my computer, then I bought an SSD and disconnected the old hard drive and put it on a shelf. I installed Windows 10 on the SSD, but after a while I needed Windows 7 and I connected the old hard drive back. Now my system unit contains two drives: an SSD and a regular HDD, but only Windows 10, located on the SSD, loads. How can I boot my computer with Windows 7 located on the HDD?
I understand that you can simply disconnect the SSD and the seven will boot, but this does not suit me, since Windows 7 is needed for constant operation and I need to get the operating system boot manager to appear when I turn on the computer.
On one forum on the network, it was advised to open the command line as administrator in Windows 10 and enter the command bcdboot X:\windows, where X is the drive letter with Windows 7 installed, I did everything as they said, and then some strange things started to happen. If you shut down Windows 10 and then turn on the computer, there is no boot manager, Windows 10 loads immediately and that’s it, but if you restart the computer, then There is still a boot manager and you can select Windows 7 or Windows 10. But for some reason, Win 7 loads by default and the menu itself is in English, and even in the old black and white style Windows 7.
Hello friends! If you connected to your computer, which already has one hard drive with Windows 10 installed, a second hard drive with Windows 7 and want to register Win 7 in the Win 10 boot manager, then you can do this very simply using the command line tool - bcdboot.exe. We launch the command line as administrator and enter the appropriate command that will register Windows 7 in boot store configuration file (BCD) owned by Windows 10. You can also do the opposite, write Windows 10 to Windows 7 bootloader.
We all know that the boot loader files for Windows 7, 8.1, 10 operating systems are located on a hidden System Reserved partition, volume 100-500MB. The main purpose of this partition is to store Windows boot files (boot manager - bootmgr file and boot storage configuration files (BCD)). AND if we want to register information about Windows 7 in the Windows 10 boot manager, then we can do this directly in a running Win 10 using the command bcdboot X:\windows, Where X is the drive letter with Windows 7 installed. This command will add information about Windows 7 to the fileboot store (BCD) configurations)belonging to Windows 10and after that, when you turn on the computer, the operating system selection menu will appear.
So, for example, let’s take a desktop computer with one hard drive on which Windows 10 is installed, then install a second hard drive with Windows 7 installed in the system unit. After installing the second HDD, let’s go to Win 10 in Disk Management, there I will have a picture like this.
Disk 0 - capacity 250 GB, Windows 10 installed.
Disk 1 - capacity 120 GB, Windows 7 installed.
Open a command prompt as administrator and enter the command:
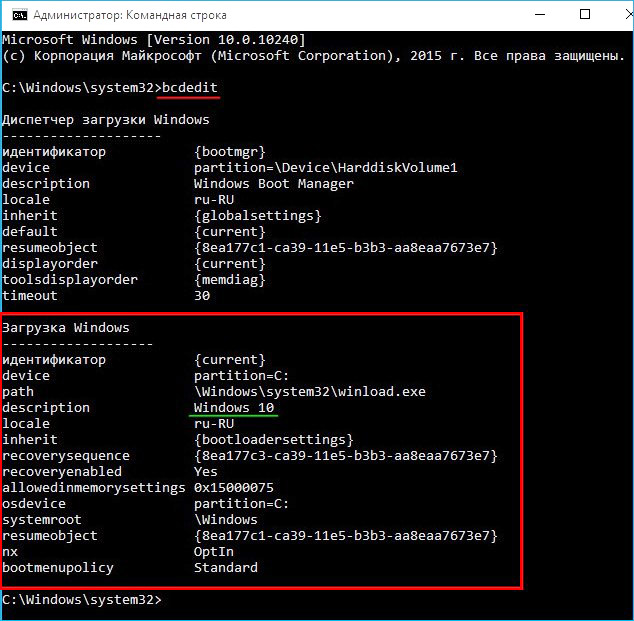
bcdedit (this command opens the contents of the file Windows 10 boot storage (BCD) configurations).
As you can see, the Windows 10 bootloader file contains information about one Win 10 operating system.
Enter the command:
bcdboot E:\windows (this command prescribes Windows 7 inWindows 10 boot store configuration file (BCD). The letter E: in the command is the drive letter with Win 7 installed.
That seems to be all, and now when you turn on the computer, the boot manager should appear with a choice of operating systems, but I will disappoint you. In Windows 8.1, 10, fast startup is set by default and after turning off the computer (shutdown), the next time you turn it on, it will boot again only Windows 10 (There will be no boot manager menu selection), even Windows 7 will be set by default. And if you restart the computer, the boot manager will appear, but in the old black and white style and Windows 7 will load by default, that’s how it is! To avoid all this, recreate the BCD boot repository, enter the following command:
bcdboot C:\windows (g de C: drive letter of Windows 10. DThis command will create a download manager in Russian in a new tiled style and After turning off the computer in Windows 10 and then turning it on, a tiled menu will appear with a choice of Windows 10 and Windows 7. Win 10 will load by default.
Let's check the contents of the download storage with the command: bcdedit
Installing multiple operating systems on a computer negates the efforts of computer device manufacturers who have achieved faster Windows launch by equipping modern PCs and laptops with motherboards and SSD drives as an alternative to slow HDDs. The launch of Windows, if at least two of them are installed on the computer, without user intervention when selecting an operating system in the boot loader list, will be delayed by 30 seconds - the preset timer value before starting the system that is the first in the boot list. How can I edit the boot menu of multiple Windows and set my own options? Including so that when starting the computer you are not distracted by choosing the system that is used primarily, while maintaining the ability to access a second (or several) Windows.
1. Editing the Windows 8.1 and 10 boot menu in the bootloader window
The Windows 7 bootloader menu only provides for the selection of one or another system to launch; all operations to edit this menu can only be carried out within the system.
But if the latest versions of Windows 8.1 and 10 were installed on the computer, we will get both a more attractive appearance and a more functional bootloader menu. Some boot parameters for multiple systems can be changed directly in the bootloader window.
By opening the boot menu parameters, we will be able to launch, as well as change the value of the timer before booting the default system and select the default system itself - Windows, which is the first in the boot list and starts automatically after the timer expires.
True, the choice of values for the timer is small.
You can more flexibly configure the boot menu of several Windows only within one of the systems.
2. Editing the boot menu of several Windows within the system
Editing the Windows boot menu is done in system properties. Press the Win+Pause keys and select “Advanced options”.
A system properties window will appear; here you need to click the “Options” button at the very bottom, in the “Boot and Recovery” column.
What is offered to us? We can select Windows, which will boot by default.
We can set a different timer value, but this time enter an arbitrary number of seconds during which the multi-Windows boot loader menu will be displayed on the screen.
To reduce the boot time of the main Windows, you can completely remove the boot loader menu for several systems. To do this, you need to uncheck the option to display a list of OS.
In this case, the bootloader menu will disappear and the main Windows will boot immediately. At the same time, the second system is not going anywhere. To get into it, you just need to check the box back, and the next time you start the multi-system boot loader menu will appear again. This option is convenient for cases where the second system is rarely used.
When you finish editing the bootloader menu, click “Ok” at the bottom.
3. Complete removal of the second Windows
The process of completely removing a second Windows system, including removing its boot entry from the boot loader menu, is described in.
Have a great day!
For those who don’t understand what we’re talking about, I’ll show you everything in pictures:
This is what the boot menu looks like when installing the latest Windows 8 OS.
And this is what the menu looks like when installing the latest Windows Vista, 7.
Before Windows Vista (Windows 2000, XP), all changes to downloads were made to the file boot.ini. Boot.ini is a system file that contains information about the Windows operating systems installed on your computer. This data is displayed while the computer/laptop is booting. In order to change the boot parameters, just open the boot.ini files with any text editor and make changes.
Starting with the Windows Vista operating system (Windows 7, 8, 10), the boot.ini file has been replaced by the Boot Configuration Data (BCD) file. This file is more versatile than boot.ini and can be used on platforms that use a means other than the BIOS to boot the system.But how do you make changes to boot options in Windows Vista 7, 8, 10? There are two ways for this provided by Windows developers:
1 Using a graphical interface;
2 Using the command line.
Change boot options using GUI in Windows Vista, 7, 8.
To use this method, press the key combination "Win" + "R", In the "Run" line, type msconfig, and press Enter.
It must be said that quite a few settings are available this way, but for most users this will be quite enough. This tool will allow you to:
1) Get information about the current and default boot systems.
2) Edit time (timeout). After this time, the operating system set to boot by default will be loaded without user intervention. To do this, specify the time (in seconds) in the "Timeout" field.
3) Change the default system to boot. To do this, select which system you want to boot by default (without external intervention) and click the "Set as default" button.
4) Remove unnecessary entry from boot menu. Select the entry you want to delete and click the "Delete" button.
All changes will take effect after pressing the "OK" button and rebooting the system.
Change boot options using command line (bcdedit) in Windows Vista, 7, 8.
The bcdedit utility provides more extensive options for changing boot parameters. Bcdedit is a command line tool designed to manage boot configuration data. It can be used for a variety of tasks: creating new repositories, modifying existing repositories, adding boot menu options, and much more.
To get to know this command better, launch a command prompt with administrator rights and run the command:
/bcdedit/?
In this article I would like to go into more detail on examples of using the bcdedit command .
Example of using bcdedit.
Before you start making changes to the Windows boot loader, you must first create a backup copy of it. To do this, create a BootBackup folder on any disk and enter the following command at the command line (the command line must be run as Administrator):
bcdedit /export D:\BootBackup\bcd
If you feel that something went wrong, in order to return everything to its original state, run the BCD restore command:
bcdedit /import D:\BootCopy\bcd
Where is D:\ drive where the BootBackup folder is located.
The next step is to find out basic information about your BCD. To do this, run the command bcdedit.
Where:
identifier– ID of a particular record;
device– shows the partition on which the download files are located (this can be the operating system or the BOOT folder);
osdevice– shows the partition on which the operating system system files are located. Typically, the device and osdevice parameters are equal;
path– if device defined a disk partition that contains operating system files, then this parameter defines the rest of the path to the operating system loader;
default– shows the ID of the operating system that is loaded by default, if the operating system in which the command line was launched is loaded by default, the default parameter is assigned the value (current);
displayorder– shows the order in which records about bootable systems are located;
timeout– timeout (see above), the value is shown and set in seconds;
locale– specifies the language of the boot menu or the advanced boot options menu;
description– shows the name of the operating system displayed in the boot menu.How to change the default operating system.
Specify the value /default and the ID of the OS that should boot by default.
bcdedit /default (ID)
Now the operating system with the specified ID will boot by default.How to change the boot delay value
To change the delay before the operating system starts loading, run the following command:
bcdedit /timeout XX
where XX is the number in seconds, the default is 30 seconds.Removing an entry from the BCD and boot manager done with the command:
bcdedit /delete (ID)
There is a peculiarity in executing the command: if a known record is specified as the ID, for example (ntldr), then the command must be executed with the /f key:
bcdedit /delete (ntldr) /f
If the ID is written in alphanumeric code, the /f switch is not needed.In order to obtain more detailed information about the capabilities of the bcdedit utility, you must use the help bcdedit/?