Mac os does not connect a second monitor. iMac as an external display. Selecting the mode of operation with an external monitor
Fair, not overpriced and not underestimated. There should be prices on the Service website. Necessarily! without asterisks, clear and detailed, where technically possible - as accurate and concise as possible.
If spare parts are available, up to 85% of complex repairs can be completed in 1-2 days. Modular repairs require much less time. The website shows the approximate duration of any repair.
Warranty and responsibility
A guarantee must be given for any repairs. Everything is described on the website and in the documents. The guarantee is self-confidence and respect for you. A 3-6 month warranty is good and sufficient. It is needed to check quality and hidden defects that cannot be detected immediately. You see honest and realistic terms (not 3 years), you can be sure that they will help you.
Half the success in Apple repair is the quality and reliability of spare parts, so a good service works with suppliers directly, there are always several reliable channels and your own warehouse with proven spare parts for current models, so you don’t have to waste extra time.
Free diagnostics
This is very important and has already become a rule of good manners for the service center. Diagnostics is the most difficult and important part of the repair, but you don't have to pay a penny for it, even if you don't repair the device based on its results.
Service repairs and delivery
A good service values your time, so it offers free delivery. And for the same reason, repairs are carried out only in the workshop of a service center: they can be done correctly and according to technology only in a prepared place.
Convenient schedule
If the Service works for you, and not for itself, then it is always open! absolutely. The schedule should be convenient to fit in before and after work. Good service works on weekends and holidays. We are waiting for you and working on your devices every day: 9:00 - 21:00
The reputation of professionals consists of several points
Company age and experience
Reliable and experienced service has been known for a long time.
If a company has been on the market for many years and has managed to establish itself as an expert, people turn to it, write about it, and recommend it. We know what we are talking about, since 98% of incoming devices in the service center are restored.
Other service centers trust us and refer complex cases to us.
How many masters in areas
If there are always several engineers waiting for you for each type of equipment, you can be sure:
1. there will be no queue (or it will be minimal) - your device will be taken care of right away.
2. you give your Macbook for repair to an expert in the field of Mac repairs. He knows all the secrets of these devices
Technical literacy
If you ask a question, a specialist should answer it as accurately as possible.
So that you can imagine what exactly you need.
They will try to solve the problem. In most cases, from the description you can understand what happened and how to fix the problem.
Mac mini bills itself as the world's smallest and greenest computer. At the same time, Apple engineers provided the device with decent functionality. Despite its small dimensions, the computer is in many ways superior to its stationary predecessors.
When purchasing an Apple computer, it is worth understanding its capabilities in order to get the most out of it. For example, if you wish, you can connect two or even three monitors to the device at once.
Mac mini technical features
High computer performance is provided by Mac OS X Leopard OS, NVIDIA graphics processor and Intel Core 2 Duo processor. Despite its power, the device is small in size: 5.8 cm in height and 16.51 cm on the side. And of course, the “Apple” signature design, which makes the Mac mini elegant and compact.
The hard drive stores from 160 GB to 500 GB of information, photos, videos, etc. If there is not enough space, you can additionally use an external hard drive.
What devices is the Mac Mini compatible with:
- digital cameras;
- iPhone;
- scanners;
- printers;
- iPod;
- hard disk;
- TV;
- monitors;
- various peripheral devices.
Thanks to Bluetooth and 802.11n wireless technologies, keyboards and mice are perfectly connected to the Mac Mini computer, and Wi-Fi settings are made. Accordingly, all devices that have similar technologies can connect to the Mac.
Connecting a Monitor to a Mac Mini
There are different ways to set up your Mac and monitor, for example, the connected display can be in addition to the built-in or main display. For example, to view content on a computer screen in detail, you can use a higher resolution TV screen.
Set up a secondary display on Mac:
- Before you start installation, you need to connect an additional screen;
- in the menu tab, select “System settings”;
- go to the “Monitors” section, then select “Location”.
On the Location tab, screens will appear as blue rectangles. On your computer, you can set the location of the monitors relative to each other. To change the location, you simply drag the selected rectangle in the selected direction. You can connect two or three monitors, depending on your purposes. One way or another, most Apple devices are compatible with each other and are perfectly customizable.
Connecting a second monitor to an Apple computer is not difficult. The second monitor is connected using a special cable. There are several types of such cables:
HDMI– this connector is found on almost all modern video cards. It can transmit both image and sound, while providing high-quality signal transmission.

DVI- This is the most popular way to connect modern monitors to a computer. Apple uses Mini-DVI for such purposes. It differs from DVI only in its smaller size.

DisplayPort and Thunderbolt– connectors similar to the HDMI connector. Quite often found on Apple computers. Thunderbolt is an improved version of DisplayPort. At the same time, Thunderbolt monitors can be connected exclusively to Thunderbolt connectors, while DisplayPort monitors can be connected to both DisplayPort and Thunderbolt connectors.


VGA– a fairly old connector that is practically not used today. It was popular during the use of CRT monitors. If your monitor is connected only through this cable, then in addition to the cable itself, you will also need an adapter for another connection to connect, because Apple products simply do not have this connector.


To connect a second monitor, you need to purchase the necessary cable and connect it to both the computer and the monitor itself.
Comment! If you connect a monitor via VGA or DVI/Mini-DVI, then before the procedure, it is better to turn off the computer; if you connect via HDMI, DisplayPort or Thunderbolt ports, then turning off the computer is not required.
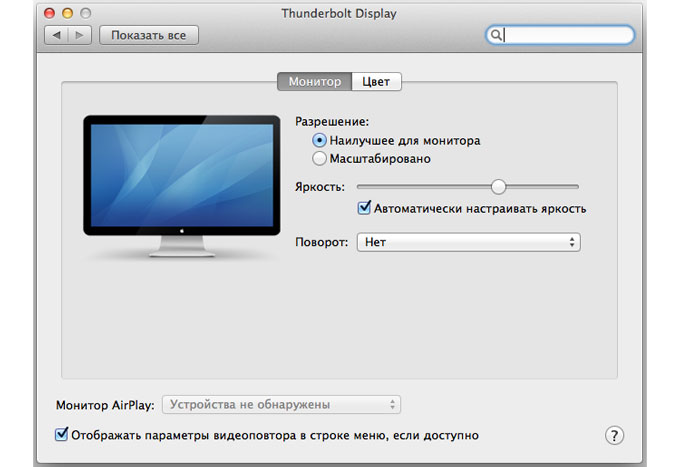
Now, in the Apple menu, select the item System Settings – Monitors.


Here you can adjust the screen layout, as well as set the settings for transferring the image to the second screen.
By default, when connecting a second monitor, the desktop expands to cover both monitors. In these settings, you can set the image to be duplicated rather than expanded; to do this, check the box next to Enable video repeat of monitors.
A month ago, it contains compared to its predecessor, but today I would like to draw attention to one of them. At the operating system presentation at WWDC in June of this year, Craig Federighi announced improved support for multiple screens in Mavericks, and a couple of days ago I was able to put his words to the test.
Using a regular HDMI cable (not ) I connected my MacBook to an external 27-inch monitor. At first, no major improvements were noticed: the image appeared very quickly, and then the monitor duplicated the image from the laptop. There is nothing surprising in this; a similar “trick” can be pulled off by Windows computers.
However, an active AirPlay icon immediately appeared on the top bar of Mavericks. Clicking it revealed the option to turn off the monitor's video repeat and ended up with almost two computers instead of one.

The laptop display and the external monitor turned out to be independent of each other, but at the same time they did not lose connection. The Dock can be used on only one of the screens by moving the cursor to the bottom edge of the monitor. At the same time, you can run different applications on two monitors - for example, watch a full-screen movie on a laptop and simultaneously open an email client on an external display. Very comfortably.
But the most interesting thing is that the monitors can “communicate” with each other. To move the window of a running application from the laptop to the monitor, you just need to pull it in the direction where the external display is located. As the program begins to disappear from the laptop screen, it will appear on another monitor. It is noteworthy that the application will be automatically optimized for the new resolution.
The new feature works especially impressively with the Mac Pro. supports up to six simultaneously connected displays, which will turn you almost into Tony Stark. The user can “stretch” the same Safari over the entire workspace (I don’t know why this is needed, though), and also control each monitor as if it were a whole separate computer.
So the next time you connect your Mac to an external monitor, don't close the laptop's lid. Make the most of your workspace.

It would seem that what could be simpler than connecting a MacBook to an external monitor? We take a laptop, a monitor, connect them with a suitable cable and enjoy the picture on the big screen. In theory, this is true, but in practice, many users are faced with numerous pitfalls. In this material, we will try to consider the main problems that may arise for a user who decides to increase the display space of his MacBook using an external monitor.
Let's consider the most common situation in which we have a MacBook and any external monitor or even a TV. They must be connected to each other using a suitable cable. Owners Cinema Display And Thunderbolt Display Feel free to skip this part.
How and how to connect an external monitor to a MacBook
All modern Apple computers are equipped with a port Thunderbolt, which is backwards compatible with the Mini port DisplayPort. In turn, Mini DisplayPort is used on older MacBook models. Even earlier, in the days of plastic MacBooks, a connector was in use Mini-DVI. Also now Apple has the most common connector in some computers HDMI. They are equipped with it, for example.
Accordingly, the first thing you need to do is make sure what connectors your monitor to which you plan to connect is equipped with. Additionally, it is important to know exactly which port your MacBook has. In any case, the list of possible cables and adapters ultimately comes down to the following set:


This list of adapters and cables will be sufficient to connect most MacBooks to all modern monitors. Moreover, all presented accessories can be purchased directly on the Apple website. Cheaper alternatives are available at any electronics store or on eBay. There are exactly two important notes. Firstly, when purchasing, it is important to make sure that the adapter you are looking at is for Mini DisplayPort, and not regular DisplayPort. Also, if you plan to transmit audio to the monitor, then the cable or adapter must support this feature. Audio transmission via HDMI in MacBooks appeared in 2011 models.
Owners of the latest generations of Apple Cinema Display and Thunderbolt Display are deprived of the pleasure of purchasing any cables separately. Cinema Display, with different variations of the name, has been produced since 1999 and is most often found with a DVI-D connector, and then Mini Display Port. If you are the happy owner of an old Apple monitor and a new MacBook, then you will still need one or another adapter. In other cases there should be no problems. Modern Apple monitors have a built-in cable with a Mini DisplayPort connector (in Cinema Display) or Thunderbolt connector (in Thunderbolt Display) and immediately have built-in cables with corresponding connectors, as well as a MagSafe power cable that allows you to charge your MacBook.
Selecting the mode of operation with an external monitor
So, the MacBook is successfully connected to the monitor. Now let's try to decide on the operating mode, of which in the case of Apple laptops there are exactly three.
First and the simplest operating mode is video repeat of monitors. In this mode, the image on the MacBook display and monitor is completely duplicated. In this mode it is convenient to work with a projector or in other situations when you need to display your work on a large screen. Of course, this mode imposes a limit on the maximum resolution of the external monitor; it cannot exceed the resolution of the MacBook display.

Second and, perhaps, the most popular operating mode is the extended desktop. In this case, one monitor is literally a continuation of the other, and the user has the opportunity to use the area of two displays at once: the built-in MacBook and an external monitor. To activate this mode, just connect the monitor to a running MacBook or connect an external monitor and open the laptop lid.

In the system settings, you can change the order of the monitors, as well as select the main one. The main monitor will display a menu bar at the top of the screen. In addition, if the monitor has enough height, then it is quite possible to use the MacBook's trackpad and keyboard as input devices. The same thing, by the way, is true for the first option.
Finally, third The mode involves using a MacBook as a system unit and with the lid closed. To implement this option, you must purchase and connect an external keyboard and mouse or trackpad to your computer, since you will not have access to the laptop’s input devices.
To activate this mode, you must close the MacBook lid and put it into sleep mode. Then the charger and monitor are connected. To wake the laptop from sleep mode, you will need to press a key on the mouse or keyboard. The MacBook will use the external monitor as its sole and primary image output source.

In this case, it may not be possible to wake up the MacBook. The fact is that in OS X, by default, the ability to wake the computer from sleep using devices connected via Bluetooth is disabled. If you have a keyboard and/or mouse connected in this way, then you need to go to Settings - Bluetooth - Advanced and activate the corresponding option.
We solve possible problems
Now, having connected the monitor and choosing the most convenient operating mode, you can safely use your MacBook with an external monitor. If you periodically work separately on a laptop and separately on a MacBook with an external monitor, then you will probably find it useful to use an application that controls the size and position of windows depending on the display used.
Connecting more than one monitor to a MacBook is no longer such a simple process. For these purposes, it is most convenient to use Thunderbolt Display, and then connect other Thunderbolt-enabled displays in series to the Apple monitor. Otherwise, often only one or in rare cases two connectors for image output will limit the flight of imagination. As a last resort, you can use a USB to HDMI adapter.
