Engineering menu "Android": description, settings. Entering the engineering menu android Thl 4400 engineering menu
And interesting features hidden from prying eyes.
Why are they hidden? Firstly, so that an inexperienced user does not break anything, and secondly, they are needed in especially rare cases and are not used regularly. Today we will talk about the engineering menu - a section for programmers, testers, geeks, experienced users and those who want to get into the very “heart” of gadget settings.
What is an engineering menu?
We are talking about a special program or system section that developers usually use at the final stage of configuring the software platform of a mobile device. With its help, they make final changes to the operation of the device, check the functioning of various sensors and test system components. Also, the hidden functionality of the service menu is used to obtain a large amount of system information, conduct various tests (about 25 pieces) and configure any Android parameters - various sensors, mobile networks, equipment, etc.
The engineering, service or system menu is available on smartphones and tablets running on a MediaTek processor. On the Qualcomm chipset it is either reduced or absent altogether.
Attention! This section is intended for experienced users who bear full responsibility for the consequences. Careless actions can harm the file system and render the smartphone unusable.
How to enter the engineering menu?
To enter the engineering menu, you need to enter a special command in the dialing application: *#*#3646633#*#*. On some versions the code *#*#4636#*#* or *#15963#* may work.
If the engineering menu code on Android does not work, or there is no dialing application on the phone (relevant for tablets that do not support calls), the MobileUncle Tools or MTK Engineering applications, which can be downloaded for free via Google Play, will help.
After entering the command or launching the application, the desired section will open. It may close immediately - you need to have “Developer Mode” activated on your smartphone. To do this, go to the gadget settings, find the kernel version there and quickly click on it 5-10 times in a row.
Engineering menu functions
The engineering menu is divided into several categories, each of which will be discussed separately.
- Telephony. All settings related to mobile communications are located here. For example, you can activate or disable certain BandModes (frequencies for 2G/3G/4G operation), check the operation of SIM cards, and even disable mobile data transfer in the background.
- Connectivity: Configure Bluetooth, Radio, Wi-Fi and Wi-Fi CTIA settings. For example, in the radio settings you can specify the radio wave, antenna type (you need to use headphones) and sound format (mono or stereo). The radio will play straight from this section.
- Hardware Testing. In this section, you can configure the operation of various components of the device, in simple words, hardware: sound levels of headphones and speakers, adjusting microphone sensitivity, various camera parameters (photo aspect ratio, adjusting ISO, HDR, focusing and much more), operation of the touchscreen, sensors (calibration right there) and so on. This category is very large and global; you need to understand each section separately and have serious knowledge and skills.
- Location. In this category, you can configure GPS operation, see how many satellites the gadget has picked up, and simply conduct testing.
- Log and Debugging. Here, logs (logs) of the battery are kept (percentage of charge, voltage, operating time, temperature) and other functions little known to the average user.
- Others. Contains two functions also unknown to the average user.
Engineering menu settings
The engineering menu opens up enormous possibilities for customizing the phone; we will consider the most interesting ones in detail.
- SAR Test - determining the level of harmful radiation from a smartphone or tablet.
- Connections - testing available wireless connection types: Bluetooth, Wi-Fi, WLAN CTIA and FM receiver.

- Audio - adjusts the sound in the speakers, microphone and headphones. About how to increase the Android volume through the engineering menu.
- Camera - configure various camera settings.

- Turning on the current camera - the operating current of the camera is displayed (in our tablet it is 2 mA).
- Load test of the CPU (central processing unit) - checking the stability of its operation, identifying errors in the operation of the processor-memory channel, testing the cooling system and power supply of the processor.
- Device Manager - activate automatic SMS registration, manage configuration parameters.
- Disable detection - adjust the signal frequency.
- Display - Sets the pulse width modulation indicator cycle, which affects the perceived brightness of the screen by quickly turning the backlight on/off; backlight adjustment; controller behind the vertical and horizontal lines of the display.

- Wake mode - its activation will not allow the device to “go” into sleep mode.
- IO - management of data input/output operations.
- Memory - detailed information about the RAM module.
- To a certain extent - detailed information about the battery (the strange name of the section is most likely due to errors in the automatic translation of names in the application, but there is no option to switch to English).
- SD card test - the name of the tab speaks for itself.
- Touch screen - checking the sensitivity and response of the display when pressed, as well as setting its additional settings.
- USB - testing the operation of the USB port.
- UART/USB switch - switching between two data transfer modes.
- Sensor - calibration (adjusting clarity and sensitivity) of the touch screen. Standard methods.
- Location - testing the GPS performance and determining the exact location.
- Battery log - detailed information about the battery and the ability to activate the recording of battery consumption information.

- MTKLogger - collection of system logs (MobileLog, ModemLog and NetworkLog).
- Temperature sensor - shows the battery and processor.
- Font parameter - change the font size.
When installing the application, some features may not be available without .
Xiaomi engineering menu
Despite the fact that our test Redmi 2 runs on a Qualcomm Snapdragon 410 processor, it also has the functionality that interests us. To enter it, you need to tap on the “Kernel version” item several times in a row.

The menu is represented by five items:
- Automatic Test. Automatic test of all device parameters.
- Single Item Test. Each of the 25 tests is taken separately. We will talk about this in detail below.
- Test Report. Report on completed texts and their results.
- SW add HW version. Information about the smartphone version, IMEI and other numbers.
- Device View. Smartphone hardware data.

Of course, the most interesting point is the Single Item Test, where you can take a huge number of tests.

Let's immediately make a reservation that there was no way to configure anything in the device we tested - only a functionality check. At the end of each procedure, you need to note its status: successful (success) or not (failed).
- Key - functionality of physical buttons. Interestingly, it was not possible to complete it successfully, since when checking the power button, the smartphone turns off.
- Backlight - display brightness.

- TouchPanel. The touch screen test includes two procedures: “Crossed calibration” and “Touch panel calibration”. The first one checks so-called “swipes”, the second one checks single taps on the screen. An easy way to calibrate your display.

- TFlash. Testing a memory card with two results: either everything is fine, or the card is damaged.
- Bluetooth. Searches for available devices.
- SIM Card. Test for the presence of SIM cards.

- Vibration. The gadget vibrates - everything is ok.
- RTC (Real Time Clock) - operation of the built-in clock.
- Speaker. Testing the conversational speaker. We didn’t understand how to get through it. We will be grateful if you can tell us in the comments.
- Receiver. Translated as receiver, receiver, but music plays during testing.
- Headset. Testing the 3.5mm jack to detect headphones, play sounds, and support headset control buttons.

- LED. Notification indicator, everything is obvious here.
- FM (radio). Click Search, and if you hear noise in the headphones, then everything is working properly.
- Camera. Everything is obvious: a test of the main and front optics, as well as the flash.
- Battery. An informative section with information about the correct operation of the USB cable (charging), the condition of the battery, its charge level and temperature. Similar data can be obtained more.

- Wi-Fi. Detection of nearby access points. There are no settings.

- Torch (flashlight): shines/does not shine.
- The loopback test includes a test of the spoken microphone. First, click Recording, then Playing.
- LCD. Screen colors.
- GPS. Detection of available satellites.
- Gyro (gyroscope). Three parameters - X, Y, Z - change depending on the position of the device in space.
- G-sensor (Accelerometer). Rotate the gadget in all planes and turn it over. The three parameters should be ok.
- Proximity Sensor. It is usually located near the speaker and is designed to dim the gadget screen during a conversation, thereby eliminating accidental clicks.
- Optical and Magnetic Sensor (optical and magnetic sensors) - points we don’t understand, share your knowledge in the comments.
After passing all tests, you can go to the Test Report section. As you can see, our “animal” is in excellent shape and has passed all the tests, which is very pleasing.

conclusions
Above we have listed the main sections of the engineering menu available on the tested devices. Now let’s summarize what features the user gets during installation:
- Formatting, restoring to factory settings.
- Testing the operation of individual elements of a smartphone or tablet, such as sensors, touch screen sensitivity and calibration accuracy.
- Detailed information about the device and its parts. For example, you can track battery consumption since the last charge and view statistics on the programs used.
- Energy optimization. Alternatively, unnecessary frequency ranges are turned off. In Russia, the standard indicators for working in 2G and 3G networks are 900 and 1800 MHz, while in the USA they are 850 and 1900 MHz.
ThL 4400 runs an operating system Android 4.2. Its performance is rated 3 out of 5 (in its segment). This smartphone is quite productive. Here you can find the characteristics of the device, instructions on how to reset the settings, flash the device and, of course, how to get root rights to the TxL
Characteristics
- Standard: GSM 900/1800/1900, 3G
- Type: smartphone
- Operating system: Android 4.2
- Case type: classic
- Control buttons: touch
- Number of SIM cards: 2
- Multi-SIM operating mode: alternating
- Weight: 158 g
- Dimensions (WxHxD): 72.36x144.96x8.9 mm
- Screen type: color IPS, touch
- Touch screen type: multi-touch, capacitive
- Diagonal: 5 inch.
- Image size: 720x1280
- Automatic screen rotation: yes
- Scratch-resistant glass: yes
- Type of ringtones: polyphonic, MP3 ringtones
- Vibration alert: yes
- Camera: 8 million pixels, LED flash
- Camera functions: autofocus
- Video recording: yes
- Front camera: yes, 5 million pixels.
- Video playback: 3GP, MPEG4
- Audio: MP3, FM radio
- Voice recorder: yes
- Headphone Jack: 3.5mm
- Interfaces: Wi-Fi 802.11n, Wi-Fi Direct, Bluetooth 4.0, USB
- USB host: yes
- Satellite navigation: GPS
- A-GPS system: yes
- Internet access: WAP, GPRS, EDGE
- Protocol support: POP/SMTP, HTML
- Processor: MediaTek MT6582, 1300 MHz
- Number of processor cores: 4
- Video processor: Mali-400 MP
- Built-in memory: 4 GB
- RAM capacity: 1 GB
- Memory card support: microSD (TransFlash), up to 32 GB
- Additional SMS features: text entry with dictionary
- MMS: yes
- Battery capacity: 4400 mAh
- Standby time: 860 h
- Address book in the device: 500 numbers
- Search by book: yes
- Exchange between SIM card and internal memory: yes
- Organizer: alarm clock, calculator, task planner
- Contents: phone, battery, USB cable, charger, OTG cable, protective case, instructions
»
Firmware for ThL 4400
Official firmware Android 4.2 [stock ROM file] -
Custom firmware ThL -
Firmware for ThL 4400 can be found in the thread. In addition, first download the necessary software for flashing
What information do you need to know for flashing?- Make/model [preferred] - ThL/4400
- Processor - MediaTek MT6582, 1300 MHz
- LCD Driver (version)
- Kernel (version) [desirable]
Before flashing and during the firmware selection process, check the basic technical characteristics (technical characteristics) through the program
What custom firmware are there?
- CM - CyanogenMod
- LineageOS
- Paranoid Android
- OmniROM
- Temasek's
- AICP (Android Ice Cold Project)
- RR (Resurrection Remix)
- MK(MoKee)
- FlymeOS
- Bliss
- crDroid
- Illusion ROMS
- Pacman ROM
Problems and shortcomings of a smartphone from ThL and how to fix them?
- If the 4400 does not turn on, for example, you see a white screen, hangs on the screen saver, or the notification indicator only blinks (possibly after charging).
- If stuck during update / stuck when turned on (needs flashing, 100%)
- Doesn't charge (usually hardware problems)
- Does not see the SIM card (SIM card)
- The camera does not work (mostly hardware problems)
- The sensor does not work (depends on the situation)
Hard Reset for ThL 4400
Instructions on how to do a Hard Reset on ThL 4400 (factory reset). We recommend that you familiarize yourself with the visual guide called on Android. . 
Reset codes (open the dialer and enter them).
- *2767*3855#
- *#*#7780#*#*
- *#*#7378423#*#*
Hard Reset via Recovery
- Turn off your device -> go to Recovery
- "wipe data/factory reset"
- “yes - delete all user data” -> “Reboot System”
How to log into Recovery?
- hold down Vol(-) [volume down], or Vol(+) [volume up] and the Power button
- A menu with the Android logo will appear. That's it, you are in Recovery!
Resetting ThL 4400 You can do it in a very simple way:
- Settings->Backup and reset
- Reset settings (at the very bottom)
How to reset a pattern key
How to reset the pattern key if you forgot it and now you can’t unlock your ThL smartphone. On the 4400, the key or PIN can be removed in several ways. You can also remove the lock by resetting the settings; the lock code will be deleted and disabled.
- Reset graph. blocking -
- Password reset -
Added including from w3bsit3-dns.com, needrom and XDA on 05/27/2019

The AnTuTu synthetic test showed that the 4400's performance was rated at 17,326 points. It's weak, but it can work.
Method 1
Turn on Wifi or mobile Internet;
Enter the engineering menu *#*#3646633#*#* , or using the program QuickShortcutMaker Engineer Mode.
For THL smartphones, engineering menu code *#35789#*
Choose Location>Location Based Service>EPO check the boxes Enable EPO And Auto Download
ATTENTION IN THE NEW VERSION OF RECOVERY THE CHECKS ARE THE DEFAULT AND ARE NOT DISPLAYED

Then we go back and chooseYGPS. On the tab
Information press the button Full, then button Cold, then button A-GPS restart. Go to the tab Satellites and wait for the signal to be detected (it can take from several minutes to tens of minutes - they will appear initially
red dots - then they will be green).


We leave from YGPS And engineering menu. Turn off wifi- we leave in the menu only data on the location of the satellites GPS (GPS cannot be turned off).
After these steps, the device finds 10-15 satellites, the signal does not “fall off”, a cold start takes about 10-40 seconds ( on the streetin good weather).
Method 2
1) You need to enable AGPS in the Android settings, in the “My location” section, then open the top “curtain” on the phone to activate GPS.
2) Then in the dialer, you need to dial *#*#3646633#*#* - this is the entrance to the engineering menu, or using the program QuickShortcutMaker create an engineering menu shortcut by writing Engineer Mode.
3) When you get (by any means) into the phone’s engineering menu, you need to go to the tab YGPS- and look at the bookmark "Satellites"- whether signal scales appear. If yes, then the phone is trying to search for satellites, but cannot find them due to an incorrectly recorded Almanac. And this is not surprising, because the device came from the other “end of the world”.
4) The next step is to go to the tab “Information”, and then pressing the buttons in turn "full", "warm", "hot", "cold"(for a complete reset of the old Almanac).
5) After that, on the tab NMEA Log, you need to press the button start. (recording of the new Almanac will begin)
6) Now for proper operation GPS, you need to go to the back "Satellites" and wait for 5-20 minutes until the maximum number of satellite scales is found (usually from 10 to 20 pieces) and their scales turn green.
7) When all satellites have been found, go back to the tab Nmea Log and press the button “stop”. Congratulations, a new almanac for your area has been written.
Let me remind you that all the above actions to improve the quality of GPS must be carried out purely in open areas, away from buildings. And the last piece of advice - I recommend setting the exact system time and date on your phone.
Add a new review
Igor 02/13/2015 16:49
Good afternoon. ZP990+. From the very beginning it caught and caught, but only under the windshield or in the open air, otherwise it gets lost, and when used in a navigator it lags. I picked it up and got lost. I put it back - we spend half an hour looking for it. That is, no confident reception, no accuracy. What to do? Please help, the rest of the device is 5. Reply from the store: Good afternoon. Yes, the problem is known, if the instructions did not help you, think about upgrading or replacing the antenna, or contact the service under warranty if nothing helps. Best regards, manager Boris
Pavel 01/19/2015 21:05
ZPO 998, everything would be fine, but... GPS stubbornly does not work. It seems to see satellites, but things don’t go further than that. I tried all the options, even changed the firmware. Nothing helps. Store response: Good afternoon. We contacted the manufacturer about this problem and he recommends ordering an antenna from Ali and replacing it, but this is provided that the warranty has expired. Best regards, manager Boris
Pavel 01/19/2015 18:13
GPS does not work under any settings. Testers sometimes (I emphasize) see satellites, but are not recorded. The system YGPS no longer sees anything (firmware 4.4.2, all attempts are in vain. Reply from the store: Good afternoon. We contacted the manufacturer about this problem and he recommends ordering an antenna from Ali and replacing it, but this is provided that the warranty has expired. Best regards manager Boris
Andrey 01/14/2015 18:18
Thank you!!! Philips i908 reception has become 12 GPS and 8 Glonas. Maybe you have a description in Russian of at least some of the engineering menu items?
Ruslan 01/08/2015 21:05
Method No. 2 - 100% working. Thanks for the specific advice.
Evgeny 05.12.2014 20:21
I did everything according to the usual method, found up to 10 satellites, turned on the Yandex navigator, didn’t see anything in the same place? where to give the body in Moscow so that everything can be done. Store response: Good afternoon. I recommend that you contact the service specified in your warranty card. Best regards, manager Boris
Yuri 09/08/2014 17:02
Andrey 08/27/2014 15:51
When setting up GPS using Method No. 1, when you press the Full button in Information, the message “Si request received for up session” appears, in Satellites it picks up 8 satellites, but they don’t turn red and green all the time, signal scales do not appear on the “Satellites” tab. Store response: Good afternoon. Perhaps you are doing something wrong. I recommend checking your time zone and disabling network time synchronization. Best regards, manager Boris
garrik900 08/25/2014 19:46
Without wi-fi and 3g it does not pick up satellites. I did everything according to 2 schemes. Android4.4.2 body 998 Store response: Good afternoon. I recommend checking the date and hourly search to also allow location determination. Best regards, manager Boris
Seryoga 08/15/2014 13:57
Good afternoon, GPC turns on very simply, go to the engineering menu, select Location, go to YGPC and wait for the satellites to turn green. Then go to any navigator and it will show your location. Thank you all, I'm happy with the device so far.
Julia 08/03/2014 17:55
Good afternoon. I do everything exactly according to the instructions (fortunately they are detailed), but I don’t see signal scales in the Satellites tab, only red satellite dots. Store response: Good afternoon. I recommend trying this: reset the phone to factory settings, then go to the engineering menu, open the map and do nothing else. We remind you that in this case the Internet is turned off and wait 10-15 minutes in an open space. Best regards, manager Boris
Sergey 07/25/2014 16:19
Good afternoon. Now I'm trying to do what is described above, but when I go to the EPO tab, it says not EPO Functionality, but EPO Download, and the Enable EPO and Auto Download checkboxes are simply not there. Tell me what needs to be downloaded additionally or what actions to take? Firmware 4.2.2 Store response: Good afternoon. This instruction was written before the engineering menu was updated, now you don’t need to go there, the checkboxes are checked automatically. Best regards, manager Boris
Tahir 07/13/2014 04:03
Hello! I just bought a ZOPO ZP780, I wanted to set up GPS for the navigation program, it doesn’t work, neither method 1 nor 2, next to my old thl w100, it catches everything, I tried to compare the engineering menu of both, everything is smooth, help me set it up... thanks in advance Reply from the store: Good afternoon. I recommend that you check your time zone and make settings using the first method. Best regards, manager Boris
Victor 07/06/2014 13:36
Everything seems to be correct, the satellites are found and identified, but when I turn on the Navitel, it also finds the satellites, only it refuses to determine the location, the same goes for City Guide. I loaded the same Navitel into Highscreen Boost 2, everything works fine, navigation without problems, what should I do? A phone without navigation is not ice at all. Store response: Good afternoon. I suggest you reset your phone to factory settings, configure the GPS and then install the navigation software. Best regards, manager Boris
Stepan 07/01/2014 22:59
Hello. Help me figure out the GPS on zopo 998. If you configure using the first method, in the EPO tab there is an EPO (DOWNLOAD) button, after clicking on it nothing happens. In the 2nd method, the scales do not appear and the satellites glow red. Even when you launch any application that requires GPS, the message “sl request received for up session” pops up. The time zone, date and time are set correctly. I hope very much for your help. Store response: Good afternoon. When you click epo download, the coordinators of the satellites in orbit are hidden. After which red dots appear, we go out into the open area and wait for the maximum number of green satellites. Best regards, manager Boris
Alexey 07/01/2014 02:23
I bought Zopo zp998 in your store in April, installed Navitel 8, everything worked just class 5 - 8 satellites sees stably even in rainy weather, does not lose contact with satellites. I really liked the device and that’s why my wife bought another Zopo zp 998 and I discovered that Navitel 8 does not work on it, what could be wrong with the new firmware? I tried to rewrite the almanac as written in technical support, but nothing worked. When I start, Navitel doesn’t see a single satellite, so maybe I can install the firmware like on the first one, and I can’t find where I can download it. Store response: Good afternoon. It’s actually strange, usually after rewriting the almanac everything works like clockwork. You can find earlier versions of the software on the manufacturer's website. Best regards, manager Boris
Maxim 06/19/2014 15:07
I tried everything and still can’t see the GPS. Reply from the store: Good afternoon. Perhaps you are doing something wrong. Describe your problem. Best regards, manager Boris
Alexey 06/18/2014 08:39
Good day! I purchased a zp990+ device from you. After some time, I noticed that when connecting to Wi-Fi, the connection periodically drops. when talking on Skype, Weber, WhatsApp, the conversation lasts no more than 5 minutes. Then the phone loses Wi-Fi and connects again ((and I checked it on different access points. Perhaps the problem is in the engineering menu settings? Thanks in advance. I hope this can be treated somehow? Store response: Kind day. Apparently there was an unsuccessful unpacking of the application, which resulted in a system error. I recommend resetting it to factory settings and then installing the applications one by one. Sincerely, manager Boris.
Anton 06/17/2014 17:42
Have a good day! EPO DOWNLOAD is not pressed, it is simply inactive. What am I doing wrong? :) Store response: Good afternoon. You installed an application that blocks access. I recommend resetting your phone to factory settings. Best regards, manager Boris
Peter 05/26/2014 11:19
Good afternoon! Last week you purchased a ZP998 device. Initially, there were medium-minor problems with it, they became apparent after the over-the-air update (March update). There is only one left - GPS. Methods 1 and 2 from "GPS Settings" have been tested several times on the Lenovo P780. In clear weather in an open area, after all the manipulations, Lenovo finds itself reliably in 5-15 seconds, the error is minimal. The same actions are carried out with ZP998 - 1. It catches satellites much longer. 2. After saving the Almanac, turning on the navigation program for the first time (for example, Yandex navigator or simply GPS Test) allows the device to find itself in 3-5 minutes, but with a large error, judging by the navigator, my car is driving in a field next to the road about 150. After stopping, the device thinks that it continues to move at the same speed for up to 2-3 minutes. 3. Re-enabling the navigation program does not give any results within 15-20 minutes. GPS Test no longer sees satellites. If you write down the Almanac again, history repeats itself - it’s enough for one launch of a navigator or GPS test with grief in half. Resetting to factory settings and rebooting does not help. The setup steps are carried out for two devices simultaneously and under the same conditions; the ZP998 cannot cope, unlike its Chinese counterpart. I blame it on the GPS hardware failure. What else can you do? Store response: Good afternoon. When launched, GPS test loads a-gps data and thus you have several inmea log files in your memory. And naturally the phone accesses two at once and is a bit confused: in one file there was communication with the satellites, but in the other there was not. The only 100% way to set up navigation: copy all the necessary information, then reset it to factory settings and clear the phone’s memory. Next, we record the almanac with the correct date and time zone. To make your phone's orientation more accurate, I recommend downloading a simple compass and calibrating it. Best regards, manager Boris
Mikhail 05/23/2014 20:02
I purchased Jiayu G4C. Tell me, will these instructions for setting up GPS work? Store response: Good afternoon. Yes, of course, this is a universal instruction for all phones with an MTK processor. Best regards, manager Boris
Vanya 05/21/2014 12:55
Please help me figure out the GPS! I tried to update the almanac according to the instructions, no changes occurred. In the "my location" settings there is no option to turn on A-GPS, I turned it on in the engineering menu. On the first point, the same did not work out. Store response: Good afternoon. This also happens that A-GPS must be enabled in the engineering menu. First, look at what time zone you have on your phone. Then start searching for satellites and recording the almanac. Best regards, manager Boris
Ivan 05/10/2014 21:16
Good afternoon I did the first method, the satellites were found and turned green. After exiting the engineering menu, programs (eg 2 GIS) found the satellites. But here's the problem: after rebooting the phone, the satellites are not found! It’s very inconvenient to do the first step every time after a reboot! What could be the problem? Thanks in advance) Store response: Good afternoon. In order not to search every time, you need to save the almanac by pressing the stop key. Best regards, manager Boris
Victor 04/09/2014 18:36
The zopo 998 phone is an excellent device. I just have a question about GPS / After the first setting item is done, it says exit the engineering menu, But how through the house or the return arrow? Store response: To exit, simply press the home key. Best regards, manager Boris
Maxim 03/23/2014 08:55
Good afternoon Model Zopo ZP980+. I tried method 1. In the Location Based Service there is also only the EPO (DOWNLOAD) button. Pressed it. Next came the instructions. In the YGPS tab, after clicking AGPS restart, in the Status line it first writes STARTED, and after a second UNAVAILABLE. Red satellites have appeared, but things go no further. What could be the problem? Thank you. Store response: Good afternoon. You need to check the time zone and operator time. Best regards, manager Boris.
Hello! You have very useful instructions here, otherwise on different sites they write very different settings, I didn’t buy from you, but thank you very much! Post more of everything, otherwise the Chinese make phones and their all sorts of hidden capabilities are not stated anywhere. For example, I found it here such a thing at random on zopo980+ mtk6592 if you press the volume minus and power and wait 2 seconds it makes a screenshot of the desktop. Thanks again and post more hidden chips.
Igor 12/25/2013 02:07
Hugs to you guys! I have an ass ts2 in the settings it says zp980, the firmware update also went to zp 980, whose stupid idiot I ordered in Ukraine because I live in Kyiv. There was a sad problem with the navigator, I use Yandex, I search for 1 hour or 2 hours, I can’t find satellites, but the mobile Internet helped out, I went by the map and the location is also possible! then it will transfer me to Moscow or errors of 300 - 500 meters are shorter than that! I accidentally found your combinations; they don’t respond to me; I downloaded your application and launched the mod engineer in your application and started shamanizing everything as written in method 1; I didn’t even read it. In general, everything went as it should be; satellites are found from the window in 7 seconds. THANK YOU SO MUCH!
Ilya 11/12/2013 12:07
What should you do if the first method did not produce results, and when you try to configure it using the second method, the signal scales are not filled? Two empty scales appear periodically and disappear. store response: Clear the almanac as indicated in the second method, step 4. Also set the correct date, time and time zone.
All reviews (31)
Data-lazy-type="image" data-src="http://androidkak.ru/wp-content/uploads/2016/09/inzhenernoe-menyu..jpg 400w, http://androidkak.ru/wp- content/uploads/2016/09/inzhenernoe-menyu-300x178.jpg 300w" sizes="(max-width: 200px) 100vw, 200px">
 Android-based gadgets are becoming increasingly popular among users due to their ease of use and high functionality. But at the same time, not everyone knows about the possibility of more personalized and flexible settings for their phone. For these purposes, an engineering menu is usually used, which includes a number of different settings - a program for automatically recording conversations, increasing the volume of the device, a huge number of different add-ons for the radio.
Unfortunately, this menu is not available to everyone. Some manufacturers simply remove the program to log into it at the last stage of pre-sale Android setup. Also, the engineering menu is available for owners of Android devices with a processor only from MTK; trying to run it with a processor from other manufacturers is useless.
Special commands and applications
To enter the engineering menu, you must enter a “secret code”. For different manufacturers, the “activation code” may be different, but there is one universal one that is suitable for almost all ANDROIDs - *#*#3646633#*#*.
You need to enter it in the dial and call window. Most often, immediately after entering the code, you will be logged in immediately, but on some devices, in order to log in, you may also need to press the call key. If the program does not launch to log in, you can try entering other launch combinations that match your phone model.
- Samsung – *#*#4636#*#* or *#*#8255#*#*
- HTC – *#*#3424#*#* or *#*#4636#*#* or *#*#8255#*#*
- Sony – *#*#7378423#*#*
- Huawei – *#*#2846579#*#* or *#*#2846579159#*#*
- MTK – *#*#54298#*#* or *#*#3646633#*#*
- Fly, Philips, Alcatel – *#*#3646633#*#*
If all of the above steps were unsuccessful, you can try downloading a special application on Google Play to launch the engineering menu. If even after installing a special program (most often “Mobile Uncle”) you were unable to enter the service menu, it means that the engineering settings launcher on your phone was removed, you can install it again.
Not many people know about the existence of a menu in the Android OS with advanced device settings - engineering menu
. And someone knows, but doesn’t know how to enter it and what to do with it.
In this article we will show how to enter the engineering menu and some of its capabilities.
You can enter the engineering menu simply by entering a special command (but I must add that this method does not work on all versions of Android and not on all devices)
Command to enter the engineering menu: *#*#3646633#*#*
Also on some versions of Android the command may work *#15963#* And*#*#4636#*#*
Immediately after entering, the command should disappear and the engineering menu should open. But on some devices you will still need to press the "Call" key
If this method does not have any effect, you can use an alternative!
And it consists of installing the program (which, by the way, is freely available on Google Play) " Mobileuncle MTK Tools 2.4.0"

This program will open access to the engineering menu (that is, it will work similarly to dialing a combination*#*#3646633#*#*)
There are a lot of settings there! There is huge scope for experimentation! Almost EVERYTHING can be debugged and adjusted!
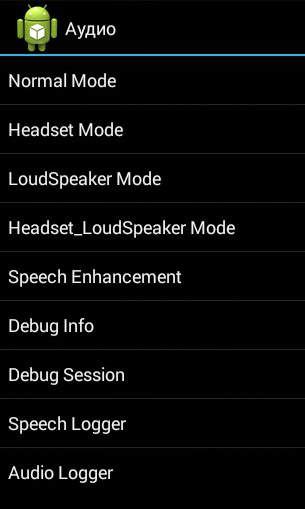
For clarity, let’s briefly look at setting the device’s volume level:
Go to the program ---> select the "Engineer Mode" section


Because We are interested in adjusting the sound level, select ---> "Audio"

And voila, the menu we are interested in opens.

Max Vol - the same for the entire subsection, as a rule, it is set to 150 (you can change 0-160 - it changes if you select the Media item in the subsection).
If in some submenu, for example, Audio - Normal - Sph, the general level is not available for regulation, then enter another submenu, for example, Audio - Normal - Media - there will be an opportunity to adjust the general volume level.
Sub-items:
Sph - volume levels during telephone conversations,
Mic - microphone sensitivity levels,
Ring - ringer volume,
Media - volume when playing music, movies, and games.
Ring volume levels are set in Audio - LoudSpeaker - Ring
Max Vol = 150
Levels: 120 130 145 160 180 200 (starts to wheeze more)
Phone speaker volume levels in Audio - Normal - Sph
Max Vol = 150
Levels: 100 120 130 135 140 145 150
Microphone conversation volume levels in Audio - Normal - Mic
Levels: 100 172 172 172 172 172 172
Media volume levels are set in Audio - LoudSpeaker - Media
Levels: 110 130 160 190 210 230 250
All the same can be configured for the Headphone mode, by analogy:
Speakerphone volume levels are set in Audio - LoudSpeaker - Sph
Max Vol = 150 (it is the same for the entire section)
Levels: 80 100 110 120 130 140 150 (more wheezing starts)
Now all volumes are adjusted within adequate ranges.
If you are not satisfied with the volume levels, you can set your own values (the higher the value, the greater the volume when adjusting with the volume keys, or the greater the sensitivity of the microphone)
By analogy, you can configure most sections! Experiment!
