Recovering data from a Seagate FreeAgent Go external hard drive. Recovering an external hard drive Recover the system folder on an external hard drive
Need to recover data from an external hard drive? Is he behaving inappropriately? Does it make strange sounds or does it not spin? Not detected when connected to a computer? Data not available?
Contact the most powerful laboratory in Russia with the best specialists for restoration.
How we recover data from external hard drives
Soldering stations
In a clean room
Plate shifters
PC3000 Data Extractor
What is an external hard drive?
 External hard drives are connected to a computer (laptop or media player) via USB interfaces (because of this, the name “usb drive” and the corresponding name of the service - usb drive recovery), eSATA, FireWire and Ethernet have become widespread. They consist of two components - a regular hard drive (2.5″, 3.5″ or 1.8″ form factor, SATA/IDE interfaces and their various micro versions), the same as those that work in computers or laptops. The second component is a container with an adapter board that converts the SATA/IDE interface into an external USB/eSATA, etc. The adapter board can also add indicators, buttons, a power interface, a connector for connecting another drive, and similar functionality.
External hard drives appeared and became popular with the development of USB technology. It allows you to connect external media and start working with it without rebooting the operating system. The “mobile rack” solutions that preceded it solved a similar problem - to simplify connecting the drive, turning it into a removable hard drive. But due to the fact that they worked using IDE technology (less often - SATA), they were not as convenient as external USB hard drives.
 Also, external drives sometimes mean mini-servers using RAID technology (manufactured by Synology, QNAP, Buffalo, Lacie, Iomega and leading manufacturers of conventional hard drives - Western Digital, Seagate, Maxtor, Hitachi, Toshiba and others). Inside these network drives there are from 1 to 5 regular hard drives configured in a RAID system. This ensures the reliability and speed of RAID, but it can also complicate data recovery, since in essence you have to perform both data recovery from the hard drive (in case of failure) and data recovery from the RAID array.
How we are working

Delivery
free courier

Diagnostics
fast and free

recovery
on professional equipment

examination
quality and completeness of restoration

only if successful
Why is data lost on external hard drives?
To the main reasons for data loss on conventional hard drives, here is added the factor for which these drives are mainly purchased. Removable hard drives are dropped, hit, thrown, coffee is poured on them, people step on them, and much, much more, which happens less often with stationary drives. Because of this, problems such as spindle wedge, malfunction of the magnetic head unit, and such a rare problem for conventional drives as sticking of heads on the surface of the platters are more common on external hard drives.
On the other hand, on 2.5″ form factor drives, which are the most common, the listed problems are solved much easier than on 3.5″ drives, so data recovery from an external hard drive is often much more successful than data recovery from a regular disk.
External Hard Drive Specialists:
In what cases can data be recovered?
Briefly: data recovery from a removable hard drive can be performed in any case, as long as the data is not destroyed or completely overwritten. In case of any symptoms (the external drive is not detected, knocks, does not spin) or breakdown (its microprogram, electronics board, read-write heads are faulty, the motor is jammed or the heads are stuck on the surface), the data can be restored. Recovering deleted data from an external hard drive is no different from recovering data from a hard drive that is located inside a computer or from recovering data from a laptop hard drive. The same can be said about data recovery after formatting, system reinstallation, the appearance of bad blocks and any problems in general.
For 19 years 87 750 clients chose us
We know RAID better than the manufacturers
Transparent work scheme
Favorable prices
Confidentiality and a complete set of documents
What external drives can you recover data from?
We recover data from any external hard drive. We work with any manufacturers and models:
- Transcend StoreJet
- Seagate Freeagent, FreeAgent GoFlex, FreeAgent Desk, Black Expansion Portable, BlackArmor NAS and others
- A-DATA of any series
- LaCie 2big, LaCie Rikiki, LaCie Minimus, LaCie Starck, LaCie Rugged, LaCie MAX Quadra and any others
- iomega Prestige Portable, iomega Select, iomega eGo, etc.
- Western Digital Elements, My Book, My Book Elite, My Passport
- Verbatim Premier, Acclaim, Black Wallet, CLON
- HITACHI LifeStudio
- TOSHIBA Canvio
If your external hard drive model is not listed on this list, we will still repair it - they all contain a limited number of standard hard drive models with common problems inside. For any of these problems, solutions have been developed and tested.
Information located on removable media is constantly at risk of being lost due to frequent cases of adverse effects of the external environment on the drive: high humidity, high or low temperature, falls, improper shutdown, etc.
Let's look at how to revive a portable hard drive in the event of software failures when the operating system cannot detect it or access it.
Windows doesn't see portable drive
Many users are familiar with the situation when a removable hard drive is not detected as such.
If this happens after the first connection, the solution to the problem will be to manually install drivers or format the drive (creating logical partitions of the specified size). To determine the presence of a driver, go to the “Task Manager” and look for your device. 
If the problem lies in the driver, install it by clicking “Update drivers...” in the device’s context menu and follow the installation wizard’s recommendations. Upon completion of the process, the system will notify you that new equipment has been connected, and a new data storage device will become available in the Explorer window.
You can format a new portable drive before use using the tools built into the operating system, specifying the required file system (it is better to choose NTFS) and the cluster size.
The operating system offers to format the removable hard drive
There are times that after connecting a portable hard drive to a computer, the system prompts you to format it.
This happens in the following cases:
- improperly disconnecting the device from the computer;
- various software glitches;
- damage to the file system or file location table;
- as a result of the activity of viruses;
- as a result of illiterate handling of applications for working with storage devices, etc.
Is it possible to recover a removable hard drive without formatting? Naturally, an effective method in this case is to check the hard drive for errors that could occur in the sectors where a table is stored with information about all the files located on it and their attributes.
To correct the situation, run the standard utility: in the search bar in the Start menu, write without quotes “chkdsk x: /f”, where:
- chkdsk – console command to check a logical partition;
- x – letter of the drive that is proposed to be formatted (we will restore it);
- /f – command parameters intended to automatically eliminate detected errors.
After several tens of minutes of waiting (depending, first of all, on the disk size and the number of errors), the drive will start and all the data stored on it will become available to the user.
Recovering a removable hard drive after accidentally deleting its partitions
It may happen that as a result of a hardware or software failure, a violation of the integrity of the file system due to demolition or accidental deletion of partitions by the user, access to the portable drive disappears. In such cases, the Disk Director Suite utility from Acronis will come to the rescue. This removable hard drive recovery program will allow you to recover partitions of the drive and return access to all information stored on it.
- After starting Disk Director Suite, select manual management mode.

- Then we find the unallocated area of the disk labeled “Unallocated” and right-click on it.

- In the drop-down menu, select “Advanced” -> “Restore”.
- Then we confirm the operation by clicking on the black and white flag in the toolbar.
- After a few minutes of operation, the program will restore the drive's data structure to what it was before the failure or formatting.
Read about the reasons why an external drive may not be detected by the computer and how to fix them. How to recover data from such a disk. With the advent of digital cameras, the process of creating photographs has become much easier, and the average user is much closer to the photo industry. Previously, in order to view photographs, it was necessary to print them, for which purpose one would certainly go to a photo salon. Now, photography is very accessible and everyone can take photographs without the need to have any special knowledge.
An external hard drive is the same device as any other hard drive, which is prone to breakdowns and malfunctions. And it is very useful to know how to deal with such problems. This article will be of interest both to those who have been in such a situation and to other users of external hard drives.
Content:
Reasons why an external hard drive is not detected
Most of us use an external hard drive to back up our data, but external hard drives aren't always suitable for such purposes. That is why experts recommend creating several copies of important data on different storage media. And that’s why the issue of an external hard drive not being detected or readable by a computer is so important.
An external hard drive may not be detected by the computer in the following cases:
- After sudden power surges during data transfer
- As a result of physical damage
- As a result of a malfunction of the operating system during device interaction
- After being infected by a virus or malware
- Due to hard drive wear due to overload
- Deleting system disk files or damaging the operating system.
If the hard drive is not detected correctly by the system, then after connecting it to the computer you may not see anything. There are no sounds or automatic opening of the root directory of the drive, it may not even be visible in Device Manager. Sometimes a message like this may be displayed: “To use the drive in drive F: format it first. Do you want to format it? In such a situation, formatting the hard drive may seem like the only solution. But in this case, all data on the disk will be deleted.

What needs to be done in order to restore the disk to functionality without losing data?
What can be done in such a situation
Before sending such a disk to a service center, you can try the following:
- Try connecting the hard drive to a different USB port. If after this it is detected by the computer, then the problem is in a faulty USB port.
- Connect the hard drive to another computer.
- Change the hard drive letter (change its name). For this:
- Open the This PC folder
- Look at the letters that already mark other drives
- Click in the top menu of the folder window “Map network drive” and select the “Drive” menu
- From the Drive menu, select a drive letter that is not in use
- Click “Browse” and select the unrecognized hard drive and click “Ok”
- Restart your computer and reconnect the drive.

The last point should make the hard drive recognizable, but the computer may still ask you to format it. Don't panic, the data will not be lost even after formatting.
Recovering data from a formatted external hard drive
Once you format your hard drive, do not write anything to it. Do not save any data on it or give it access to other programs and devices. All your files are recoverable until they are overwritten by new data.
After the formatting process is completed, immediately disconnect the hard drive from the computer and download Hetman Partition Recovery. Launch the program and in the main menu select the external hard drive from which you want to recover files.

Double click on it. In the next window, select the required analysis type and click next. After the analysis process is completed, you will see a list of folders and files that can be restored. By clicking on any of the files in the right window you can see its preview.

Mark the files needed for recovery and move them to the recovery trash. Then click the restore button. A window will open asking you to specify the method and path for file recovery. Select the required features and click next. After the file saving process is completed, you can view them in the appropriate folder.
Remember to have at least two backup copies of important data. In addition, do not interfere with the hard drive while it is running. But if you find yourself in a similar situation, don't panic - use our tips to recover your data.
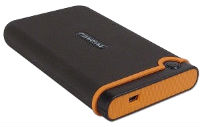
The Seagate FreeAgent Go 500Gb external hard drive faithfully served its owner, but on one of the not-so-best days it became a victim of human emotions, when the owner, in the heat of a family drama, threw the device at an object that caused her great irritation - her husband. The husband was not seriously injured, but things were worse with the drive. When connected to the computer's USB port, the drive made quiet humming sounds and did not start rotating the shaft.
rice. 1
In this condition, the external hard drive arrived at our data recovery laboratory. Visual inspection does not reveal any deformation of the box itself. Considering that the history includes an impact, such a drive must be opened in a laminar flow hood without any attempts to turn it on in order to avoid further damage. A Seagate ST9500325AS (Momentus 5400.6) hard drive, a member of the Wyatt family, is removed from the box. The hard drive case has no deformations or dents on the lid. We carry out measures to remove dust from all possible places and go to the laminar flow hood. Having removed the cover, we find that the magnetic head unit is located outside the parking ramp.

rice. 2
Using pullers, we bring the BMG to the ramp. Next, we remove the BMG and carefully inspect all 4 sliders and pendants under a microscope for deformations and the presence of foreign particles. We also inspect the recirculation filter and the surface of the upper plate in the place where the BMG is stuck. In our case, it was established that there was no deformation of the suspensions and no contamination of the sliders. There is a “spot” of damage on the surface of the plate that cannot be seen with the naked eye. There are no metal particles on the recirculation filter. There is no damage to the plastic parking ramp, and there is no distortion of the disc package.
Based on the results of this inspection, it was established that it is permissible to attempt to read with the original block of magnetic heads, but it is necessary to take into account the presence of damage at the outer edge of the plates. We install the magnetic head unit back into the drive and assemble it. Knowing that the drive has been subjected to shock loading, we will replace the original printed circuit board 100536286 Rev E with a known-good board of the donor drive and transfer the ROM. This measure is recommended to avoid unpleasant surprises due to potential microcracks.
We connect the drive to the SATA port and terminal and supply power. In our case, the drive began to rotate the shaft without any runout. The normal sound of the calibration test was heard and after a few seconds the drive announced that it was ready to exchange data in the registers.
rice. 3
The terminal also displays a normal drive startup log with additional event logging disabled.
Rst 0x08M
(P)SATA Reset
Immediately in the drive's RAM, you need to find the HDD configuration module (ID=0x2A) and remove from there all the keys that are responsible for launching offline scanning procedures, offline and delayed hiding of defects, and also disable auto-reallocation procedures when reading and writing. This measure is necessary so that when problems are detected, the drive does not try to launch defect maintenance procedures, as they will lead to a long delay of the BMG over the problem area, which can provoke an avalanche-like destruction (filing of the plate). The structure of module 0x2A (system file FC36608F) is quite simple (the order in which the parameters are written is quite obvious). During the research (research has been carried out and continues to be carried out for all drives of the F3 architecture), the main difficulty was establishing the purpose of each of the parameters and acceptable values. Using modern versions of the PC3000 complex significantly simplifies the procedure for editing values.
We back up the drive firmware (ROM, modules, “system files”). Using test modules that are not important for the operation of the drive, we check the ability to write and read what is written by each of the heads. Having made sure that all heads are working correctly, we move on to assessing the quality of their reading in the user zone. To do this, we will build a map of the zone distribution within the boundaries of the entire logical space (from 0 to 976,773,167 sectors of the LBA range). Having estimated the size of the mini-zones, we can conclude that to assess the readability of the heads in a given instance, it is enough to continuously read about 300,000 sectors at the end of the logical space, about 450,000 sectors in the middle and about 600,000 at the beginning of the disk (knowing about the presence of platter damage, We do not test the beginning of the disk).
Having made sure that all heads can read, we will configure the reading parameters: UDMA mode, read operation timeout no more than 500 milliseconds, if not ready, software reset and mini-zone skipping. Having built the list of mini-zones in reverse order, we will proceed to sequential reading of the mini-zones (creating a sector-by-sector copy).

rice. 4
99% of the logical space was read without any difficulty. Starting from LBA 6,541 xxx on head No. 1, the first delay was detected. The reading was immediately interrupted and the drive was sent into sleep mode (the heads are parked on the ramp, the shaft stops, but the firmware remains loaded into the hard disk RAM. Let's rebuild the list of zones in direct order and begin sequential reading.

rice. 5
With LBA 2,518 xxx, a read delay on head No. 1 was also detected. We also quickly send the drive to sleep mode. We make a rough estimate of the boundaries of the defective zone and the size is 6,541,000 – 2,518,000 = 4,023,000, which is approximately equal to 2 GB.
Further analysis is carried out exclusively on copies on a working drive. Let's evaluate the contents of LBA 0.
rice. 6
The value 0x07 at offset 0x1C2 tells us that the partition type is NTFS (or ExFAT).
The value 0x00000800 at offset 0x1C6 indicates that the partition begins at sector 2048.
The value 0x3A384800 at offset 0x1CA says the partition length is 976,766,976 sectors.
Let's move on to sector 2,048

rice. 7
From the NTFS parameters we see that the sector is 512 bytes, there are 8 sectors in the cluster, the cluster size is 512*8=4096 bytes. MFT is located from cluster 0x00000000000C0000 (786,432) or from sector 6,293,504 (786,432*8+2048). MFT Mirror is located in cluster 0x0000000000000002 (2) or starts from sector 2064 (2*8+2048).
Knowing the boundaries of defect formation, we can note that with a high probability there will be defects in the area with MFT. To do this, we evaluate the first MFT record (in the MFT Mirror, which duplicates the first 4 MFT records since it has been read). In our case, this file is located in the form of one fragment, starting from sector 6,293,504 and extending to 277,092 sectors.
rice. 8
Please note that the main difficulties in reading were recorded in head No. 1, so we will begin reading from the area of head No. 0. Let's wake up the drive from sleep mode and read the MFT fragment on the zero head. In this case, this did not cause any difficulties and made it possible to obtain more than 75% of the most important structure. Next, we use PIO mode for better control of read operations and try to read the remaining 68,400 sectors from the problem area. By manipulating the jump sizes, timeouts for waiting for readiness, and the block size when reading in several passes, we read the problem area. There are 18 unread sectors left in the MFT area, which are repeated in arrangement (the cyclicity corresponds to the SPT for these zones), which indicates a scratch on this plate.
Having sent the drive into sleep mode again, we will analyze the records in the MFT on the copy and evaluate the location of the files in order to understand which of them fall into the defective zone. About 50 affected files are detected. We check the technical specifications and find out that more than 35 files can be discarded from the proofreading script. For the rest, we will build chains of their location and sort them in order.
When reading, we note that in addition to problems on the surface read by the first head, problems are detected on the surface read by head No. 3. Let's exclude reading chains on problem surfaces and read sections on surfaces 0 and 2.
Next, we try to resume reading the problematic chains with heads No. 1 and No. 3, and in less than 30 seconds a fairly loud knock is heard from the drive. We are trying to reset, but the drive does not respond and continues to knock. We decide to turn off the power. Turning on the power again begins with a knock from the drive. We turn off the power and draw a conclusion about the development of degradation processes due to reading the damaged area.
We go to the laminar flow hood and examine what happened. The top surface looks ideal, but under a microscope an avalanche-like process of destruction of the plate (cut) is revealed. The presence of metal particles on sliders No. 1 and No. 3 clarifies the diagnosis.
From the sector-by-sector copy, we create a file copy, transferring files with unread fragments to a separate folder (with the original hierarchy). We also carry out a more precise analysis of MFT in order to understand what the loss of 18 sectors led to. From the damage analysis it can be clearly established that no more than 7 files were lost. Unfortunately, the Bitmap is also in the defective zone and its contents cannot be used for analysis.
Upon accepting the result, the owner of the disk was satisfied with the result (more than 99.9% of the required data) and considered that there was no need to conduct additional regular expression analysis to search for missing files due to MFT corruption.
As a conclusion, I would like to draw the attention of many users that not everything is so simple in the case of drives whose “heads” are stuck outside the parking ramp. And how dangerous it is sometimes that people who are far from understanding the principles of operation of a hard magnetic drive can independently open the device and remove the heads, and then use dd from Linux or WinHex under Windows to make a “safe” sector-by-sector copy. If similar measures were applied to the drive described in the publication, it would turn into a corpse without the possibility of data recovery when reading the second gigabyte.
From time to time, users may experience excessively slow hard drive performance. This looks like a very slow recognition of files located on the drive, and when Windows finally recognizes them, the system displays a message about the inaccessibility of the information stored on the drive.
If you have been using a HDD from a hard drive manufacturer for a long time SeaGate, then most likely you have already encountered a problem that significantly slows down the disk. In this case, we recommend that you carefully study the information written below, it will help resolve the issue in a short time.
How big is the risk of encountering a HDD slowdown problem?
Be extremely vigilant if your hard drive suddenly begins to work slowly without warnings from the system about possible errors. There is a potential risk that your drive and the information on it could suffer serious damage.
Possible scenarios for the development of events:
- 1) The hard drive begins to make noises and clicks.
- 2) Files lose their ability to open when damaged.
- 3) Windows can no longer detect the hard drive or display files.
- 4) The HDD file system is displayed as RAW.
- 5) Windows offers to format the drive for further work with it.
- 6) The hard drive continues to work in the previous manner with failures, freezes when double-clicking on its icon or trying to open documents.
Recovering data from damaged HDD
As you understand, each of the error messages described above can lead to unpleasant consequences - the loss of information stored on the hard drive. It will no longer be possible to even view files on it due to the extremely low speed. Now you can only rely on professional help to recover lost documents.
Starus NTFS Recovery is software that will allow you to quickly and effectively deal with the issue of file recovery on any device running the Windows operating system. As long as the slow HDD is not damaged further, the OS is able to recognize it and assign a drive letter, which will allow you to export inaccessible information to another safe location using third-party software.
Useful articles

Let's look at the data recovery algorithm that needs to be done in a situation when your disk with the NTFS file system starts to work slowly.
1. Launch the program, select the hard drive on which the error occurred and left-click on it to open File Recovery Wizard(by default it opens immediately at startup).


2. Next, Starus NTFS Recovery will prompt you to select the type of analysis, which you can specify based on your tasks. Quick Scan will allow you to perform a lightning-fast analysis of the HDD or logical partition, however, you should remember that such a check is superficial and is not able to find files lying in the depths of the drive. Full analysis makes it possible to scan every sector of the hard drive down to the last byte, which allows you to get a holistic picture of all the information stored on it and get your hands on even those documents that you may have already forgotten about.

3. An undoubted advantage of the program is the ability to preview each individually selected file. After reviewing the documents and selecting those that interest you, highlight them and, right-clicking on any of them, in the context menu that appears, click Restore.

4. You can now choose any convenient data export option, including the ability to remember your selection if you only want to save information to one specific medium.

Wait for the recovery process to complete and you can breathe easy - your data is completely safe.
How to fix a problem where the external HDD starts to work extremely slowly
Having secured your files, it's time to start using all available methods to solve the problem of a slow functioning external hard drive. We have selected five good options for you.
- 1) Replace the SATA cable.
- 2) Replace the USB 2.0 port with a USB 3.0 port
- 3) Defragment the disk to optimize its performance.
- 4) Check the HDD for logical errors and eliminate them.
- 5) Take the disk to a service center for diagnostics or replace it.
Below we will provide detailed instructions on the third and fourth methods to resolve the issue, since users can easily test them on their computers.
Optimizing the performance of an external hard drive
Follow these steps:
1. Open My computer.
2. Right-click on the slow hard drive and select Properties.

3. In the next window, open the submenu Service and in the menu Disk optimization and defragmentation select Optimize.

By following these steps, you can optimize any hard drive, thereby helping it perform much more efficiently. This method is well suited for speeding up the functioning of slow, “sluggish” hard drives.
Checking and repairing bad sectors
Very often, it is logical errors in hard disk partitions and bad sectors that prevent it from working fully. Let's figure out how to solve this issue.
1. Open the HDD properties window, as described in the previous chapter.
2. Go to the tab Service and in the section Checking for errors click on the button Check(this utility will scan the disk for possible errors and fix them).

Note: if the hard drive does not respond when trying to restore it or the system displays various types of errors, use the Starus Partition Recovery program, which will allow you to restore any logical partition in two clicks.
If the external hard drive does not allow you to check the points described above, check the following: whether the LED indicator is blinking correctly and whether the drive recognizes it by Windows. If not, we recommend visiting a service center where they can provide professional support for restoring an HDD that appears to be damaged and is not yet able to fully function.
