How to clean up drive C: detailed instructions. How to clean up drive C: detailed instructions Cleaning up disk space with Windows 10
Greetings, friends! The law of life says that disk space always tends to zero. Sooner or later the moment comes when the disk space runs out. Today I’ll tell you about ways that can help you solve this problem. In most cases it can be solved, especially if you establish the root cause.
There are several reasons - it depends on what operating system is installed, how it is configured, what its bit depth is, what programs are on the computer, how often you use the Internet, and so on. What we will study today:
It is not necessary that your computer's system drive is assigned the letter " WITH:". It happens that letters are assigned and D, And E. To ensure that the correct drive is selected, locate the folder " Windows“.To clean the system disk, it is not at all necessary to immediately delete the necessary files, films, documents, programs. To begin with, we will determine for what reasons overflow occurs.
How to clean up your system disk quickly and easily - without losing data?
Frequent messages that there is little disk space left appear among owners of not very new computers or laptops who have updated their system to Windows 10. There is nothing wrong with the update itself, but since its introduction, the Windows 10 version has already gone through several versions . You receive updates via the Internet, and now six months or a year later, we see this disk state on the computer:
It also often happens that the desired program stops running because it no longer has enough free space to run. Windows 10 (especially 64-bit versions) take up more space than, for example, “Seven”. Let's start cleaning the system disk with the most obvious. First, let’s visually look at the “unnecessary” folders on drive C::

If there are any, we delete them. If not, go further to “Control Panel” - “Programs”. Checking for unnecessary programs:

If we find any, we delete them. Often there are a lot of games installed by children, a lot of unnecessary, accidentally installed programs like the Amigo browser, services like Mail-R Agent, intrusive MacCafee antiviruses, various applications like Music in Contact, etc.:

If you have two (or more) accounts on your computer, you can remove unnecessary ones from the computer, this can also free up space on drive “C”:

Don’t forget that each account has folders “My Documents”, “Desktop”, “Downloads” and so on. These folders and their contents will be deleted. Before deleting, copy the necessary contents to a flash drive.
In these ways you can free up several gigabytes of space. The next thing we look at is whether you have cloud storage on your computer. Many users use the services Yandex Disk, Google Drive, OneDeive. The availability of free space on the disk of your computer depends on the volume of these storages. If you use cloud storage, read on.
Google Drive can take up space from 10 GB, OneDrive from 5 GB. And I have Yandex Disk, for example, with a capacity of 220 GB. When synchronization of all folders on these storages with your computer is enabled, a significant part of the disk space is occupied by data on these disks. In order to free up space on the “C”: drive, you must first disable synchronization of folders that you can do without for now. On Yandex Disk, disable synchronization altogether (or only those folders that are not needed now):

In the settings, uncheck the largest, “heaviest” folders that we don’t yet need to “see” on the computer:

After this, folders and files can be deleted from the disk through Explorer. If folder synchronization is turned off, then folders and files will only be deleted from the computer, but will be saved “in the cloud”. You can later download them through your browser, or turn on folder synchronization on your computer again. We do the same with Google drives, OneDrive, and other cloud storage services that you use.
Another solution (after disabling synchronization) may be to transfer the Yandex Drive and Google Drive folders to another partition of your hard drive, where there is more space, for example to drive D:

Then you need to enable synchronization of the desired folders again. You can free up a few more gigabytes of disk space in this way until you get a new, spacious device.
Do not forget to empty the trash after all the above described manipulations.
How to free up space on the C: drive from temporary files on Windows 10?
In addition to our files and programs that we store on the computer, the system stores and accumulates its own. These are so-called temporary files, logs, reports that the system uses when installing programs, documents, creating backups, and installing drivers. "Ten" has its own built-in utility for cleaning temporary files in the "Control Panel" - "System and Security" - Administration:
It helps to get rid of unnecessary files without harm to your health:

Having selected the desired disk, launch the cleanup wizard:

Next, you can disable the so-called shadow copying of disks. Typically, this function is enabled specifically for the “C:” drive, on which the most important information is stored. Go through Explorer to “This PC” - Properties - “System Protection”:

These settings are responsible for creating copies of documents and system restore points in case of failure:

A copy of your volume with documents and files is created, if they are in standard locations. Why this is needed, why it is undesirable to disable it is written in. When you disable this function and delete it, the space allocated for copies is freed up and the amount of free space on the “C:” drive also increases by the same amount.
Freeing the “C:” drive from old updates on Windows 10
Updates to Ten arrive quite often; as a rule, temporary files are deleted after the computer is restarted, but sometimes this does not happen. If you click on the “Clean up system files:” button

Then the system will clean out updates plus what it considers possible to safely clean:

A rather nice innovation, dating back to the days of Windows7, allows you to safely delete all unnecessary files. However, this utility does not remove everything. Received updates are stored in the folder C:\Windows\WinSxS:

You can completely clear your disk of old updates by deleting all these folders. Removing them will help free up a few more gigabytes of free space, but this is not recommended, only as a last resort.
How to free up space on the C: drive on Windows 10 without uninstalling any program?
The last method that will be discussed is clearing free space using special programs. One of them, my favorite so to speak this season, is Glary Utilities.

It is a comprehensive tool for solving problems of cleaning your computer from garbage. I have already written about it, and for now I continue to use it. It also has a function for cleaning the disk from unnecessary files. The program deletes not only the files that we have already mentioned in this article, but also everything else unnecessary. Go to the “Disk Cleanup” menu:

If you disabled volume shadow copying, these copies will also be deleted. My record for cleaning a disk with this program is about 170 GB. But you need to be careful, this program clears passwords, logins, browsing history - if these options are specified in the settings. Using the settings, you can make the cleaning process gentle so that your downloads, downloads, and so on do not disappear.
These simple methods will help you free up space on the “C:” drive at a critical moment and avoid troubles. Using each method, bit by bit, you can scrape together another 10-15 gigabytes of free space using simple, safe methods. To free up more space, there are other ways - you can increase the size of the disk by reducing another, but this topic will be discussed in detail in another article. And for today there is already enough material. Leave your feedback, good luck, see you next time!
A new feature has been introduced in Windows 10 Creators Update that allows you to automatically clean up your C drive. Let's take a look at how you can clean up your C drive from unnecessary files using the built-in memory monitoring tool?
Many users have problems with limited free space on the C drive. Over time, the free space gradually decreases through all sorts of temporary files created by the software we use. All these unnecessary files can be cleaned up since they are not required for programs to function properly.
Windows 10 Creators Update introduces a new feature that automatically deletes temporary files and also empties the Recycle Bin after 30 days. Thanks to it, you can refuse periodic manual cleaning - unnecessary data, as well as the contents of the recycle bin, will be deleted by the system after 30 days. How to activate Disk Cleanup with Windows 10 Creators Update?
Removing unnecessary files in Windows 10
The feature becomes available after installing the Creators Update on Windows 10. If the update is installed, open the Start menu and select Settings (gear icon). Then go to the “System” section and select “Storage” on the left side. On the right side, you will see a list of all the hard drives and partitions on your computer.

Below them is the “Memory Control” section. This option allows you to automatically clean your hard drive of unnecessary files created by various types of programs (for example, Spotify can create several hundred megabytes of temporary files over a short period of time). Moreover, it allows you to clear data that has been in the trash for more than 30 days.
Enable Memory Sense in Windows 10
To activate this option, move the switch to the “On” position. You can also click the "Change how you free up space" button to see more options.
Here you can specify what data needs to be cleared to free up space. So far, only the above two functions are available, that is, deleting temporary files and clearing contents that have been in the trash for more than 30 days. For example, if you do not want to empty the trash, then disable this option.

You also have the option to start the cleaning process manually if you don't want to wait for the system to start it automatically.
Just one click and Windows 10 will clear all unnecessary data from drive C. So far, the availability of options is not very impressive, but let's hope that Microsoft will expand the memory control section in the future and introduce even more additional functions for deletion.
Computers are so ingrained in our lives that it is simply impossible to imagine a world without them. Despite this, many users do not know how to care for their “iron horse”. For example, not everyone knows how to clean up drive C. This article will help fill the gap in knowledge.
Filling the system disk can lead to a number of inconveniences. If there is little space on drive C, the following problems may occur:
- You cannot install new programs;
- There is no room for operating system updates;
- PC speed decreases.
The first problem is easily solved. If there is not enough space on drive C, then you can install new programs in other partitions (D, E, etc.). But what to do with the second and third points? There is only one way out - you need to clean the system disk. How can this be done? How to free up space on drive C? The answer can be found in this article.
How to free up space on your system disk?
Many people have no idea how to clean up local drive C. People mistakenly believe that it is very difficult. Cleaning your computer is a quick and simple process that does not require any specialized IT knowledge. However, this procedure should not be neglected. The system disk should be cleaned at least once a month.
There are many ways that allow . We will look at the most effective ones in this article. Before we begin, it should be noted that the methods given below can be used to clean up the C drive from junk on Windows 10, Windows 7 and other versions of this OS.
Manually removing unnecessary programs
Of course, software takes up the most space. Therefore, when you need to clean drive C from garbage, first of all you need to pay attention to the software.
How to clean drive C from unnecessary files? To uninstall the program, you need to use the built-in Windows utility. To launch it, you need to go to the “Start” menu and select “Control Panel” in the drop-down tab. Then you need to go to the “Uninstall programs” section.

A new window will open containing information about all the programs that are on the computer. They can be sorted by size, date or name. What can I delete? First of all, software that is not used at all must be uninstalled. As a rule, these are completed games. To remove a program, right-click on it, after which the corresponding tab will appear.
Built-in Windows utility
You can free your computer from garbage using a standard Windows utility. This is done very simply. You need to go to “Computer” and right-click on the disk that we will clean. In the drop-down list, click on the “Properties” item, after which a new window opens with information about the memory partition. We are interested in the “General” tab. Go there and click on the “Disk Cleanup” button.

The built-in utility will begin to analyze the data and look for unnecessary files. This will take a certain amount of time. After the program analyzes the computer's memory, it will produce a list of unnecessary files. They need to be ticked and then click “OK”.

You won’t free up a lot of memory this way, but you can win a couple of tens of megabytes.
Temporary files
To carry out the correct installation or update of programs, antiviruses, etc. Temporary files are created on the computer. The operating system stores them in the Temp folder, which is located on drive C. Temporary files are not needed for the daily operation of programs. Therefore, software that uses intermediate resources deletes them automatically upon completion of installation or update.

However, sometimes a glitch occurs due to which temporary files are not deleted. This leads to the Temp folder gradually becoming clogged and taking up more and more space on the system disk. To fix this, you need to remove the intermediate files manually. This is done very simply. You need to go to the Temp folder, which is located at “Computer” > Drive C > Windows folder. To free up memory on drive C, you need to uninstall the contents of this folder.
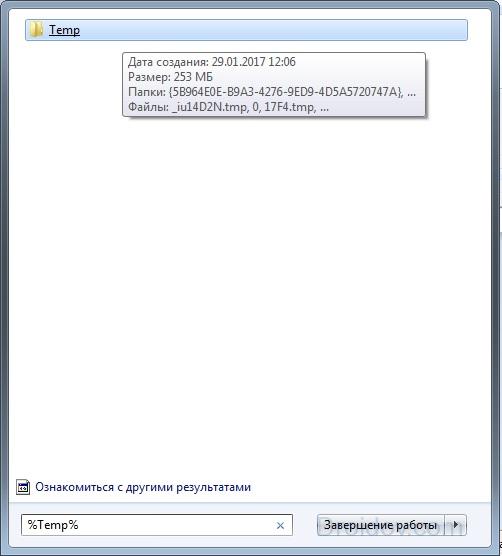
In Windows 10, Windows 7 and other versions of the OS, there are two folders for storing temporary files. You can get to the second one through the Start menu. You just need to enter the search query %Temp%. The folder needs to be opened and cleaned. It is worth noting that sometimes the operating system may issue a warning that some files cannot be deleted. This indicates that they are currently being used by some program. If such a message appears, then simply click the “Skip” button.
"Basket"
“Trash” is a special folder that is a temporary storage for deleted files. Everything stored there takes up computer memory. Therefore, the “Trash” needs to be cleaned from time to time. To do this, you need to right-click on the folder and click on the “Empty Trash” item in the drop-down list. After this, the folder will be freed from garbage, and there will be more memory on drive C.
"Downloads"
Users quite often download movies, music, and games through the standard browser downloader. Files from the Internet are automatically saved to the Downloads folder. And, as you know, it is located on drive C. If a user often downloads some files from the Internet, then the free disk space runs out very quickly. To prevent disk C from becoming clogged, you need to check the boot folder from time to time for the presence of large files. 
You need to open “Computer” and go to “Downloads”.
You need to check the folder for large files and if there are any, they need to be deleted or moved to another drive.
Swap file
In Windows OS there is a paging file. How does it affect memory and why is it needed? Sometimes the system does not have enough RAM to perform certain operations. In such cases, the file takes a certain amount of permanent memory from the disk and uses it as RAM.
To free up drive C, you need to make sure that the paging file takes resources elsewhere. You need to go to the “Computer” folder, and then press RMB. In the tab that appears, click on “Properties”. A window will appear. In it, open “Advanced system settings”.

Then click on “Options”.

In the new window, go to the “Advanced” section and click on “Change”.
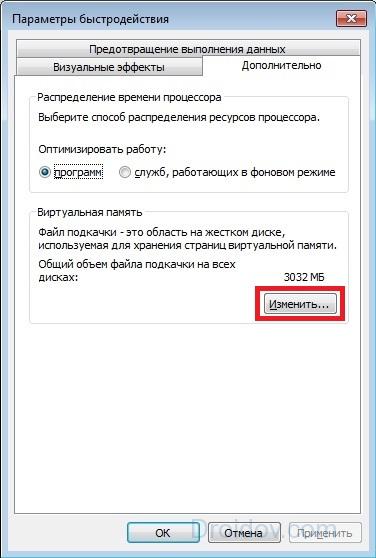
We install the disk from which the paging file will take memory. This is done as follows. Select drive C and check the box next to the “No paging file” property. To confirm, click on the “Set” button. With another disk, do the opposite and check the “Size by system choice” property.
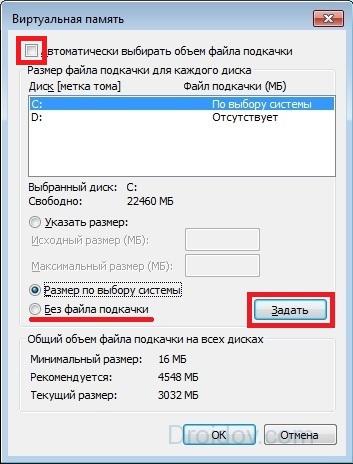
If the window does not allow you to change properties (the field with disks is dimly highlighted), then uncheck the box next to the “Automatically select paging file size” option.
Hibernation
To save memory on drive C, you can turn off hibernation on your computer. You need to activate the command line (Win + R combination) and write in it: powercfg.exe –h off. Press Enter and voila – hibernation is disabled. After restarting the computer, you may notice that there is a little more memory on the system disk.
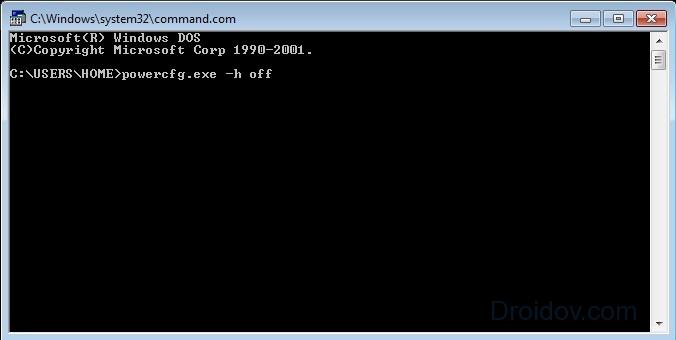
However, it is better not to turn it off unless absolutely necessary. This is an extremely useful feature that allows you to restore previously running programs, even if the computer was turned off. To reactivate hibernation, you need to write the command powercfg.exe –h on in the console and restart the PC.
Checkpoints
Checkpoints are created after various changes in the system (updating drivers, installing new software, etc.). They allow you to roll back the system if any problems arise. But for such an opportunity you need to pay with system memory. To free up drive C, you can delete checkpoints. This will give a couple of megabytes of memory. In this video you can learn how to delete restore points and thus clean up your local drive C:
Conclusion
The memory on drive C gets clogged up pretty quickly. This can cause a whole range of troubles. To avoid problems, you need to monitor the amount of free space and clean the system disk from time to time. Cleaning the C drive has a positive effect on the performance of the computer and does not take much time. There are many free ways to free up disk space when memory is full. Moreover, these methods are the same on all Microsoft operating systems. That is, disk cleanup on Windows 10, Windows 7, Windows XP, Windows Vista is identical.
In contact with
During its operation, the operating system creates a lot of temporary data that is stored on disk (usually drive C) in the form of files and registry entries. These can be files from update packages, archivers, shadow copies, content downloaded from the Internet, etc. Third-party programs behave in a similar way, for example, browsers that store website data in a cache. Some temporary files are deleted automatically after a certain time, others remain on the disk until they are forcibly deleted.
If the user does not regularly maintain and clean up the C drive, the free space on it becomes less and less, to the point that the disk eventually ends up filled to capacity with temporary files, which precludes further writing of any data to it. reduces its performance. There are two ways out of this situation - either increase the size of the system partition at the expense of the user volume, or perform a comprehensive cleanup of it, which is more preferable. Let's see how to free up space on your local C drive in Windows 7/10.
What can you delete if the disk is full?
The system volume contains many important files that ensure the normal operation of Windows, so deep cleaning it should be approached with the utmost care. What can you delete from the C drive to free up space and not disrupt the system? All its contents can be divided into three groups. The first includes files that can be deleted without any fear. The second consists of files, the deletion of which, although it will not harm the system, can still cause certain problems under some circumstances. The third group includes files that cannot be deleted, as this can make programs and the system inoperable. You can clean up drive C without negative consequences by deleting:
- Cart Contents.
- Library catalogues.
- Temp and Downloaded Program Files folders in the Windows directory.
- Cache of browsers and some third-party programs.
- Icon sketches.
- Logs and memory dumps for system errors.
- Old Chkdsk utility files.
- Bug reports.
- Files created by the Windows debugger.
With some caution, you can delete shadow copies () created during the installation of updates and stored in backup copies, files from previous system installations (Windows.old folder), unnecessary components and applications, folders of uninstalled programs in the ProgramData, Program Files and Roaming directories, MSOCache Microsoft Office folder. If you do not use Quick Start, you can delete the file hiberfil.sys in the root of drive C, having previously disabled these functions in the settings. It is acceptable, but not recommended, to delete the swap file pagefile.sys. Other files and folders on drive C cannot be deleted so as not to disrupt the operation of the system.
Cleaning junk and temporary files using Windows
First, let's look at how to clear drive C of unnecessary files in Windows 7/10 using the operating system itself. Windows has a built-in utility for these purposes. cleanmgr.exe, which can be launched either through the properties of the partition being cleaned or through the “Run” dialog box. After the utility scans the disk for outdated files, check the boxes on the “Disk Cleanup” tab and click “OK.”
If you click the “Clean up system files” button, reports, device driver packages, error dumps and, additionally, restore points, with the exception of the most recent one, will become available for deletion.

For a deeper and more thorough cleaning of drive C from garbage, you can use the built-in console utilities Dism And vssadmin. The first allows you to delete temporary data from the WinSxS folder, including backups created before installing Windows updates. To do this, use the following commands executed in the CMD console running as administrator:
- DISM.exe /online /Cleanup-Image /StartComponentCleanup
- DISM.exe /online /Cleanup-Image /SPSuperseded
- vssadmin delete shadows /all /quiet
The first command does the same thing as the cleanmgr.exe utility, only more thoroughly.

The second deletes all backup update packages from the WinSxS folder.

The third command can delete all restore points, including the last one.

However, you should use these tools with caution, since after executing the indicated commands, you will no longer be able to roll back the system to a working state or a previous version.
Note: Before cleaning the WinSxS folder, it is recommended to set its true size, thereby making sure that it really needs cleaning. To do this, you need to run the command on the command line Dism.exe /Online /Cleanup-Image /AnalyzeComponentStore and compare the actual size of the component store with the size indicator in the Explorer properties.

After updating Windows to a newer version, a folder appears in the root of drive C Windows.old, which can take up significant disk space.

The contents of this directory are copies of the system installation files of the previous version of Windows. If you are determined not to return to the old version of the system, the Windows.old folder can be deleted. This is done again either using cleanmgr.exe or using the command line. In the first case, you need to find and select the “Previous Windows installations” item on the “Advanced” tab; in the second case, run the command in the CMD console running as administrator rd /s /q c:/windows.old.

You can get a little extra space on the C drive by removing unused components, the same ones that are accessible through the classic Add/Remove Programs applet.

The standard Dism utility is also used here. To select and uninstall an unused Windows component, run the following two commands in the CMD console running with elevated rights:
- DISM.exe /Online /English /Get-Features /Format:Table
- DISM.exe /Online /Disable-Feature /featurename:NAME /Remove
The first command displays a list of all components in the system, the second deletes the selected element. In this example, its name must be substituted for the NAME line element.


Manual removal of programs and files
With the exception of Windows 8.1 and 10 universal apps, almost all desktop programs are installed in the folder Program Files. If a program is no longer needed, it should be deleted so that it does not take up disk space, but this must be done either using a standard uninstaller or using special third-party programs. However, after uninstalling applications, folders with configuration files may remain on the disk, the weight of which can reach several hundred megabytes. Such data must be deleted manually.
Let's say you have removed Microsoft Office or Skype from your computer and you also want to get rid of all their remaining “tails” on the C drive. To do this, carefully check the Program Files and ProgramData directories in the root of drive C, as well as the folders C:/Users/Username/AppData. If the folder name matches the name of the deleted application, it can be deleted.

The AppData folder is a little more complicated. This hidden directory contains three subfolders: Local, LocalLow and Roaming. The first stores files created during the operation of various programs. You cannot clear it entirely, as this will most likely lead to the loss of saved application settings, however, half-empty folders of uninstalled programs can be completely safely deleted. You can also safely clear the contents of the folder located in it Temp.


The same applies to the LocalLow and Roaming folders; it is permissible to delete from them only those directories that belonged to previously uninstalled applications.

Note: By clearing the contents of the Local, LocalLow and Roaming folders, you lose user settings and data saved in their cache. For example, after deleting its folders in your user profile, you will lose your current messenger settings and part of your message history.
As for removing universal applications, they are uninstalled using the standard tools of the system itself or the CCleaner program, which will be discussed below. You can also move some universal applications from drive C to drive D, if they support this feature.

Transferring desktop programs to another volume is also possible; there is a special utility for this purpose SteamMover, which you can download from the developer’s website www.traynier.com/software/steammover.
Using CCleaner
Many novice users are interested in how to delete unnecessary files from drive C using third-party programs, as well as which of these programs are more effective and safe in this regard. These can be recommended CCleaner– a simple, fast, convenient, and most importantly safe Windows disk and registry cleaner. This program allows you to delete temporary data from the Internet and Windows itself, the contents of the thumbnail cache and DNS, Index.dat files, memory dumps, fragments of chkdsk files, various system logs, outdated prefetch files and a lot of other unimportant data.

Using CCleaner, you can clear the system registry of incorrect entries, optimize, enable, disable or remove browser extensions, analyze the contents of hard drives, search for duplicates and, of course, uninstall unnecessary applications, including universal ones.


CCleaner's interface is very simple, so understanding its simple functionality will not be difficult even for a novice user.
Considering, however, that the main purpose of CCleaner is still cleaning, all its additional tools have limited functionality. If your C drive is full of unknown things, and you want to find out what exactly it is, then for these purposes it is better to use specific utilities, for example, Scanner, JdiskReport or their analogues, showing more accurate information about the file structure of the media with the ability to navigate through subdirectories.

Other ways to free up space on drive C
Clearing the Driver Store
The steps described above are usually enough to free up enough space on the system volume, but what if drive C is still full? What else can you do to get additional space? One option is to clear the contents of the folder FileRepository located at C:/Windows/System32/DriverStore.

This directory contains copies of device drivers that were ever connected to the computer, and may also contain outdated versions of drivers. Before deleting driver packages from the FileRepository folder, it is highly advisable to create a complete list of them and find only outdated versions in it, leaving the rest untouched. It also wouldn't hurt to create a complete copy of all drivers installed on the system. To list the DriverStore drivers in a file, run the following command in an elevated command prompt:
pnputil.exe /e > C:/drivers.log

Compare the driver versions in the list and remove only the outdated ones.

To remove the selected driver, immediately run the command in the console pnputil.exe /d oem№.inf, where № is the name of the driver in the list.

If an error appears in the console when uninstalling a driver, it means the driver is being used by the system. There is no need to touch such a component.
As an alternative to the command line, you can use the free utility Driver Store Explorer, just designed to remove old unused device drivers.

Disabling hibernation
Thanks to the hibernation mode, the user can quickly return to work in running applications; on the other hand, its use requires the allocation of significant space on the system disk, slightly less than or equal to the amount of RAM. If having free space on your hard drive is a priority for you, you can disable hibernation mode by deleting the hiberfil.sys container file.

Launch the CMD console as an administrator and run the command in it powercfg -h off. Hibernation will be disabled and the bulky hiberfil.sys file will be removed.
Note: The hibernation file can be compressed by a maximum of two times with the command powercfg hibernate size 50.
Disabling the page file
In addition to other hidden system objects, there is also a file in the root of drive C that can be deleted under certain conditions. This is the swap file pagefile.sys. This file plays the role of a RAM buffer, and if an application does not have enough RAM to operate, its data is temporarily written to . Accordingly, if there is no swap file, a heavy application will slow down greatly or simply freeze while waiting for faster RAM to become available. Therefore, disabling and deleting the paging file is not recommended unless the computer has a very large amount of RAM.
If your PC has more than 10 GB of memory or you do not intend to run resource-intensive applications, you can try carefully disabling swap. To do this, open Advanced system settings and on the “Advanced” tab in the “Performance” block, click the “Options” button.

This will open another window. Switch to the “Advanced” tab, and then click the Change button in the “Virtual Memory” block.

Uncheck the “Automatically select paging file size” checkbox, turn on the “No paging file” radio button, save the settings and reboot. The pagefile.sys file will be deleted.

Removing the MSOcache folder
Users who have installed Microsoft Office have a hidden folder in the root of the system volume MSOcache, the weight of which can reach several gigabytes.

This folder is an office suite cache and contains files that may be needed to restore Microsoft Office if it becomes corrupted. The MSOcache folder is not involved in launching Microsoft Office or working with documents, so it can be deleted in the standard way. Just keep in mind that if Microsoft Office is damaged for some reason, you will have to restore the package from the installation disk with its distribution.
Compressing the contents of a system volume
You can free up some free space on drive C without deleting anything from it at all. Instead, all system files can be compressed. To do this, just open the properties of drive C, on the “General” tab, check the box “Shrink this drive to save space” and click “OK”.

To compress system files in Windows 10, you can use the function Compact OS by running one of two commands in the CMD console running as administrator:
- compact /CompactOs:query
- compact /CompactOs:always

The second command performs the same actions as the first, but in forced mode. It is used if you really want to shrink the system volume, and the first command rejects the operation, considering it inappropriate. Compression is completely reversible and to return the file system to its normal state, just execute the reverse command compact /CompactOs:never.
In addition to NTFS compression, LZX compression is available in Windows 10, but it has a number of disadvantages, which is why it is not widely used. LZX compression is applicable to read-only files and directories, but an entire system volume cannot be compressed with its help due to the risk of creating an unbootable system.
If you work a lot and intensively on your computer, you can quickly fill your hard drive partitions with documents and files. For SSDs that are lightning fast, this doesn't matter, but it's not suitable for regular hard drives. We'll tell you how to clean up your hard drive on Windows 10 and free up gigabytes of valuable space for more useful information.
What is Disk Cleanup and how does it affect your computer?
“Disk Cleanup” is an integral part of the Windows operating system, “built-in” by developers into versions 10 and earlier. And it just so happened that deleting temporary unnecessary files has become a habit for users. What are the advantages of this tool and how can cleaning affect the operation of the computer?
Let us immediately note that you should not wait for something incredible; after this procedure, your computer will not “fly”. Yes, the OS will speed up and you will get rid of garbage: temporary files of the system itself (including after updates) or programs. The developers, of course, do not recommend going into the registry, so if you want to get rid of errors there, it is better to use one of the special utilities.
When to do disk cleanup + how to check
You can also find out how much free space is on your hard drive using third-party programs, for example, WinDIRStat or through standard OS tools. Windows 10 comes with a new tool that allows you to scan and analyze your drive. Below is a short guide on how to use it.
Here you can delete temporary files, empty the Trash or the Downloads folder.

How to properly perform Advanced Disk Cleanup in Windows 10
In Windows 10, there is another way to clean up the disk, and for most users it is more familiar.
- Go to “My Computer”, select the hard drive, right-click on the icon and select “Properties” from the menu.
- On the “General” tab, click the “Disk Cleanup” button.
Open disk properties, click the cleanup button
- The disk scan will begin.
Scanning the disk will take a little time
- Then a list of files will appear in the tab; you can check off what you want to delete. Click the “Clean up system files” button.
At this stage you can select the elements to be deleted
- In addition, after verification, the “Advanced” tab will become available. Here you can remove unnecessary programs and system restore points.
After scanning the disk, a tab will become available with the ability to remove programs and OS restore points
- The utility will scan the disk again and estimate how much space will be freed up as a result. Click “OK”, then “Delete files”.
Cleaning speed depends on the number of files being deleted
The Disk Cleanup window will appear with many available options that allow you to configure the removal of unnecessary files from the HDD and SSD. Until the cleanup process is completed, the Command Prompt should be open.
Video: removing unnecessary files with a Windows system program
The frequency of performing this procedure depends on how optimized your computer is, how often you perform various updates, download files, and install programs. In any case, using a standard Windows utility, you can always check the fullness of the disk and make a conclusion whether it needs to be cleaned or not.
